
Setting Up SCIM
Set up SCIM 2.0 with your identity provider to automatically synchronize users, roles, teams, and custom attributes into awork without manual imports.
SCIM (System for Cross-domain Identity Management) simplifies user management. It lets you synchronize users between different applications using a standard protocol. You can use a central information source to manage all your users. Users can be imported from your identity provider into awork or deactivated from awork. Changes to user information like name, timezone, or user role are automatically applied in awork.
This integration uses the current version SCIM 2.0.
Key Benefits and Use Cases
Using SCIM with awork brings many advantages:
-
Simple user management: You don't have to worry about importing users manually. When you set up SCIM, you choose which information should be synchronized. The minimal setup includes first name, last name, and email. In addition to this information, you can also sync your preferred language, timezone, awork user roles, awork teams, absence region, and more.
-
SSO integration: SCIM works best with Single Sign-On (SSO). Users only need to log in once and can use security features like Multi-Factor Authentication (MFA). If you only have internal users in your workspace who are managed by your identity provider, you can disable all login options except SSO. If you also have external users in your awork workspace, you can still allow password-based login.
How SCIM Works
SCIM synchronization is one-way only: from your identity provider to awork. Information is sent to awork, but not back to the identity provider.
If you manually change information in awork for a user synchronized via SCIM, those changes won't be synced back and could be overwritten as soon as the next update from the identity provider occurs.
To use SCIM synchronization, you need to create an app in your identity provider. There, you can configure which fields should be synchronized. You also control which users should be synchronized by adding user groups or individual users to the SCIM app.
Supported Features
- Create user
- Update user
- Deactivate user
- awork user role assignments
- Update awork team assignments
- Update awork absence region
- Update awork global permission role
Requirements
SCIM provisioning with awork requires:
- An active Enterprise subscription
- A configured SSO (OpenID Connect) integration
For OneLogin, awork offers a preconfigured app that integrates SCIM and SSO (OpenID Connect) in a single app.
What Happens to Existing Users in awork?
Once you activate SCIM in your identity provider, existing awork users are retrieved and matched with the existing users in your SCIM app.
Note: We use the account email of the user, which can only be changed by the user themselves via their profile - not the primary work email that can be configured in the user details.
- Existing users who match by email are updated in awork.
- Users who don't yet exist are imported.
- All other users in awork are not updated.
You can also use SCIM for only a portion of your awork users without affecting other users.
When importing new users into awork, they don't receive an invitation to awork. You need to send the new users the link to your awork workspace so they can log in directly with SSO. Make sure you have enough unused user licenses in awork so the users can be activated.
Tip: Enable the Allow automatic user bookings via SCIM option in Settings > Workspace to automatically book new user licenses. This way, each invoice is only created once.
The invoice is created 30 minutes after the first additional user is booked.
If a user is reactivated by an admin, that person receives an email notifying them of the reactivation.
Note: Currently, awork doesn't display which user is synchronized via SCIM. However, you can check the synchronization status with your identity provider.
Setting Up SCIM for awork
Setting up SCIM involves three steps:
- Prepare awork for SCIM
- Set up awork in your identity provider
- Configure the mapping
1. Prepare awork for SCIM
- Log in to your awork workspace.
- Set up SSO for your workspace (if not already done).
- Go to Settings (gear icon in the bottom left of the main menu) > Integrations.
- Click Open Integration Library.
- In the SCIM section, select the provider you want to connect.
If your provider isn't in the list, you can choose the generic SCIM integration. - Confirm and set up the integration.
- A popup appears with a Bearer Token. Copy this to your clipboard. You'll need it to grant your identity provider access to awork.
- You should now see the new SCIM integration in the integrations list and a new client application below it named API Access.
The client application is used to authenticate the SCIM client and can be used to regenerate the Bearer Token if you need to copy it again. Please don't edit or delete this client application!
2. Set Up awork in Your Identity Provider
Okta
-
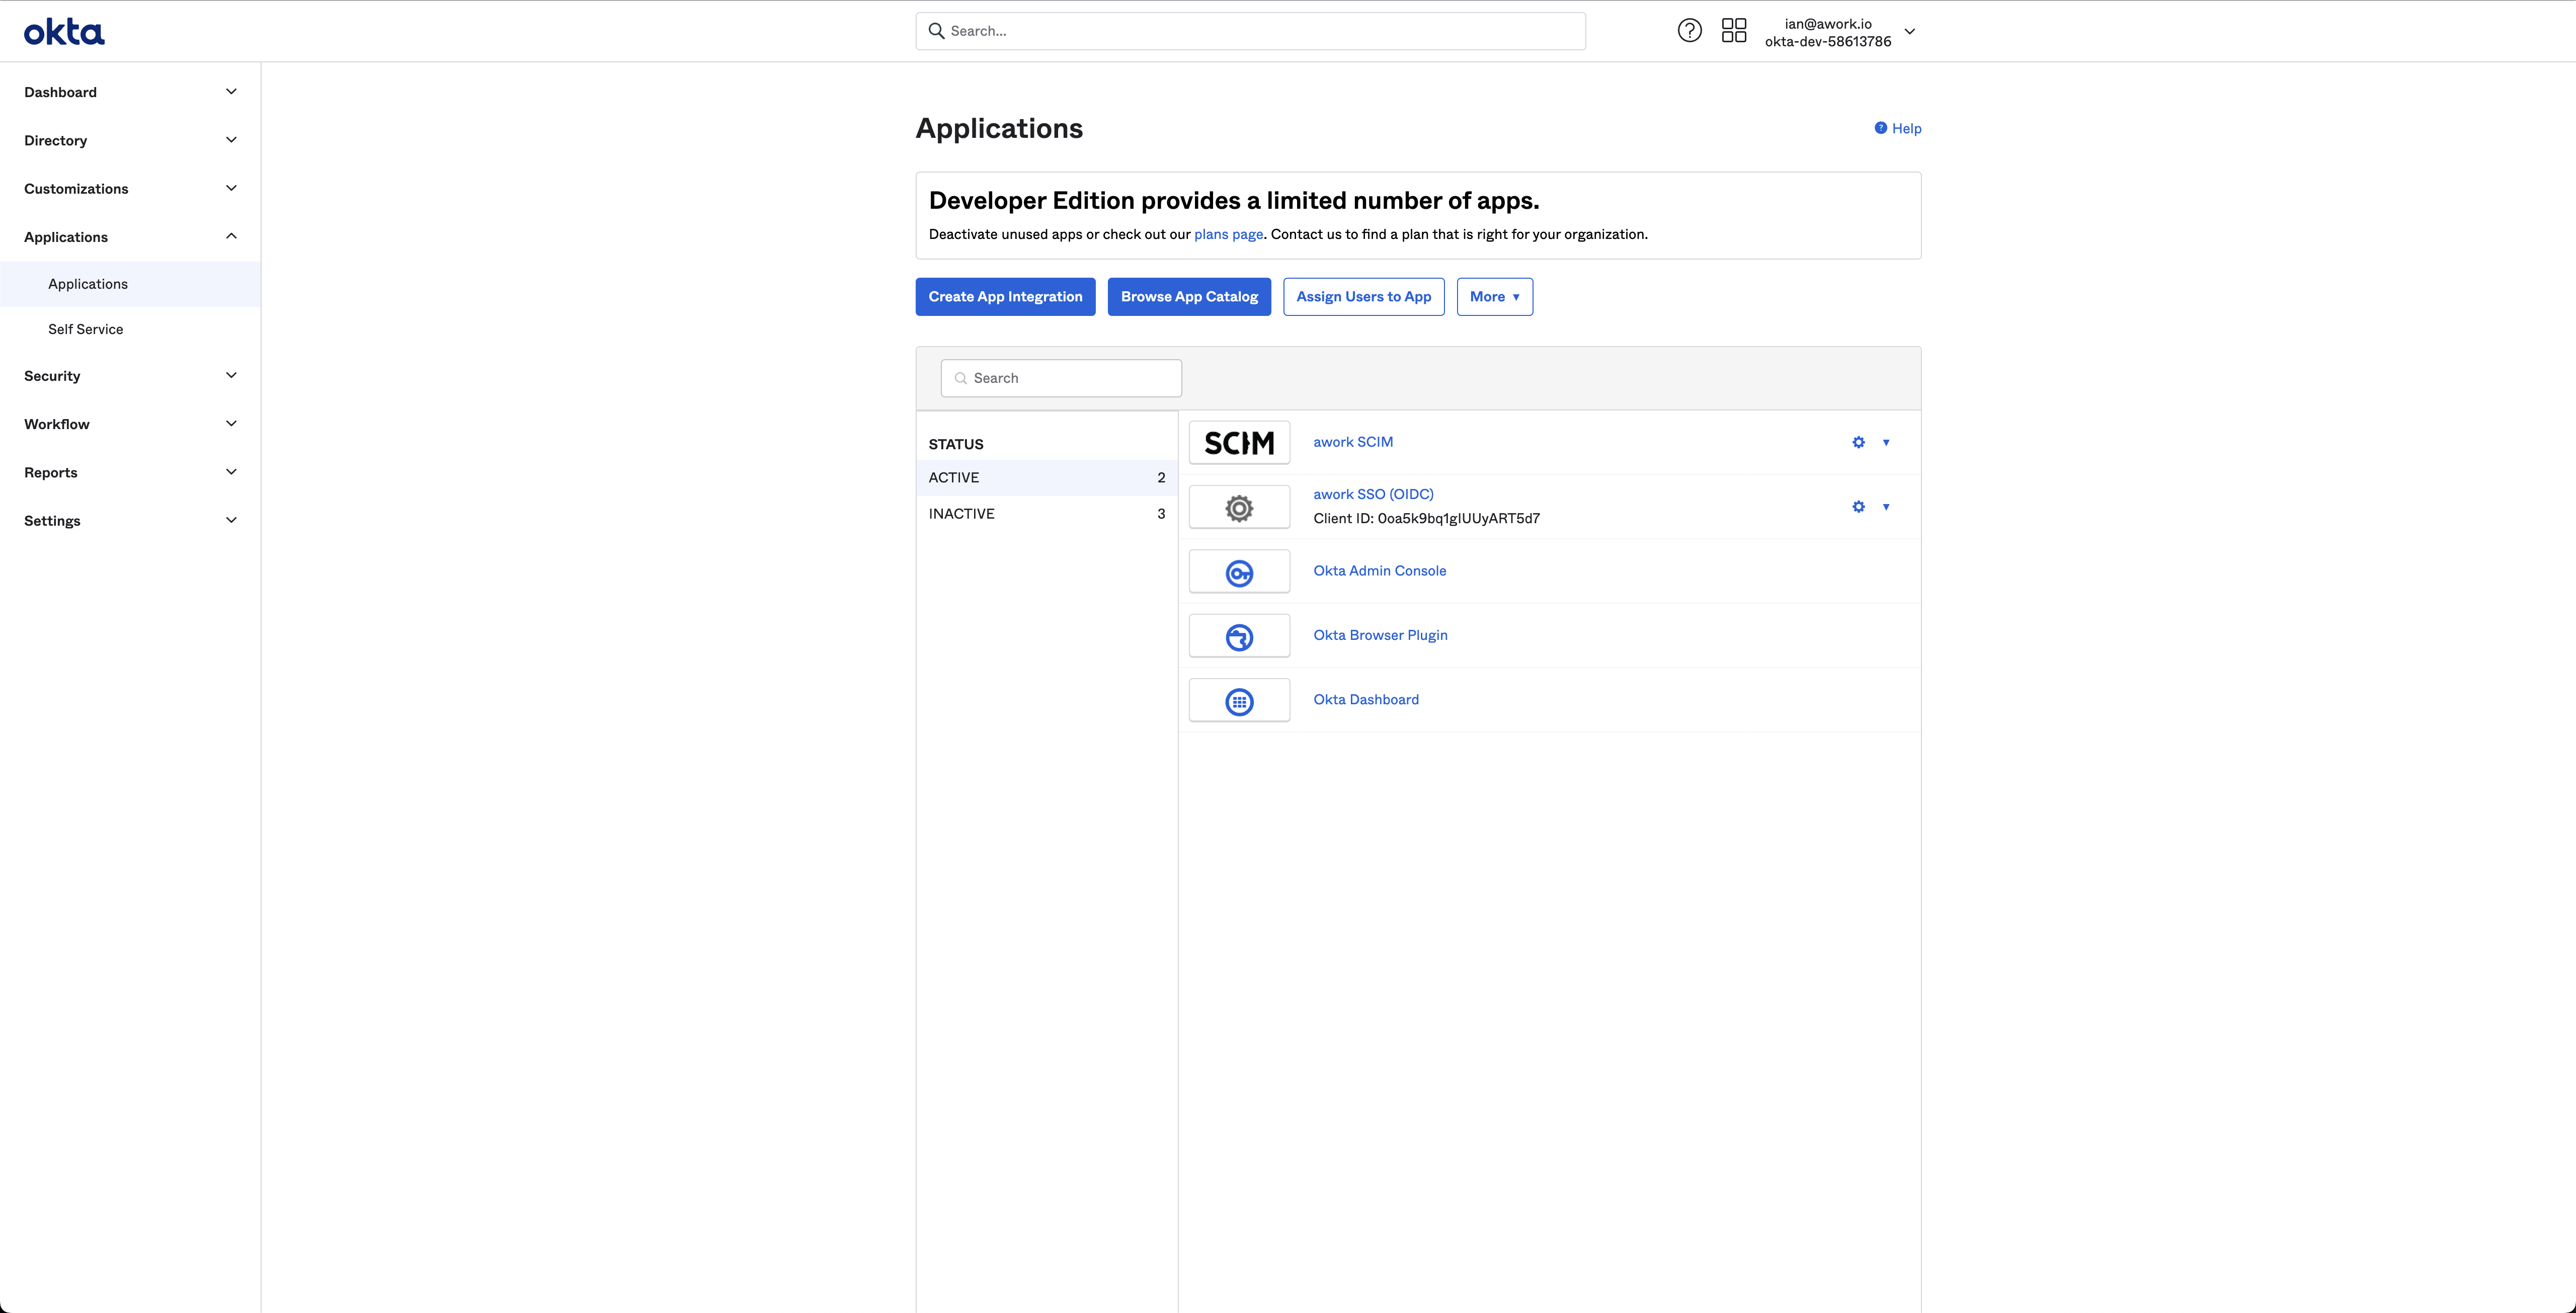
Go to Menu > Applications > Applications
-
Click Browse App Catalogue
-
Search for SCIM 2.0
-
Select SCIM 2.0 Test App (OAuth Bearer Token)
-
Click Add Integration
-
Enter an app label, for example awork SCIM integration, and click Next
-
Skip the sign-on methods (since we don't support SAML for SSO)
-
Select Email from the dropdown in Credentials Details
-
Click Done
-
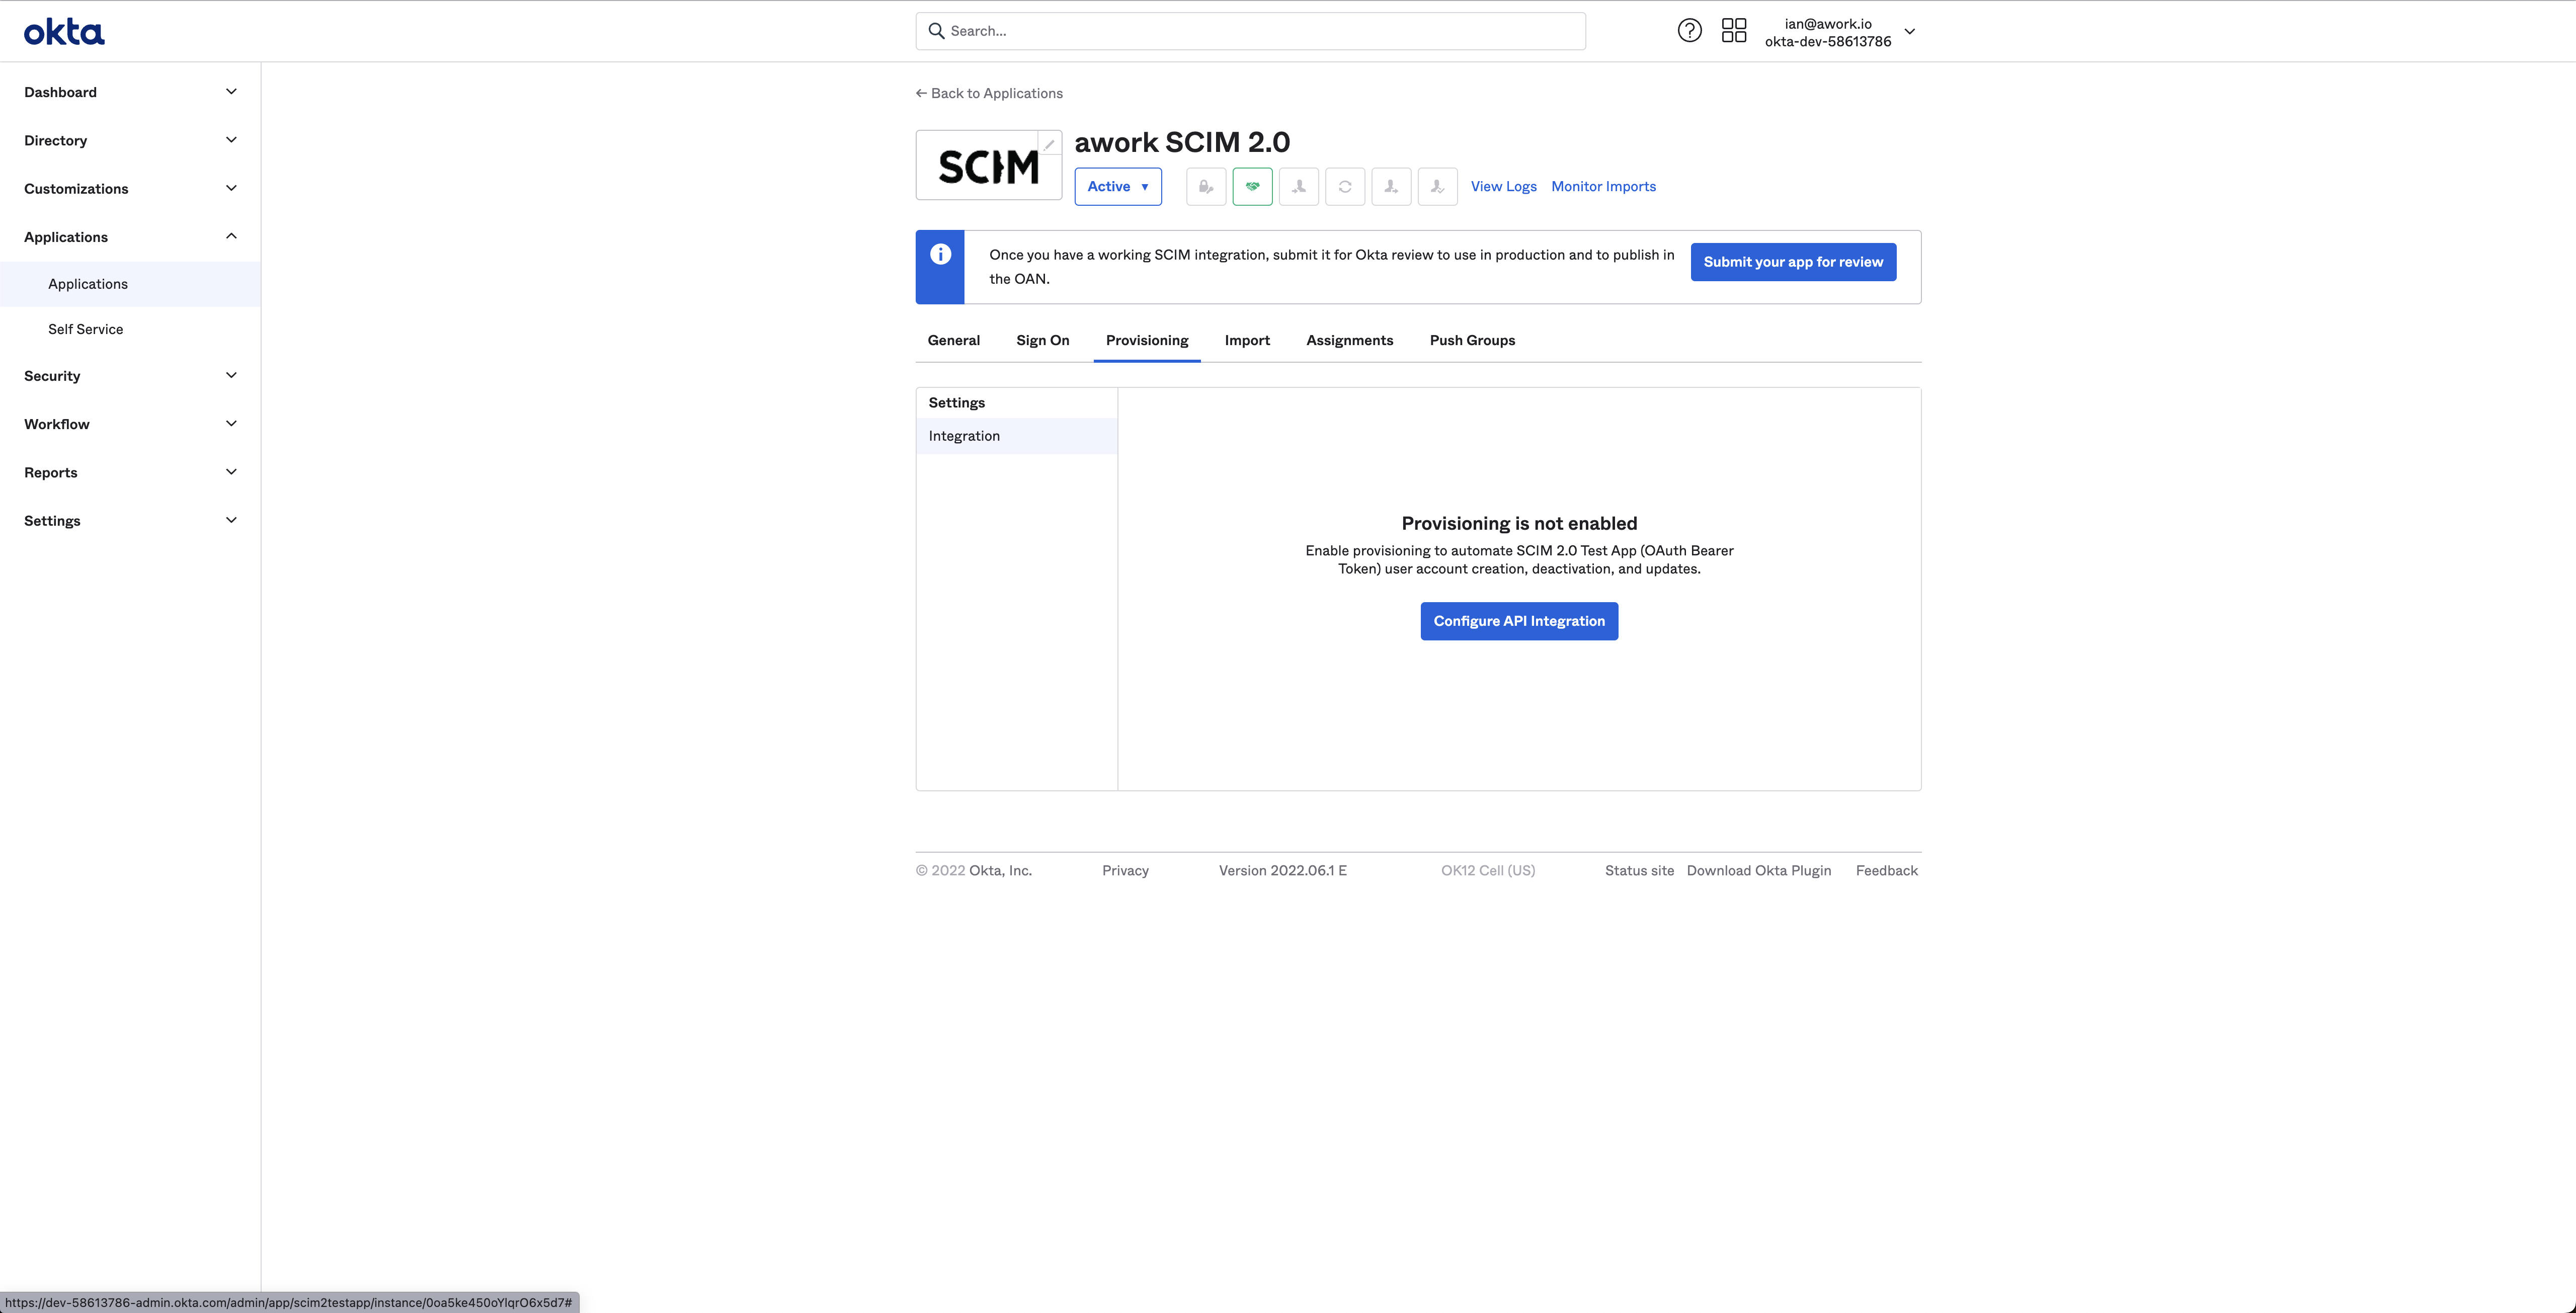
Go to the Provisioning tab and click Configure API Integration
-
Enable Enable API Integration
-
Enter https://app.awork.com/api/v1/scim in the SCIM 2.0 Base Url field
-
Copy the Client Secret from your awork SCIM integration into the OAuth Bearer Token field
-
Click Save
OneLogin
For OneLogin, awork offers a pre-configured awork app that includes useful default values and can also be used as an SSO app. So you only need one app for both SSO and SCIM.
-
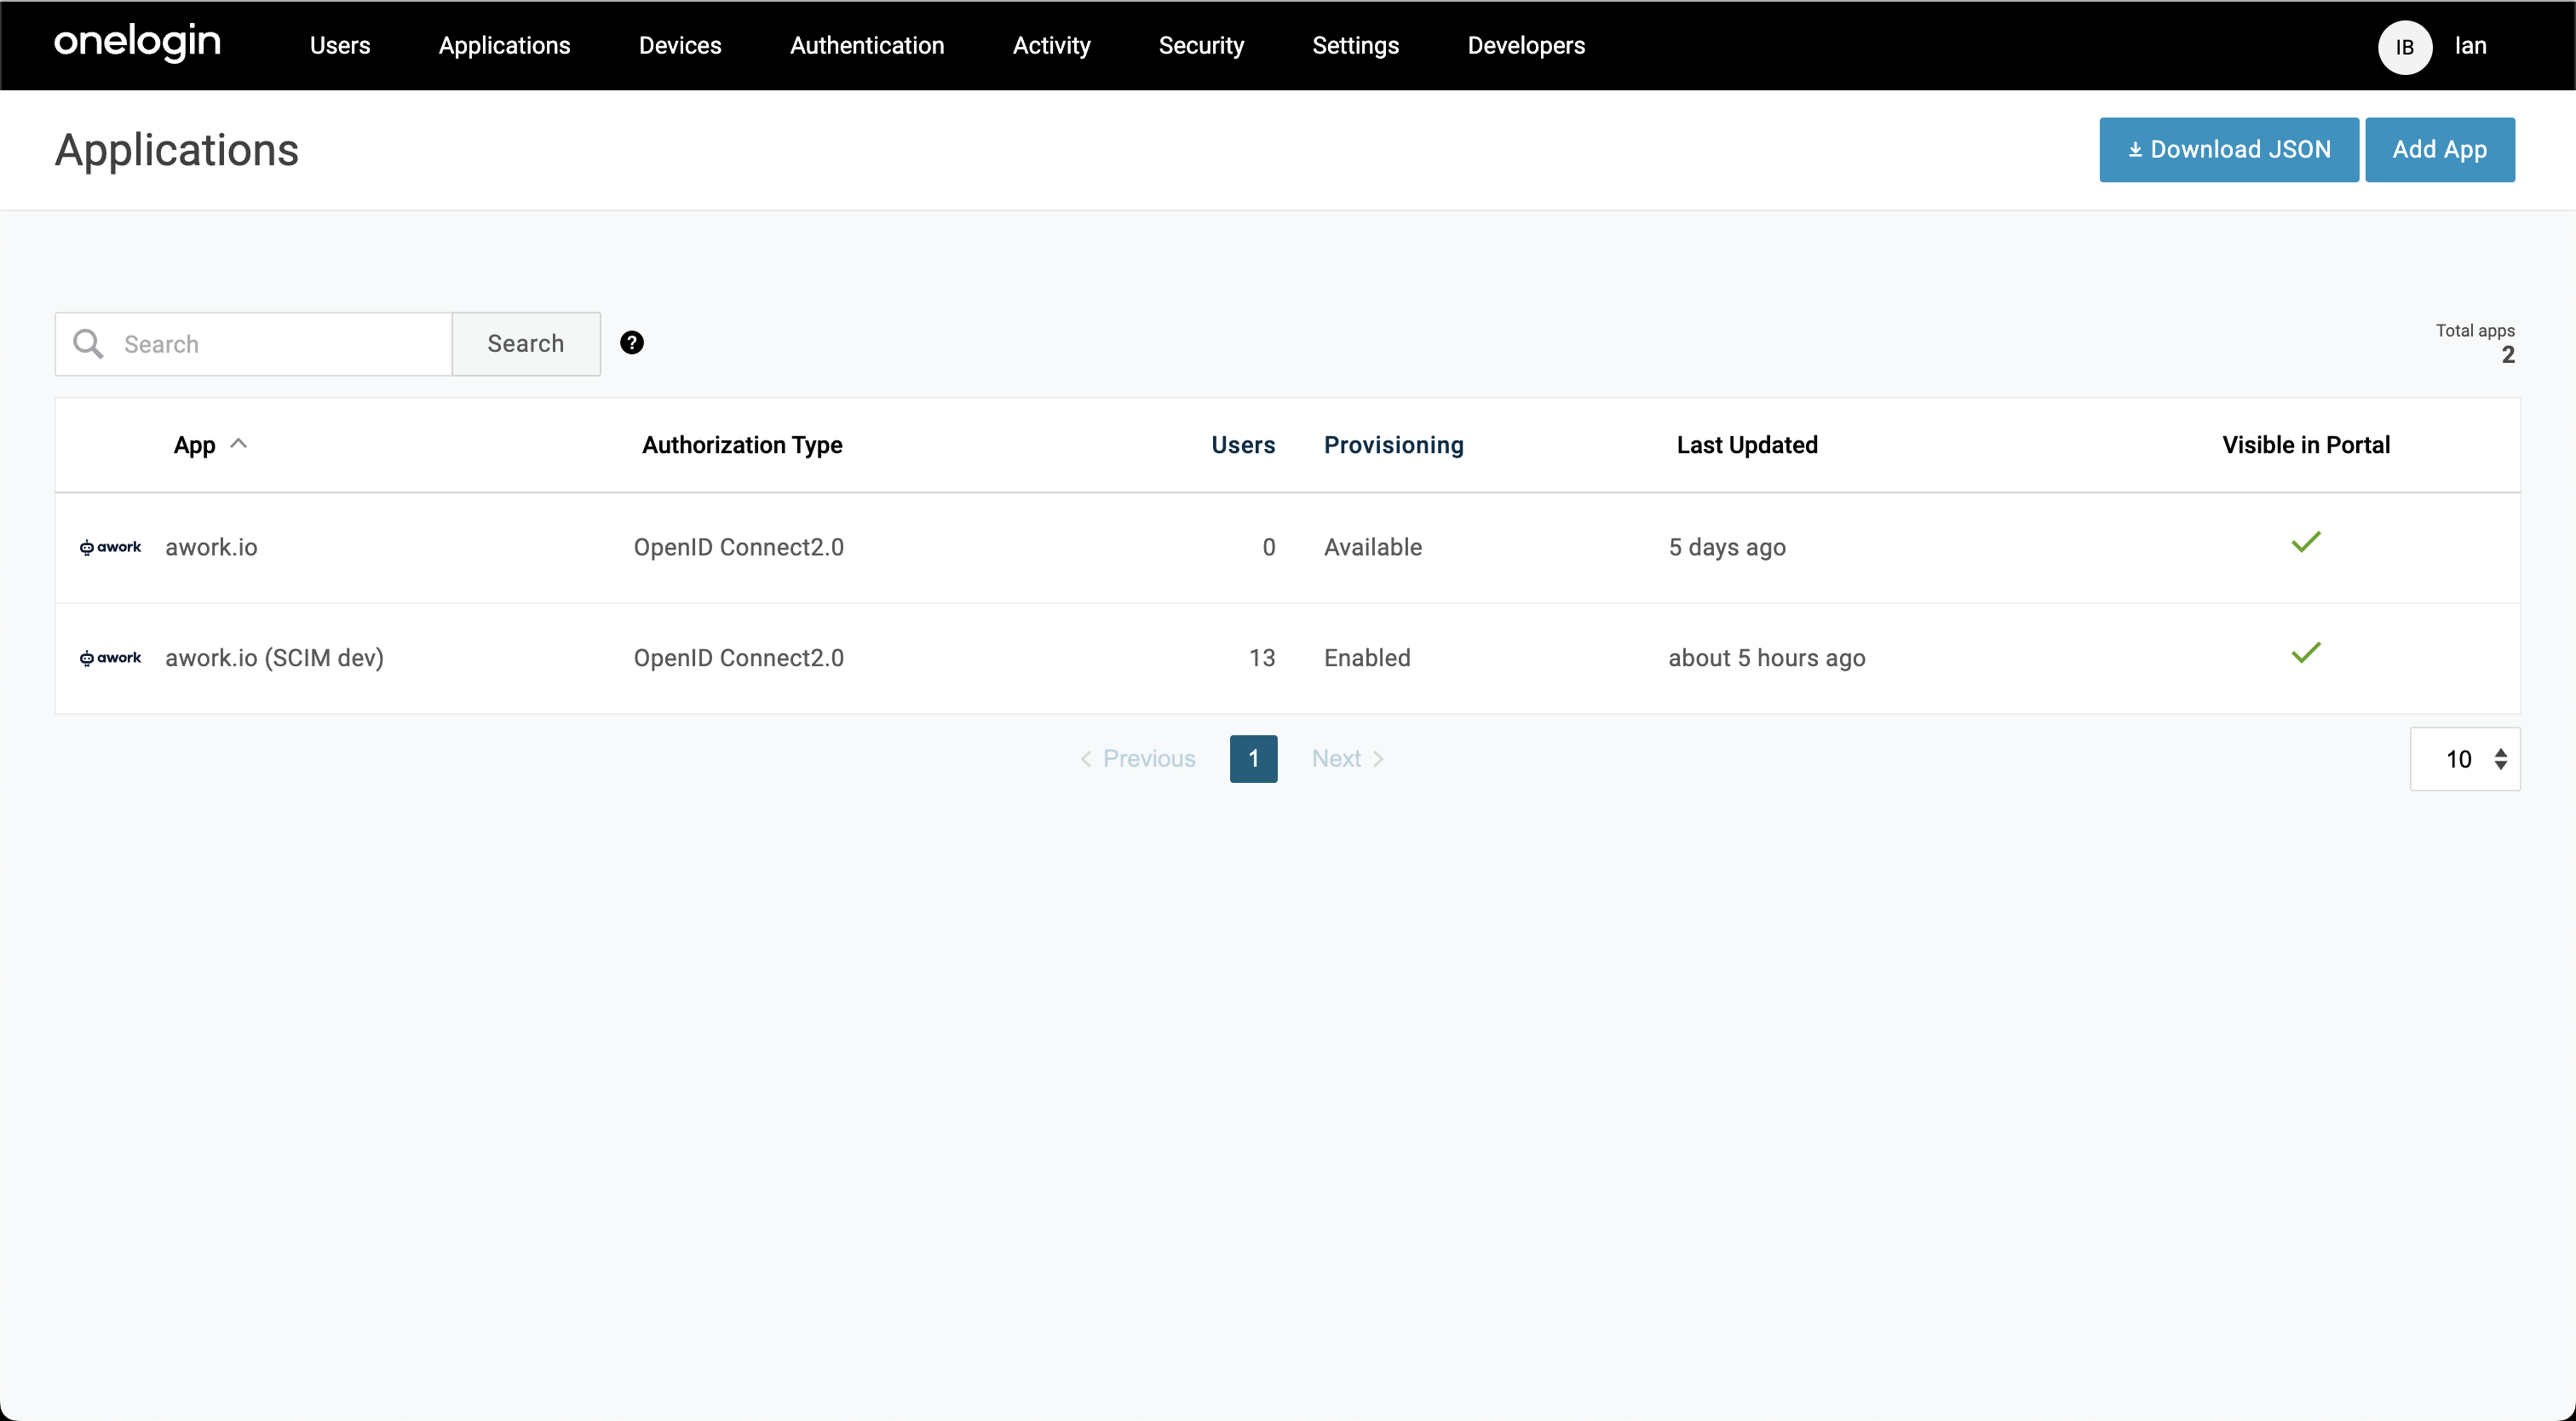
Go to the OneLogin admin area and open Applications > Applications
-
Click Add App in the top right
-
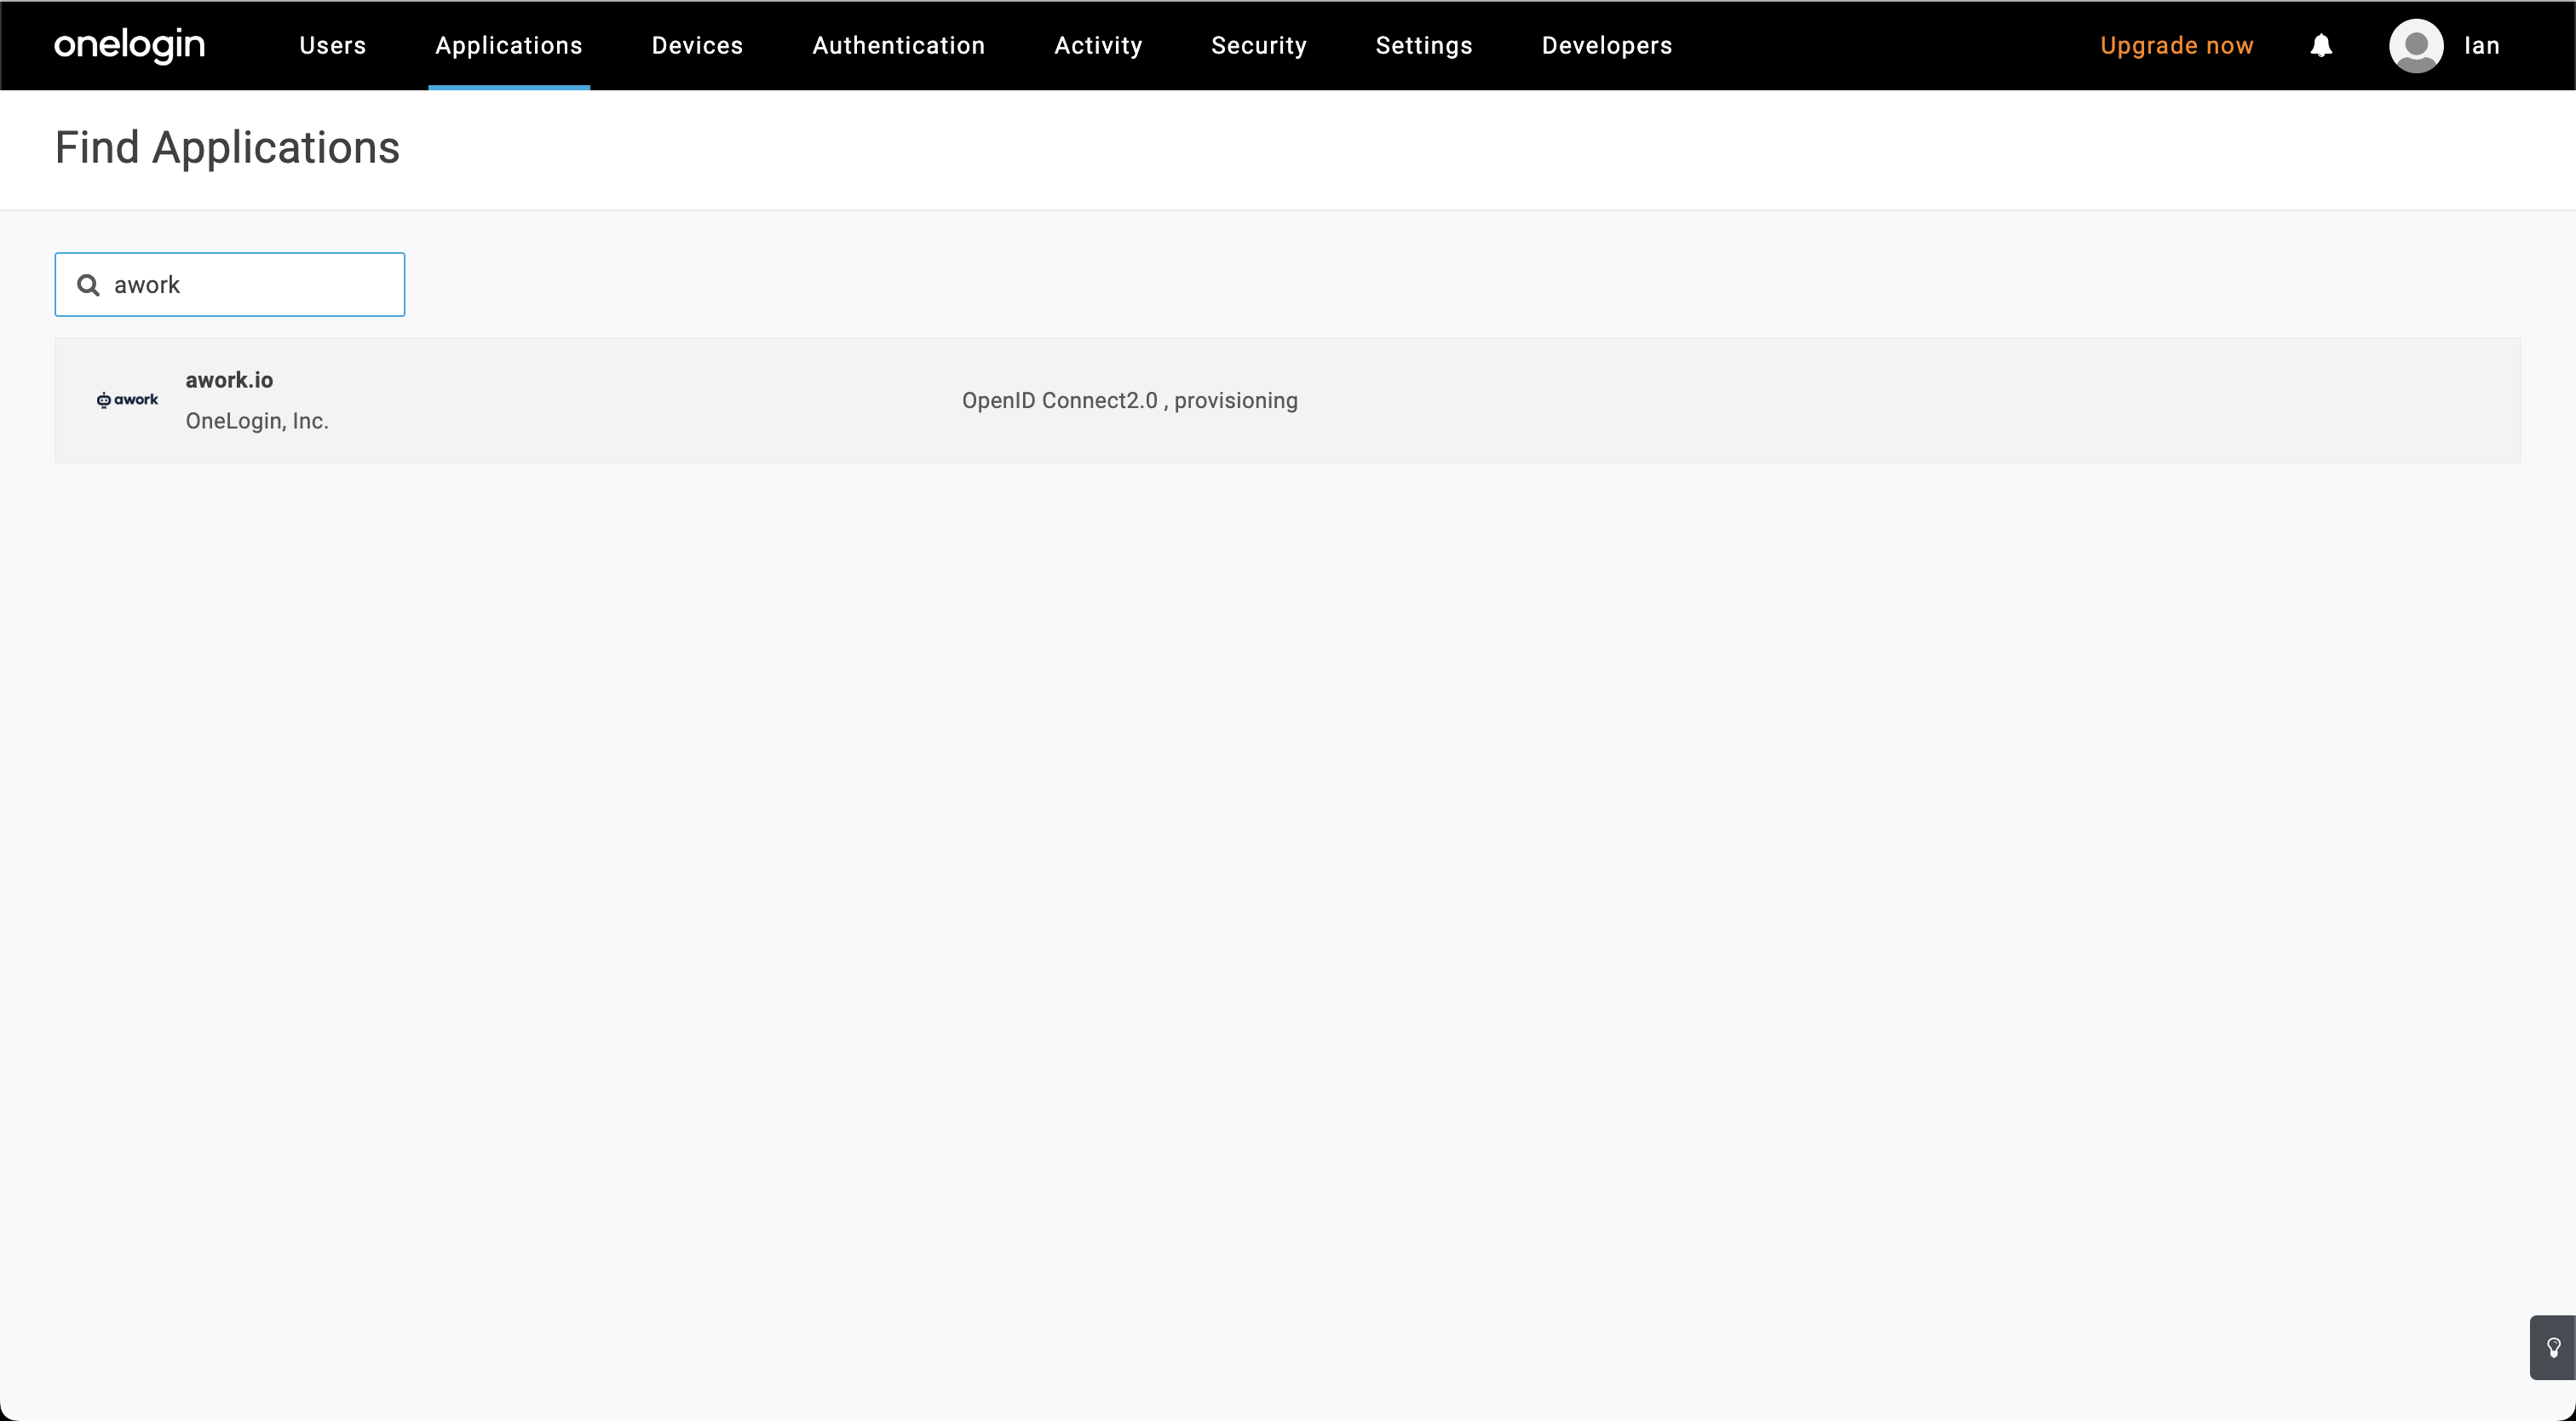
Search for awork in the search field
-
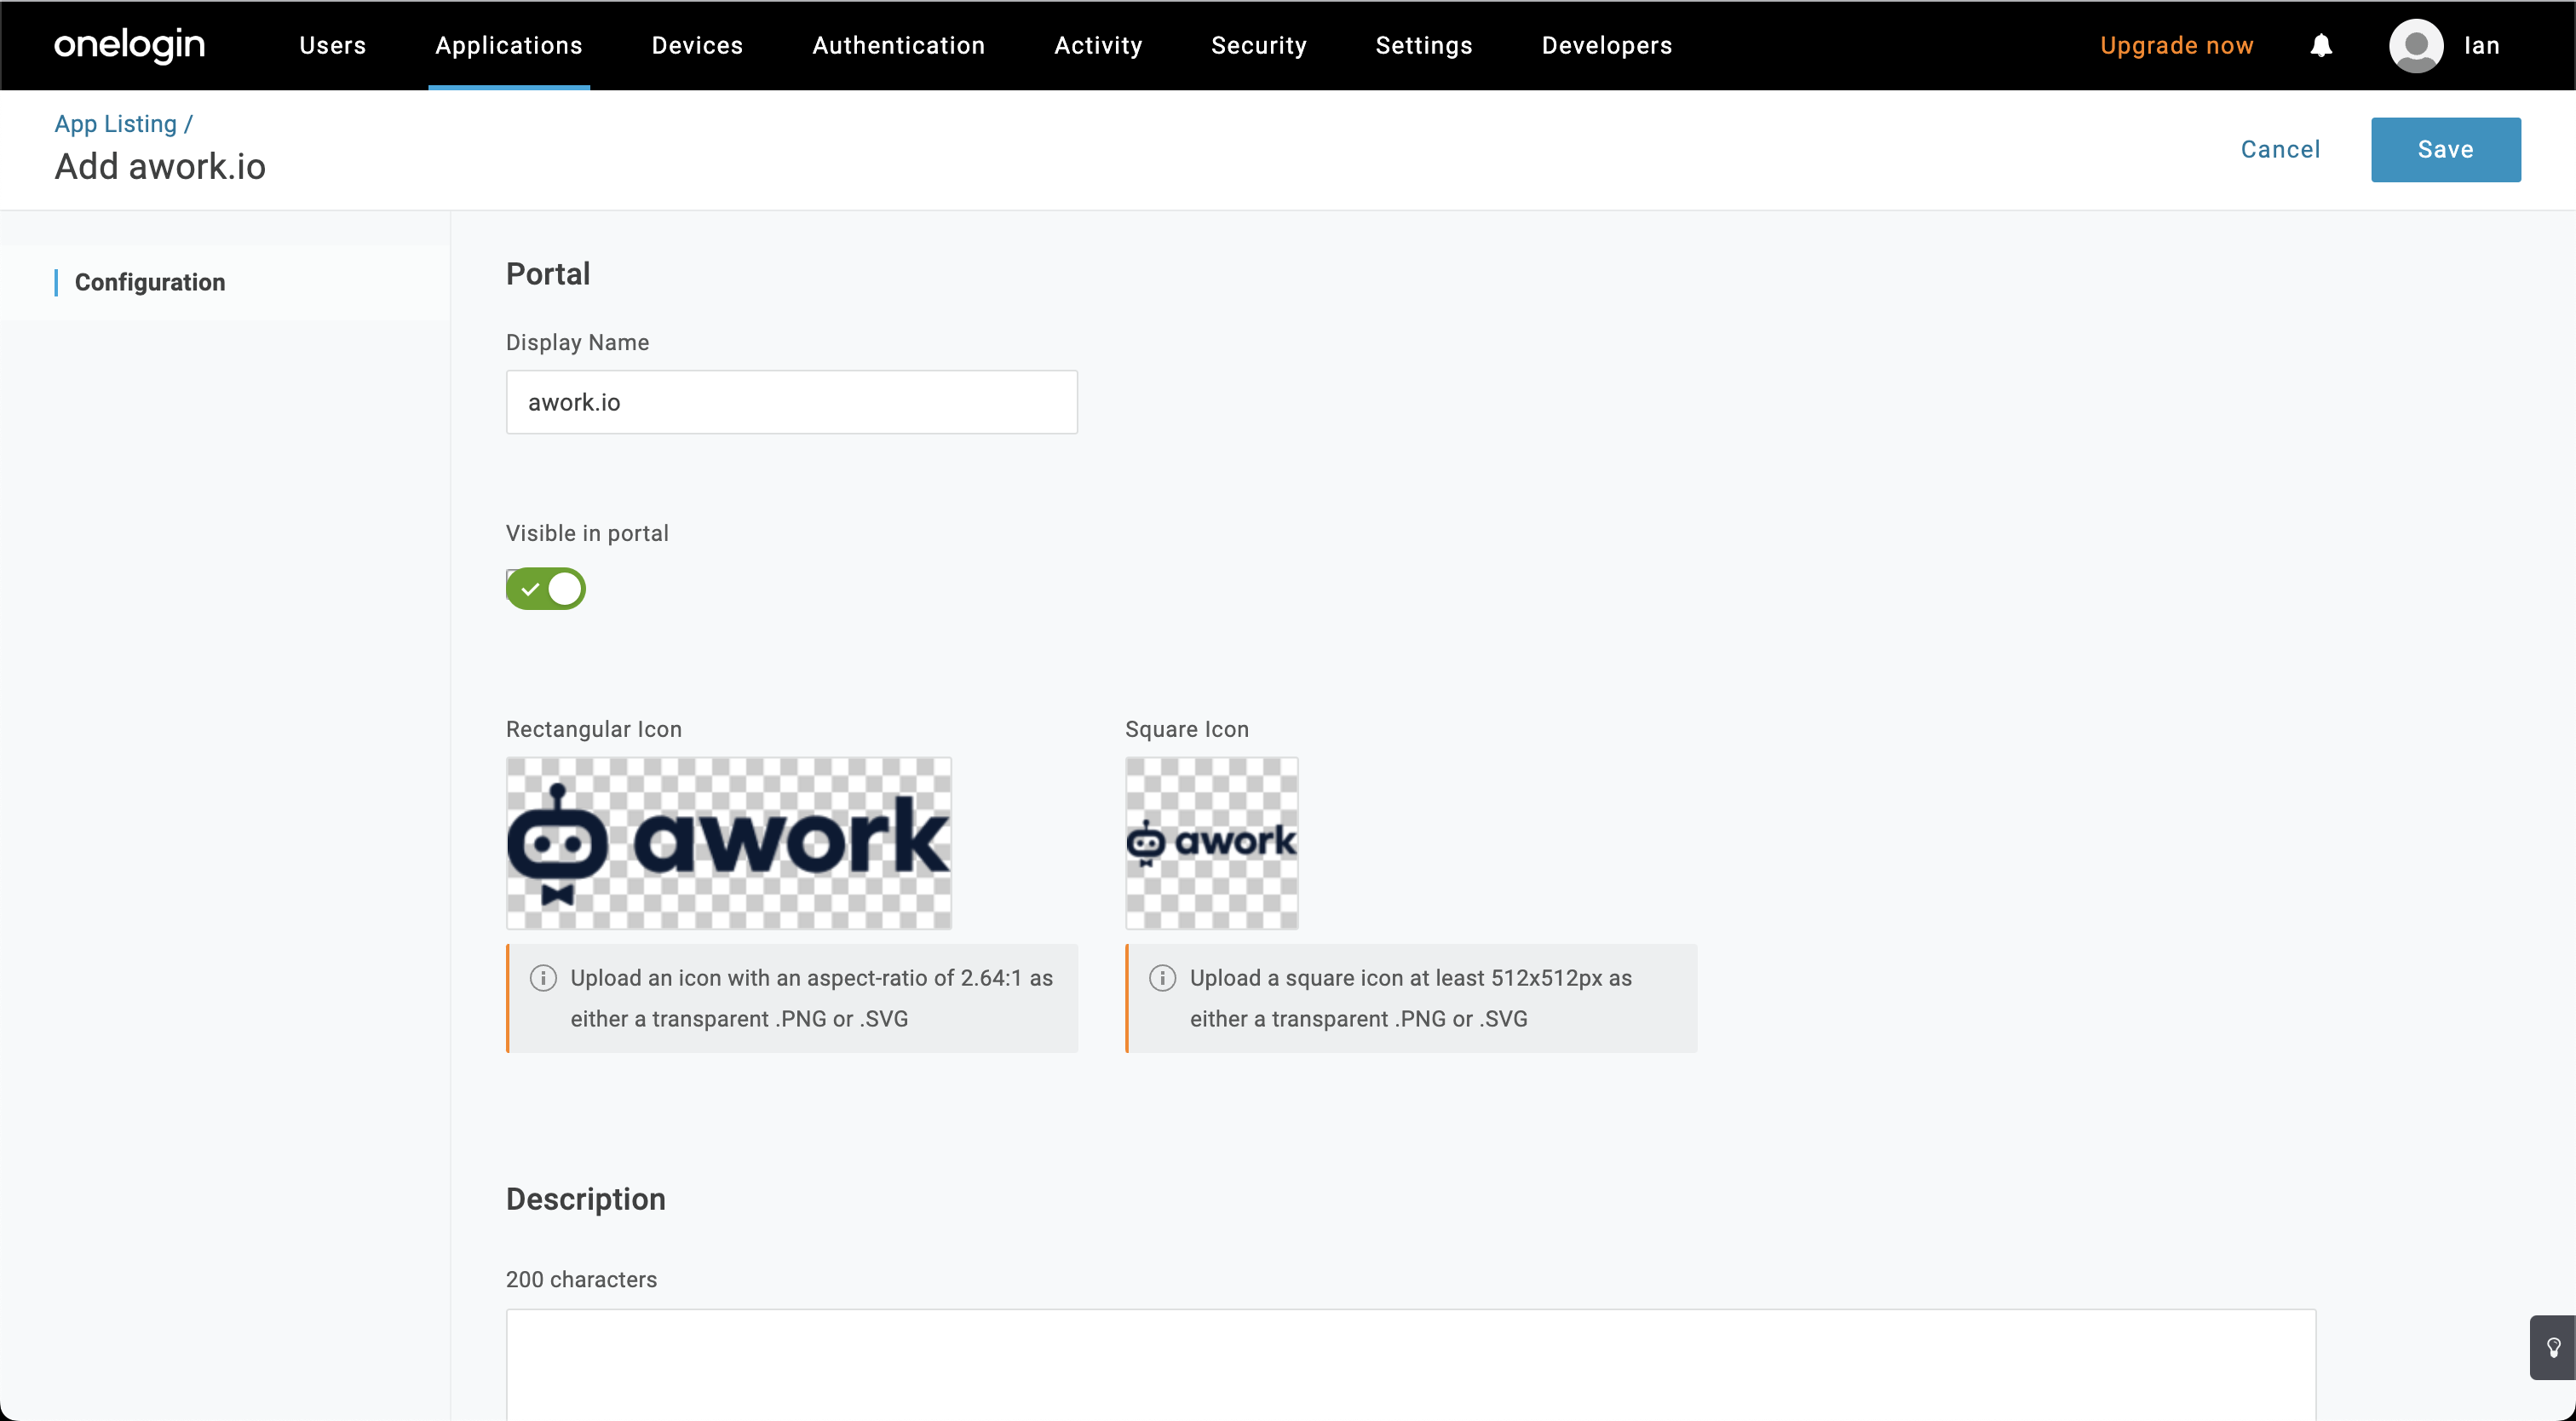
Click the awork.com app and then Click in the top right
-
After saving, you'll see a basic configuration that we've already set up for you. You can customize this configuration for your use case.
-
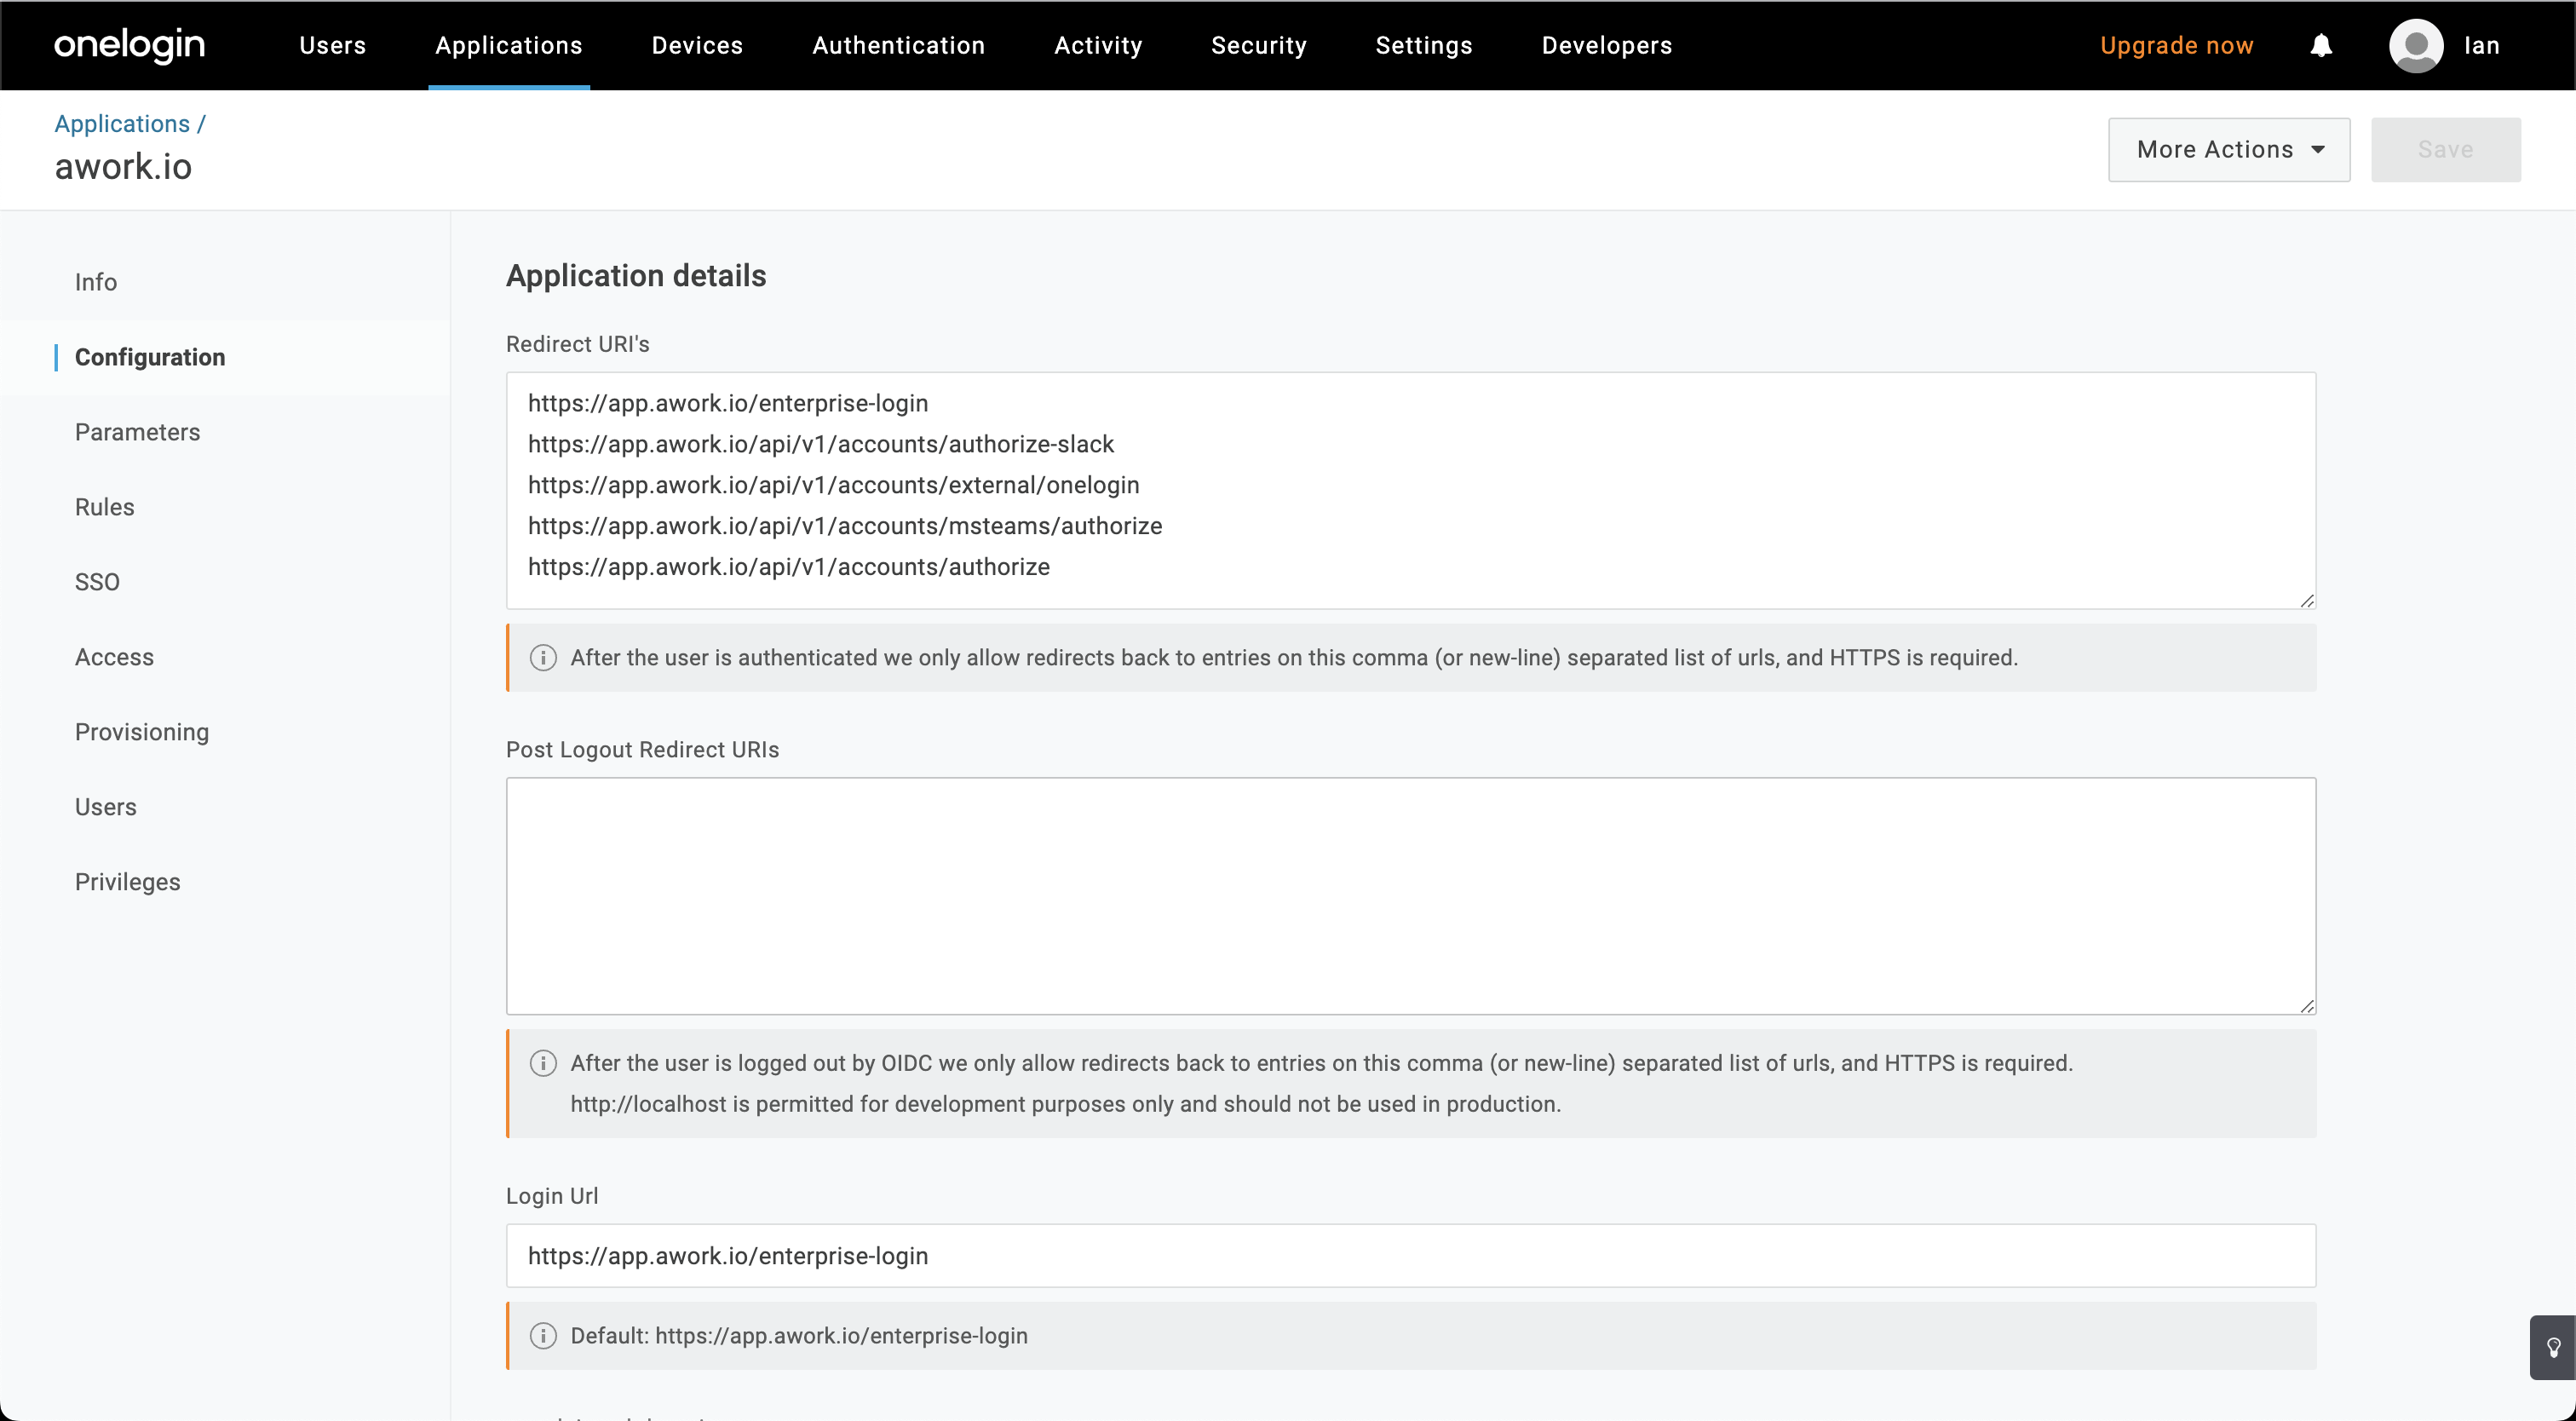
Open the Configuration tab on the left
-
In the Login Url field, you can enter either "https://app.awork.com/login" or your subdomain directly, for example "https://your-subdomain.awork.com/login" (preferred).

-
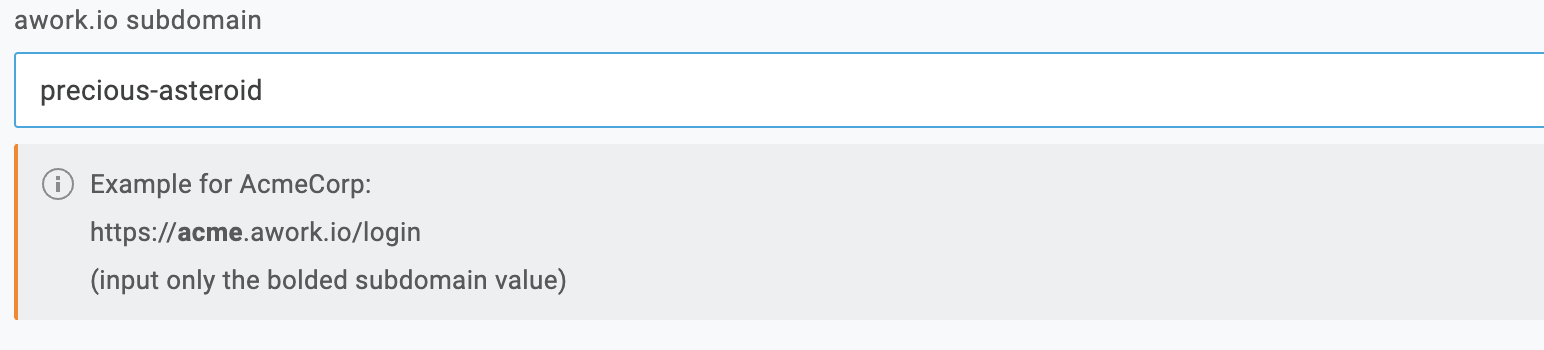
In the awork.com subdomain field, you need to enter the link to your workspace before awork.com, so for https://precious-asteroid.awork.com that would be precious-asteroid.
-
In the API Status section, you can simply click Enable.
-
In the SCIM Bearer Token section, you can now paste the token you received from the SCIM integration in awork.

-
In the SCIM JSON Template field, you can define which information from OneLogin should be synchronized with awork. The default configuration only synchronizes email, first name, and last name and looks like this:
{
  "schemas": [
   "urn:ietf:params:scim:schemas:core:2.0:User"
  ],
  "userName": "{$parameters.scimusername}",
  "name": {
    "givenName": "{$parameters.firstname}",
    "familyName": "{$parameters.lastname}"
  },
  "emails": [
    {
      "value": "{$parameters.email}",
      "primary": true,
      "type": "work"
    }
  ]
}
- You can extend this configuration to map additional user fields. You can find the available fields in the Mappings section. For each field, you need to create a parameter in the Parameters tab and assign the value from OneLogin. Contact us for more information.
- Then go to the Provisioning tab on the left
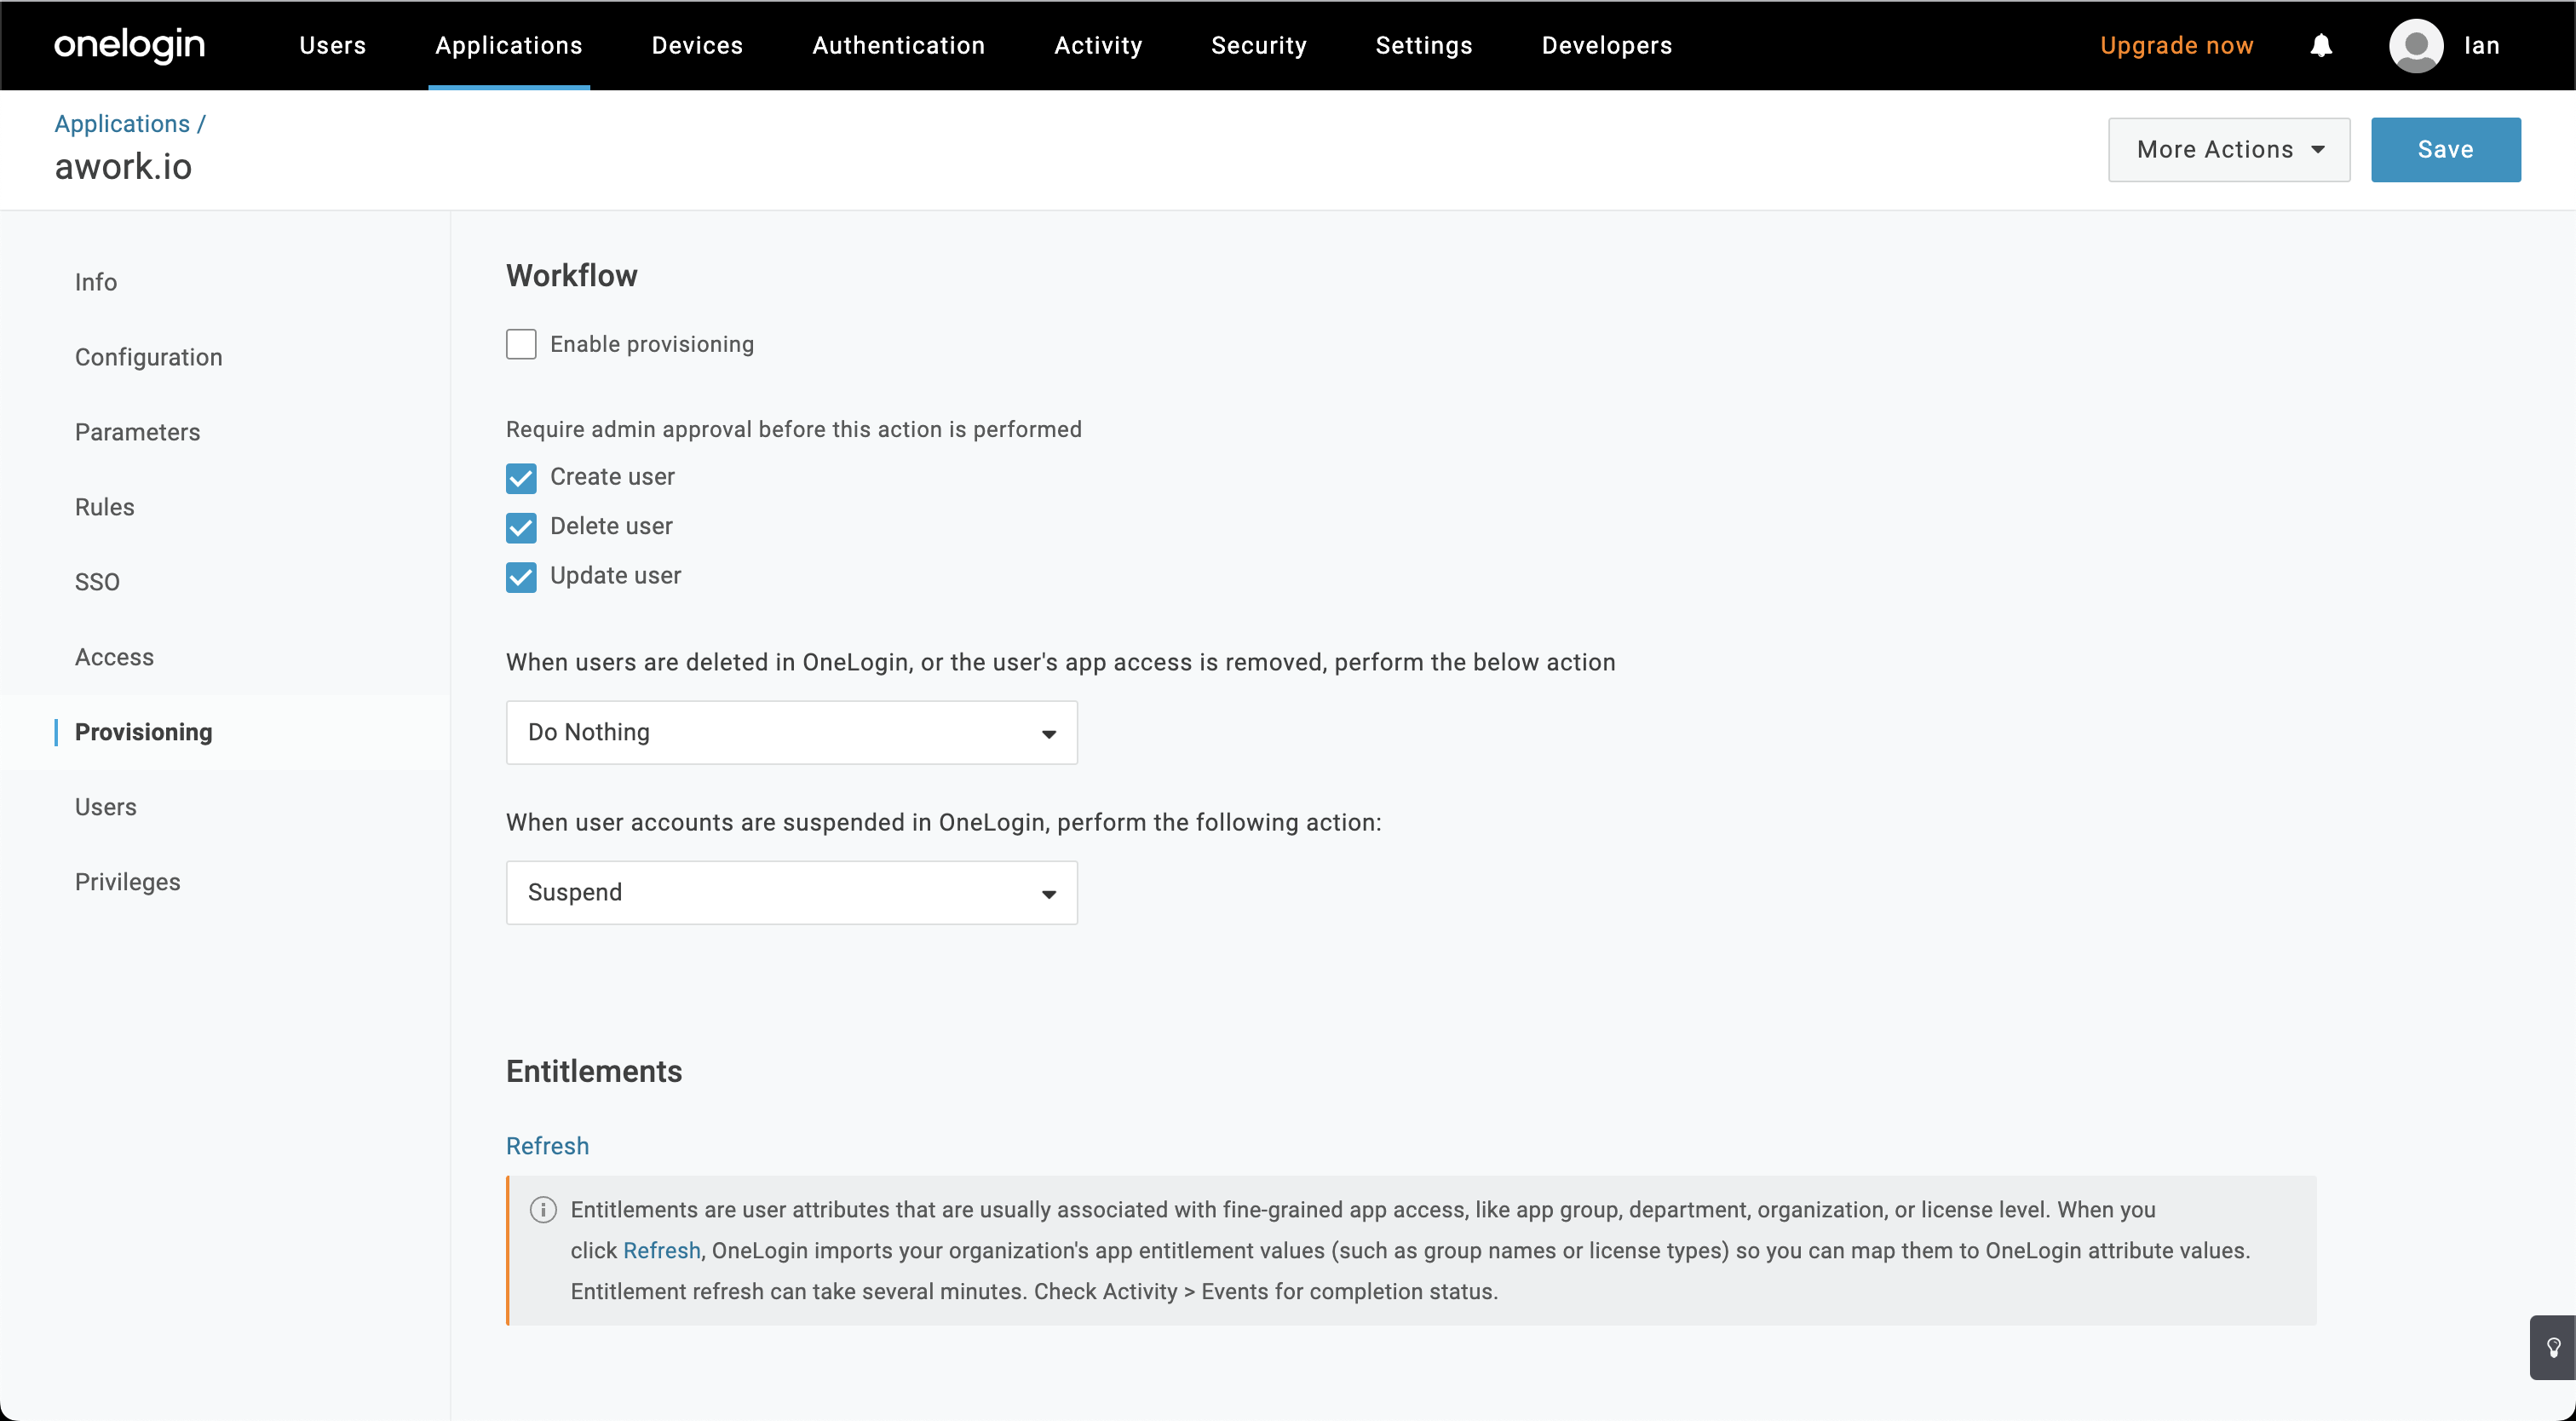
- Under Workflow, you can enable provisioning.
- You can also decide whether admin approval should be required before certain actions. We recommend enabling these options only for initial setup/testing.
- In the Entitlements section, click Refresh to retrieve the user roles from awork. Note: The Guest role is not displayed here because it's only used for external users.
- If you want to set default user roles for your users in awork, go to the Rules tab on the left.
- Click Add Rule to add a new rule.
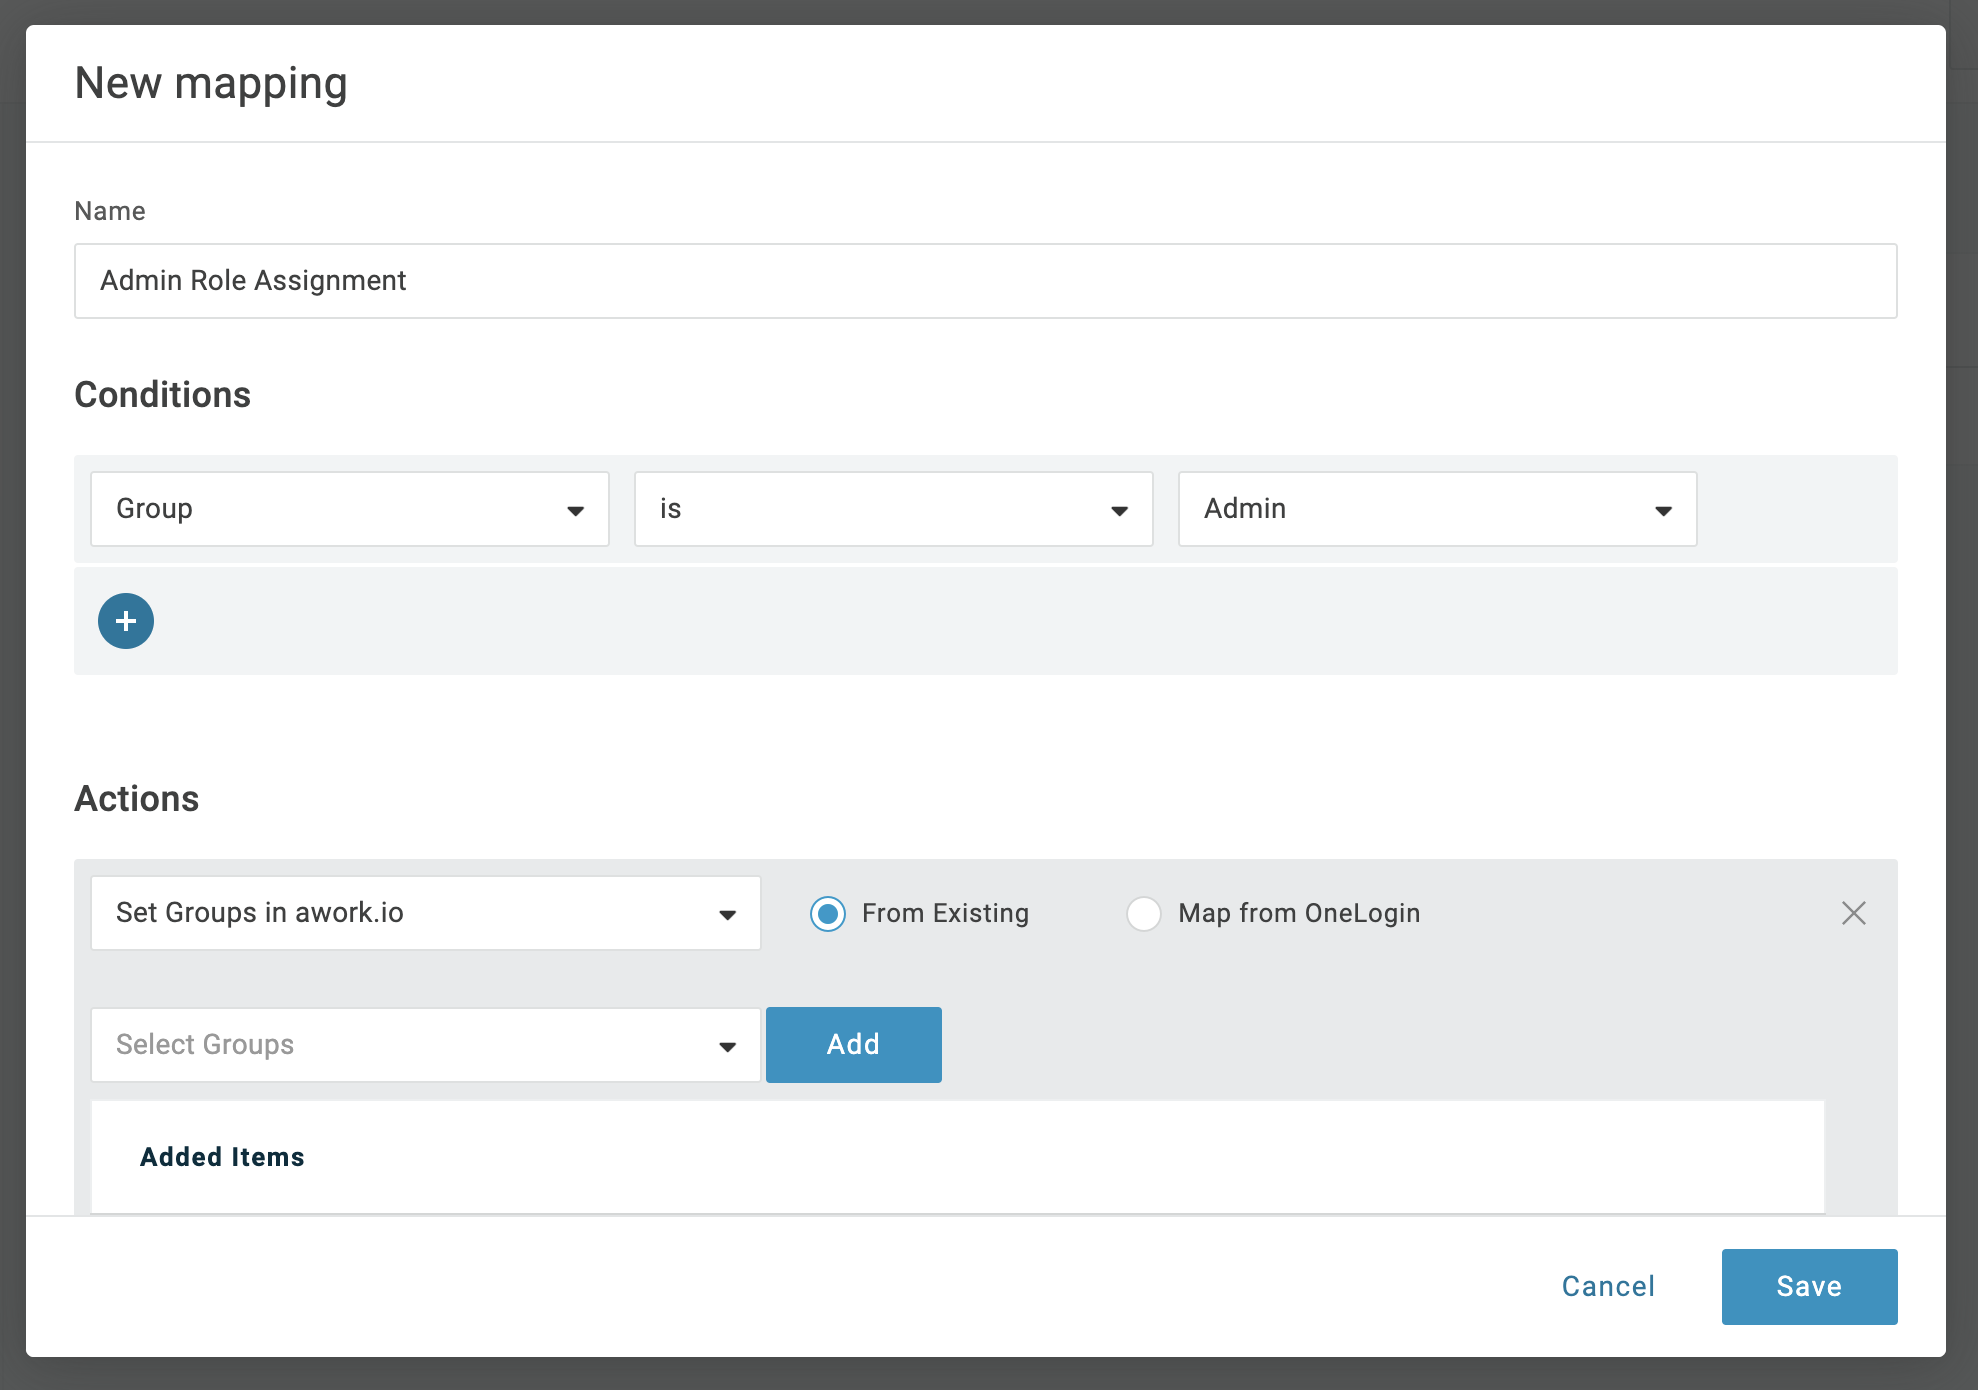
- Enter a name and add a condition for your rule, for example "user is in group Admin".
- Now you can add actions, such as setting the group in awork. It's important that you've done the Entitlements Refresh beforehand to retrieve all user roles. Also, select From Existing, since user roles can only be created/updated directly in awork. After selecting a role, don't forget to click Add, otherwise the group won't be added. Only add one group, since an awork user can only have one role at a time.
- Click Save.
- Repeat these steps for all your awork user roles.
- Complete the configuration by clicking Save in the top right.
- Attention: You've completed all configurations to add users to your app. If you want to test the configuration, we recommend adding a test user to the app (under Users > Users > select Test User > Applications)
- In the final step, you can add your users to the app, either individually or via policies (recommended).
- For policy access to the app, go to the Access tab on the left, select the roles that should be added to the app.
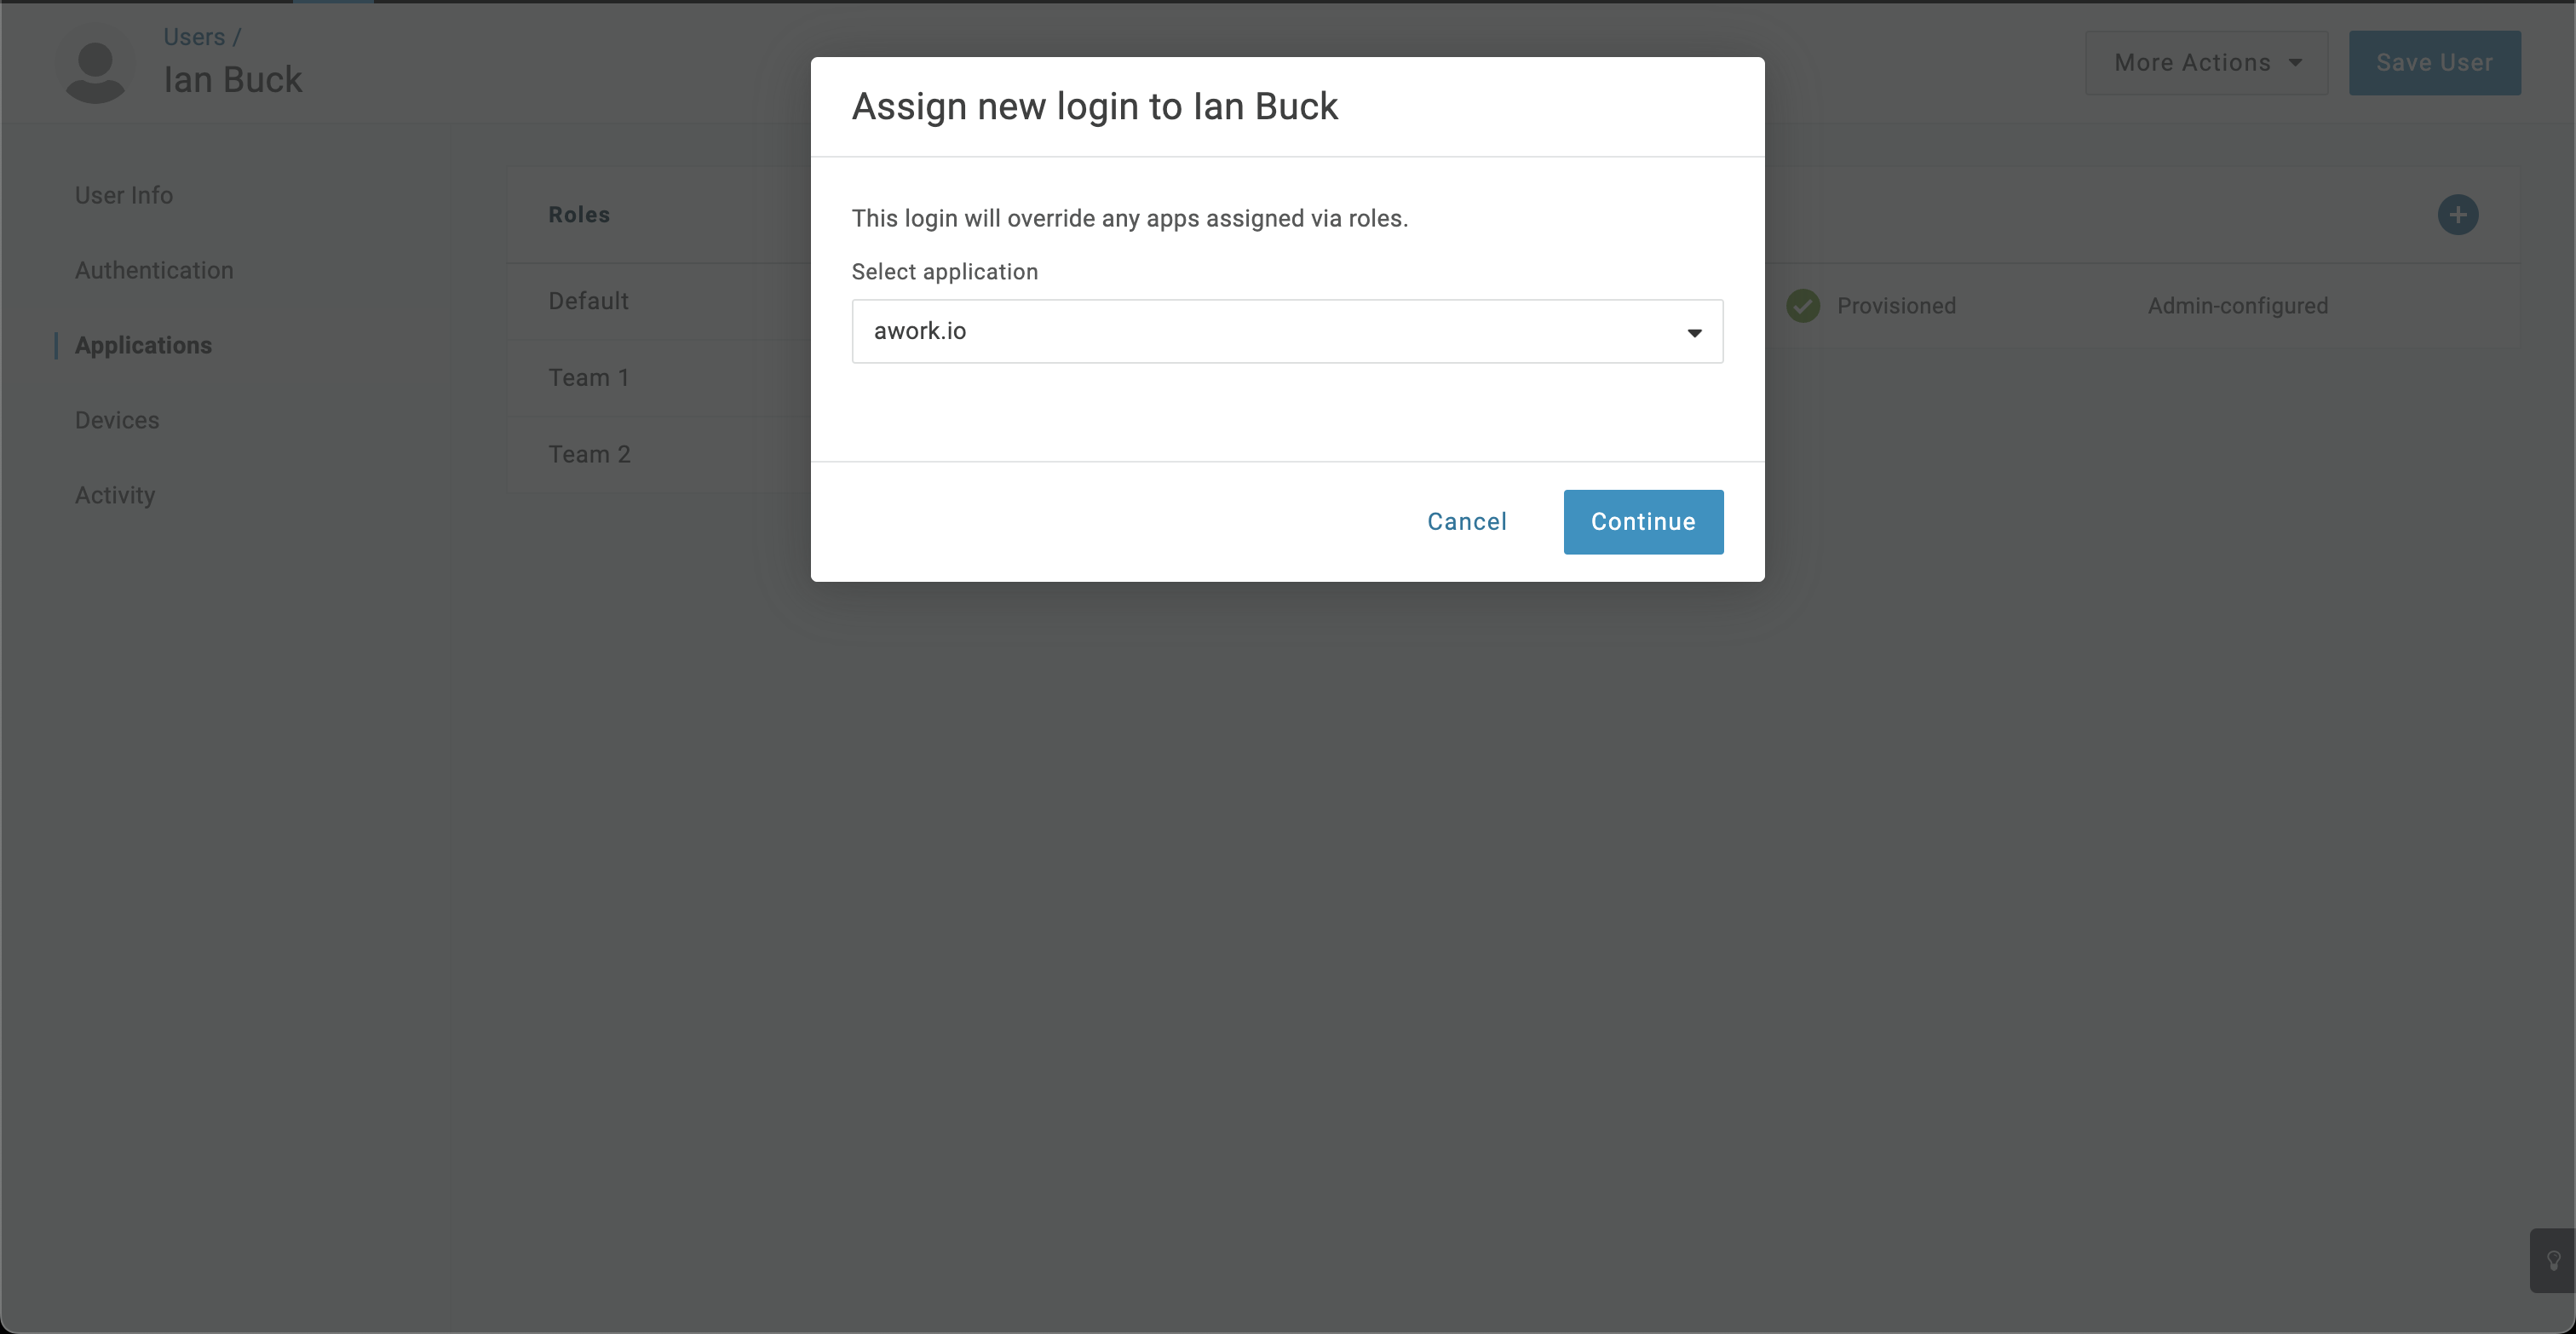
- For individual assignments, go to User Details and the Applications tab. Here you can add a new app by clicking the Plus icon in the top right.
- You can find the provisioning history under Users > Provisioning.
- You can find all events for the awork app under Activity > Events.
Known Issues
If you receive an error with the description "Invalid Accept Header Value", you can solve the problem by adding the following custom header in your SCIM application setup:
Accept: application/scim+json
Microsoft Entra ID (formerly Azure AD)
-
Go to Microsoft Entra ID
-
Go to Enterprise Applications
-
Create a new application
-
Click Create your own Application in the Entra ID Gallery
-
Enter a name, for example awork SCIM
-
Select Integrate any other application you didn't find in the gallery
-
Click Create
-
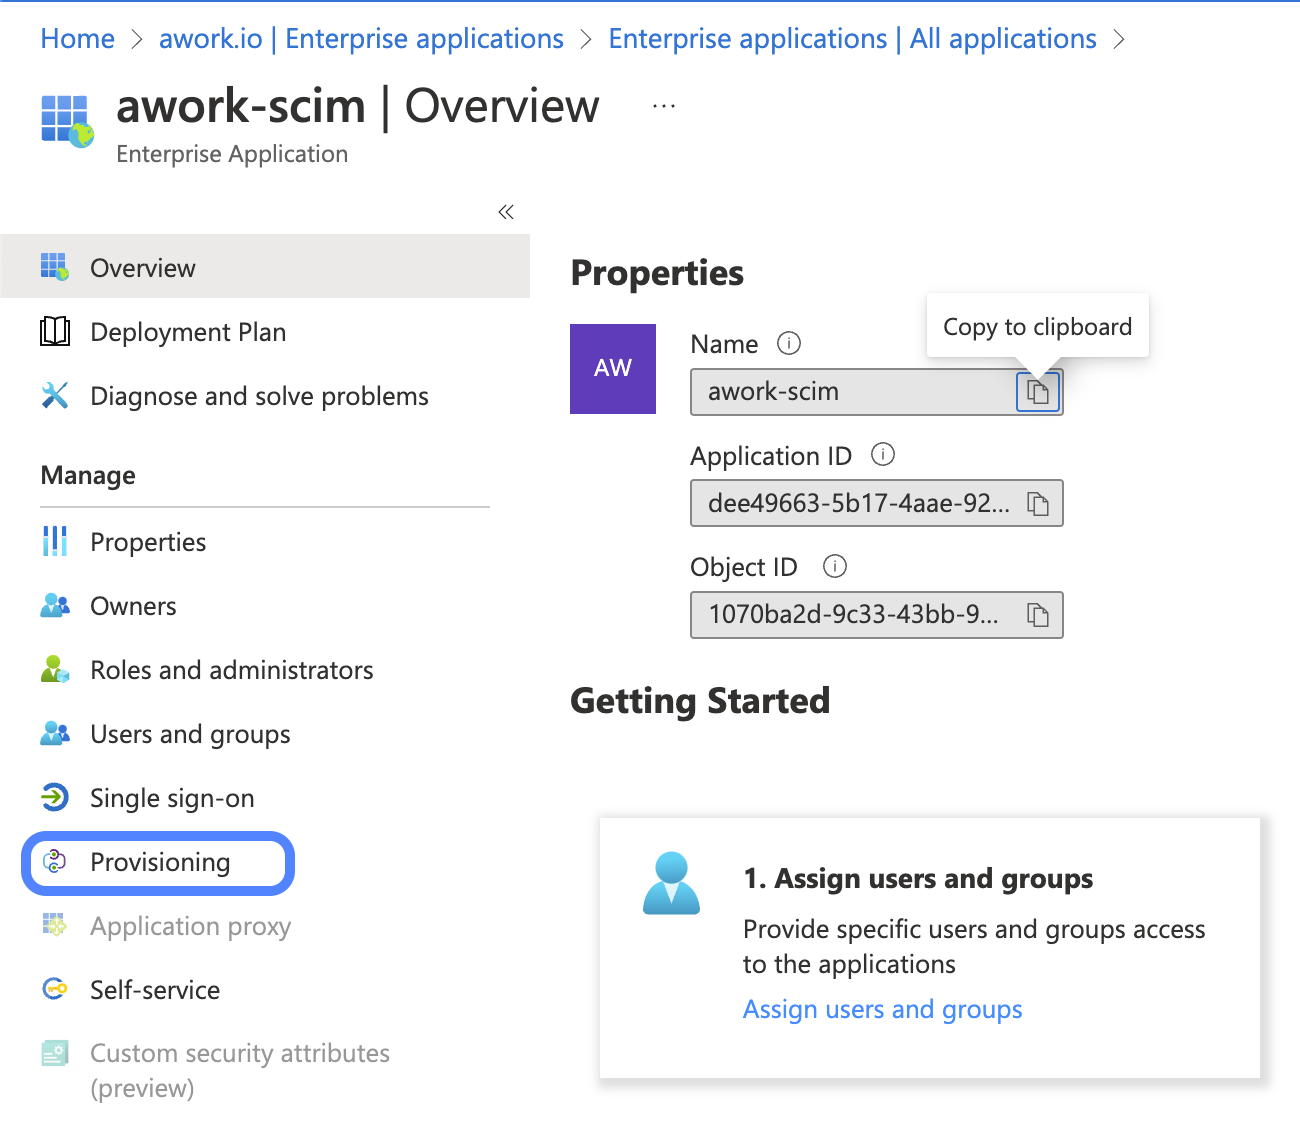
Go to the newly created app
-
Go to the Provisioning tab
-
Edit the Provisioning
-
Set the Provisioning Mode to Automatic
-
Set the admin credentials
- Set the Tenant URL to: https://app.awork.com/api/v1/scim
- Set the Secret Token to the token you received from the SCIM integration in awork
- Test the connection to verify that the secret is correct
-
Save the configuration. After that, two more sections will appear
-
Edit the mappings
- Click Groups. Disable this feature and save. Currently, awork doesn't support groups with Entra ID.
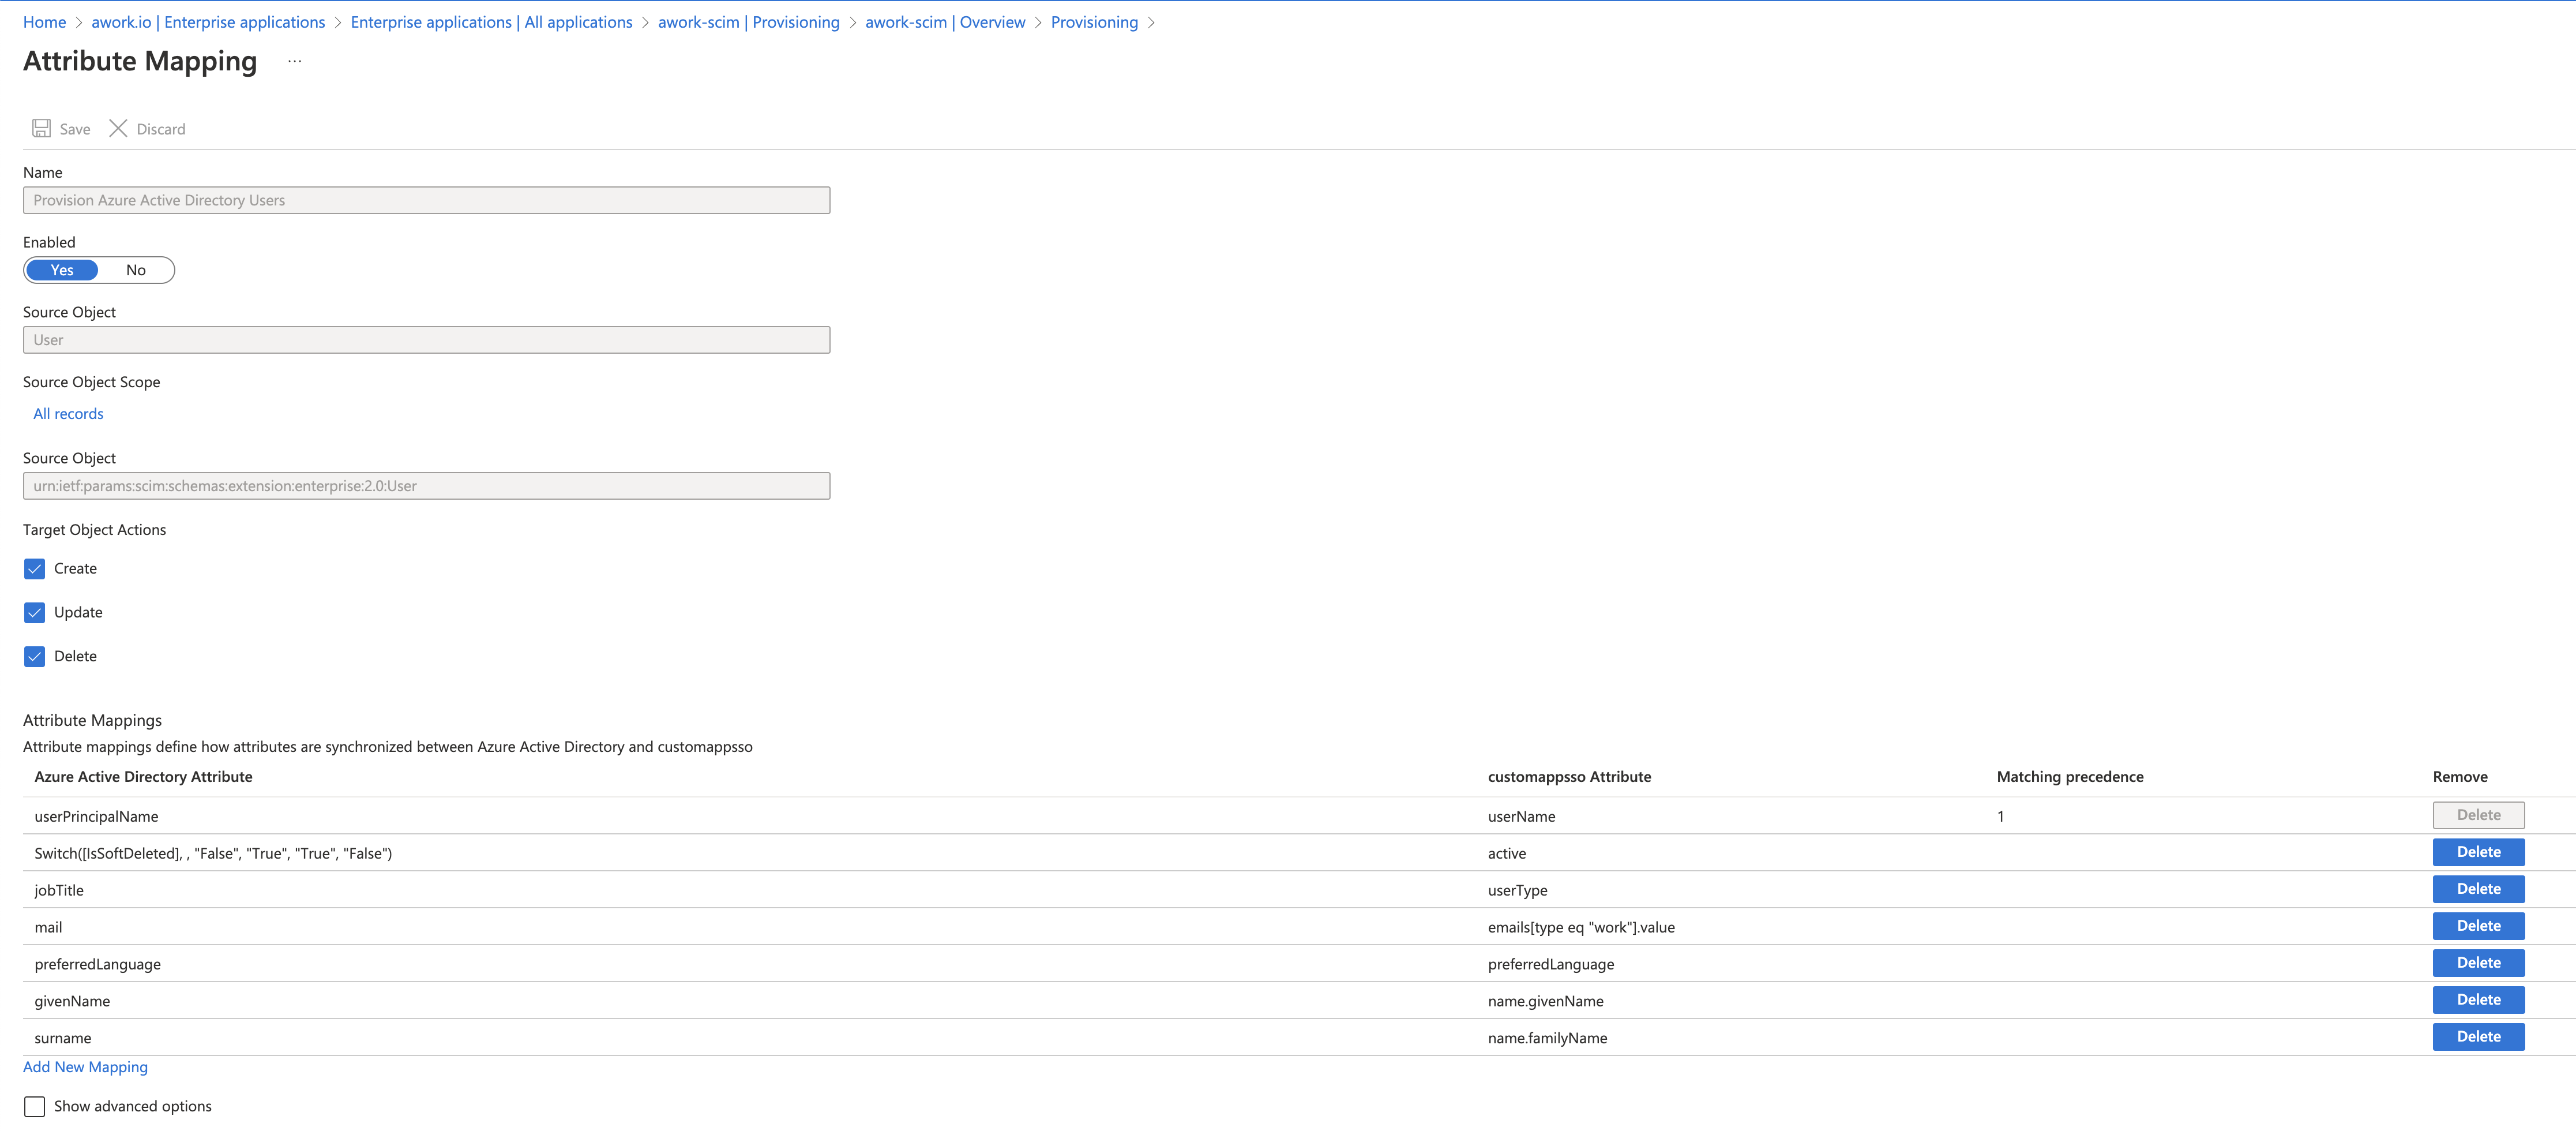
- Go back to the mappings and edit the Users mappings
-
Set Target Object Actions to all: Create, Update, Delete
-
The default list of mappings already contains the correct mappings for the required fields. The remaining mappings must be deleted so the synchronization works as expected. The required mappings from Entra ID mapping to customappsso attributes are:
-
userPrincipalName > userName (userPrincipalName must be set to the user's email)
-
Switch([IsSoftDeleted], , "False", "True", "True", "False") > active
-
mail > emails[type eq "work"].value
-
preferredLanguage > preferredLanguage
-
givenName > name.givenName
-
surname > name.familyName
-
Optionally, you can currently also map: jobTitle > userType (displayed as position in awork)
-
-
If you want to synchronize absence regions, user roles, and/or awork teams, you need to configure the awork SCIM user extension: Enable: "Show advanced options"
-
Click Edit attribute list for custommapsso. Add the following fields as strings:
- urn:ietf:params:scim:schemas:extension:awork.com:2.0:User:teams
- urn:ietf:params:scim:schemas:extension:awork.com:2.0:User:absenceRegion
- urn:ietf:params:scim:schemas:extension:awork.com:2.0:User:userRole

-
Click Save at the top and go back to the mapping
-
Add a new attribute for each extension you want to use
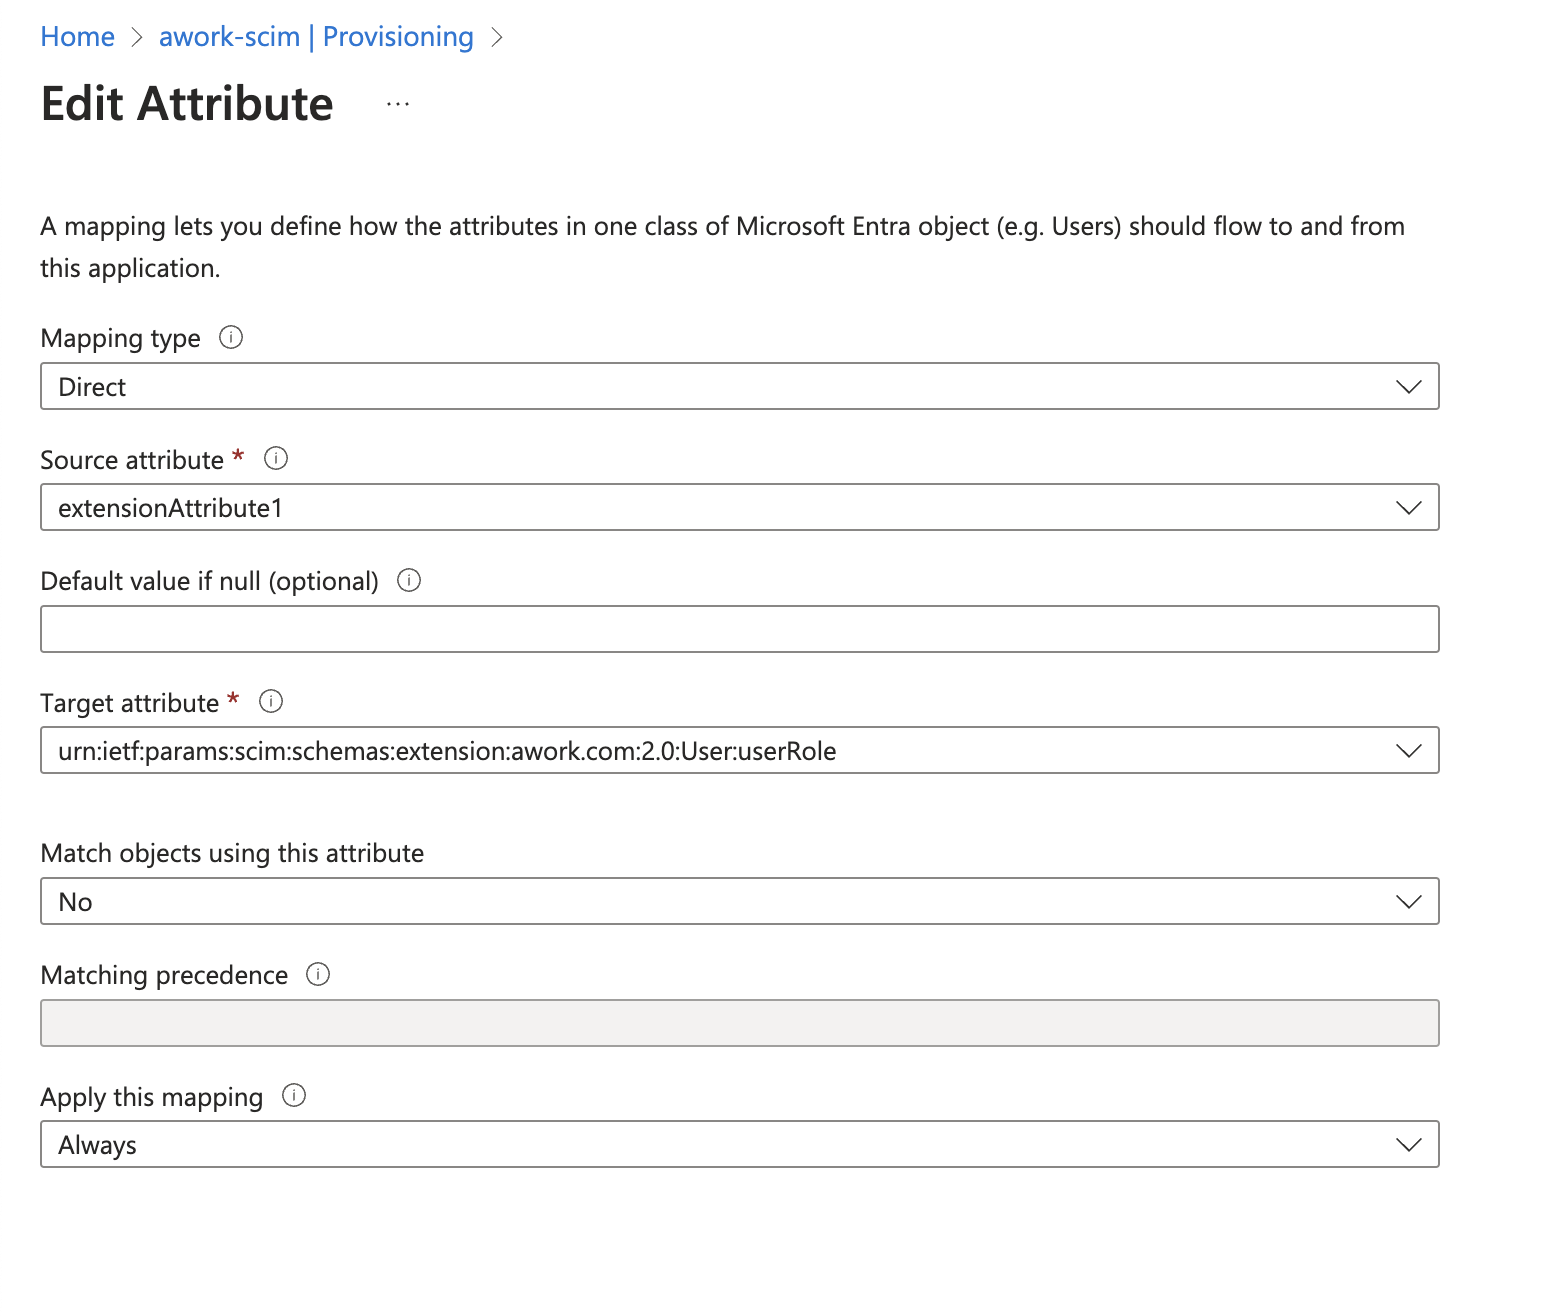
- As the source attribute, we recommend storing the value as a text field on the Azure user as a custom field and selecting it here, for example awork user role.
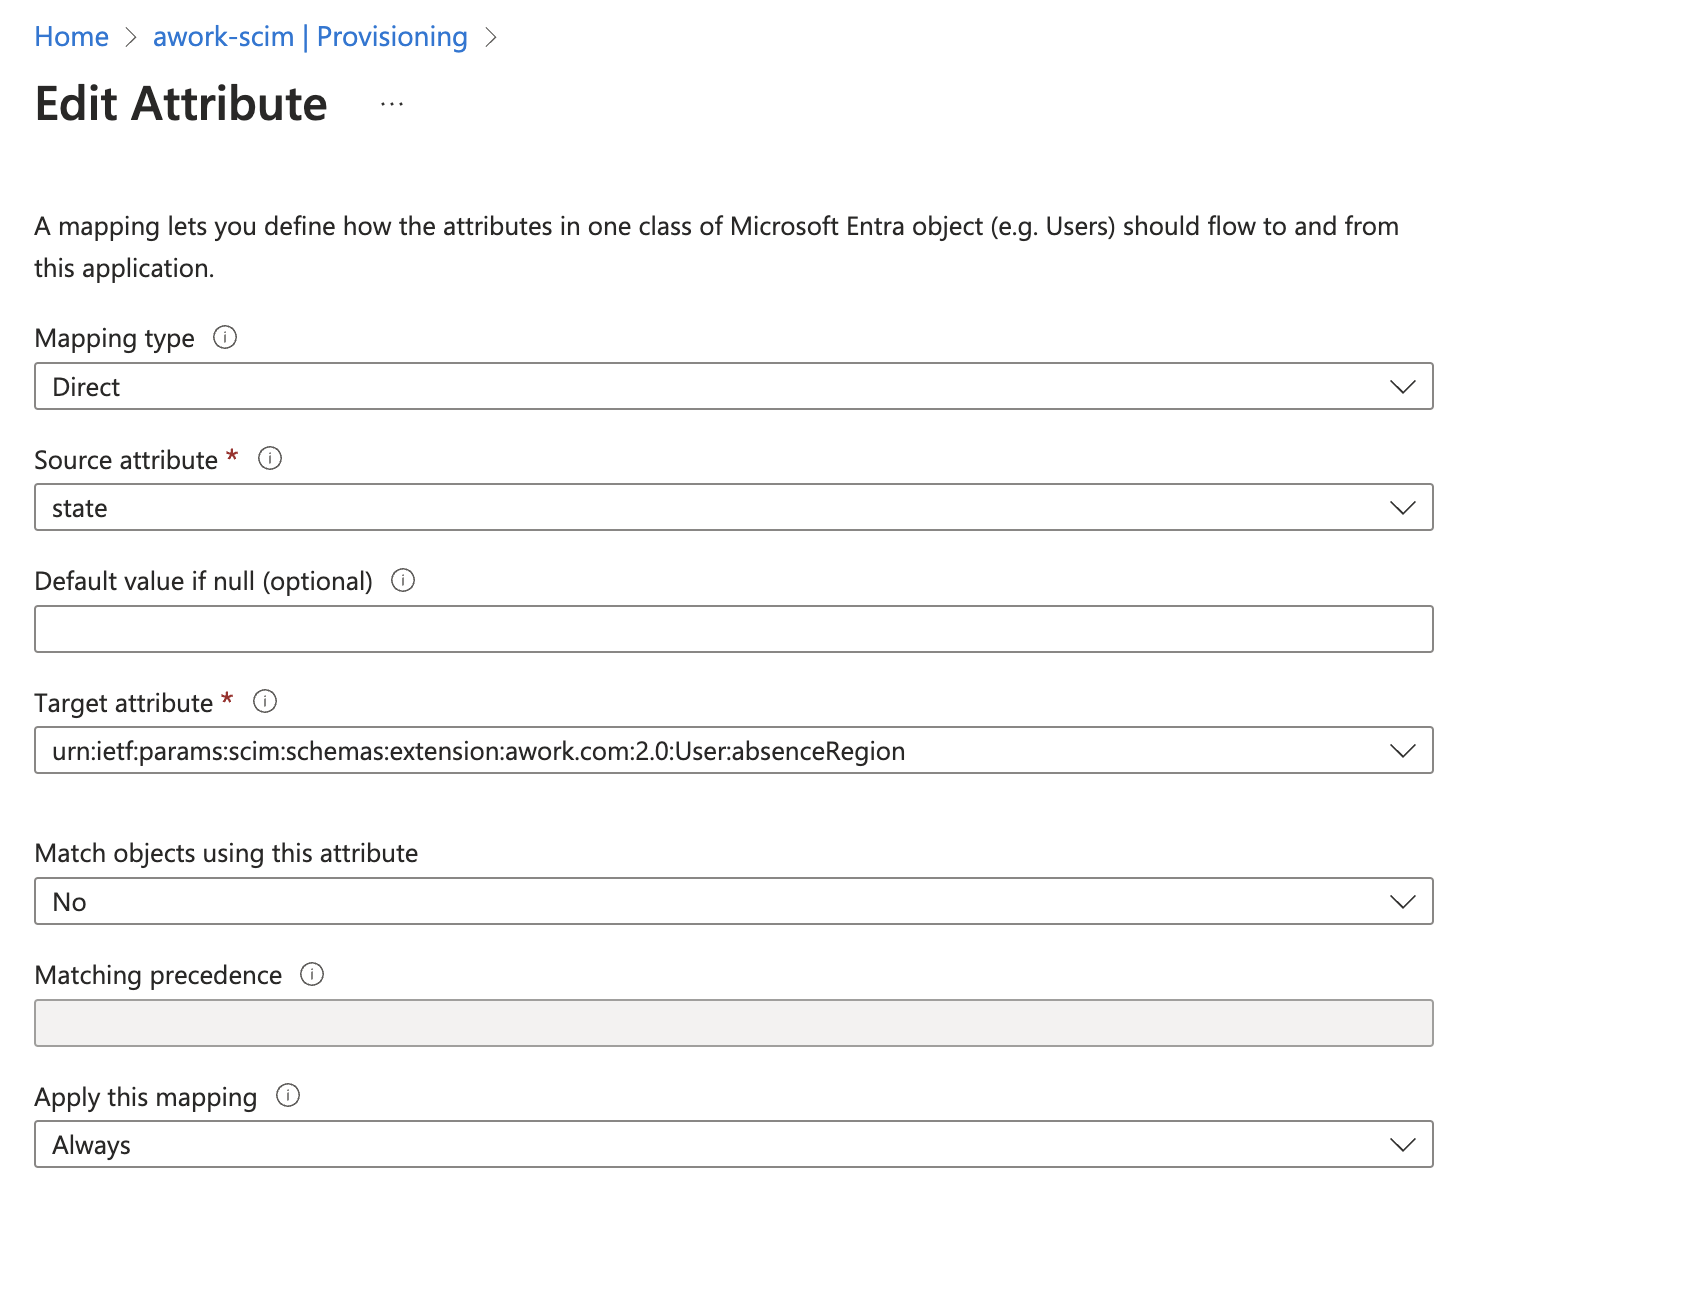
- As target, select the newly added extension field, for example urn:ietf:params:scim:schemas:extension:awork.com:2.0:User:absenceRegion
- Click Ok to add the new attribute mapping
-
Save the user mappings
-
Edit the settings
- Enable Prevent accidental deletion if desired. This prevents many users from being deleted at once if, for example, the wrong group was removed. We recommend a number like 50, depending on your number of users and typical group sizes.
- Enable Sync only assigned users and groups
-
Set the Provisioning status to On and save
-
Test provisioning for a single user
-
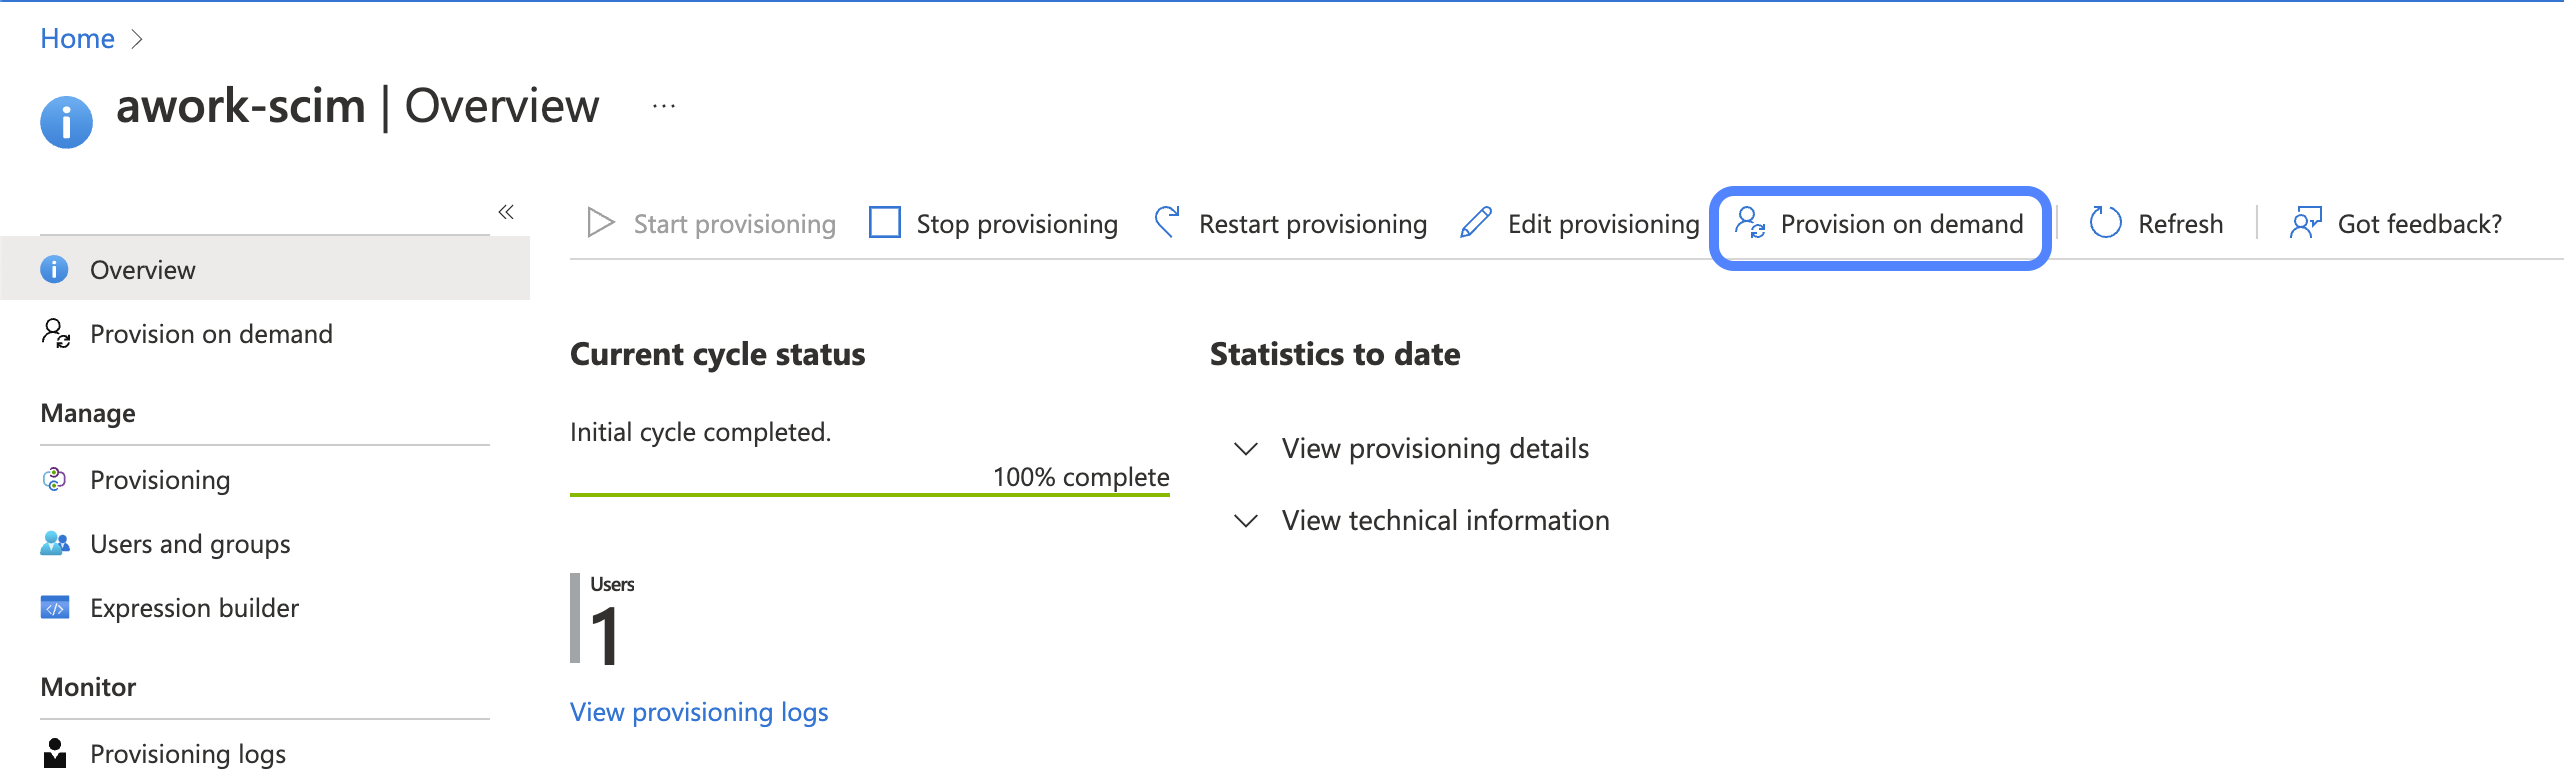
Go to the Provisioning tab of the Enterprise Application and click Provision on demand
-
Select a single user by email
-
Click Provision
-
Check the validation results. Your user fields should now be updated in awork.
-
Add the groups/users that should use the app. Each new user requires an additional license - make sure you have enough awork licenses booked.
-
Go to the Provisioning tab. Click Users and Groups and add the desired groups and users. Group assignments are only available with an Entra ID Premium P2 subscription.
-
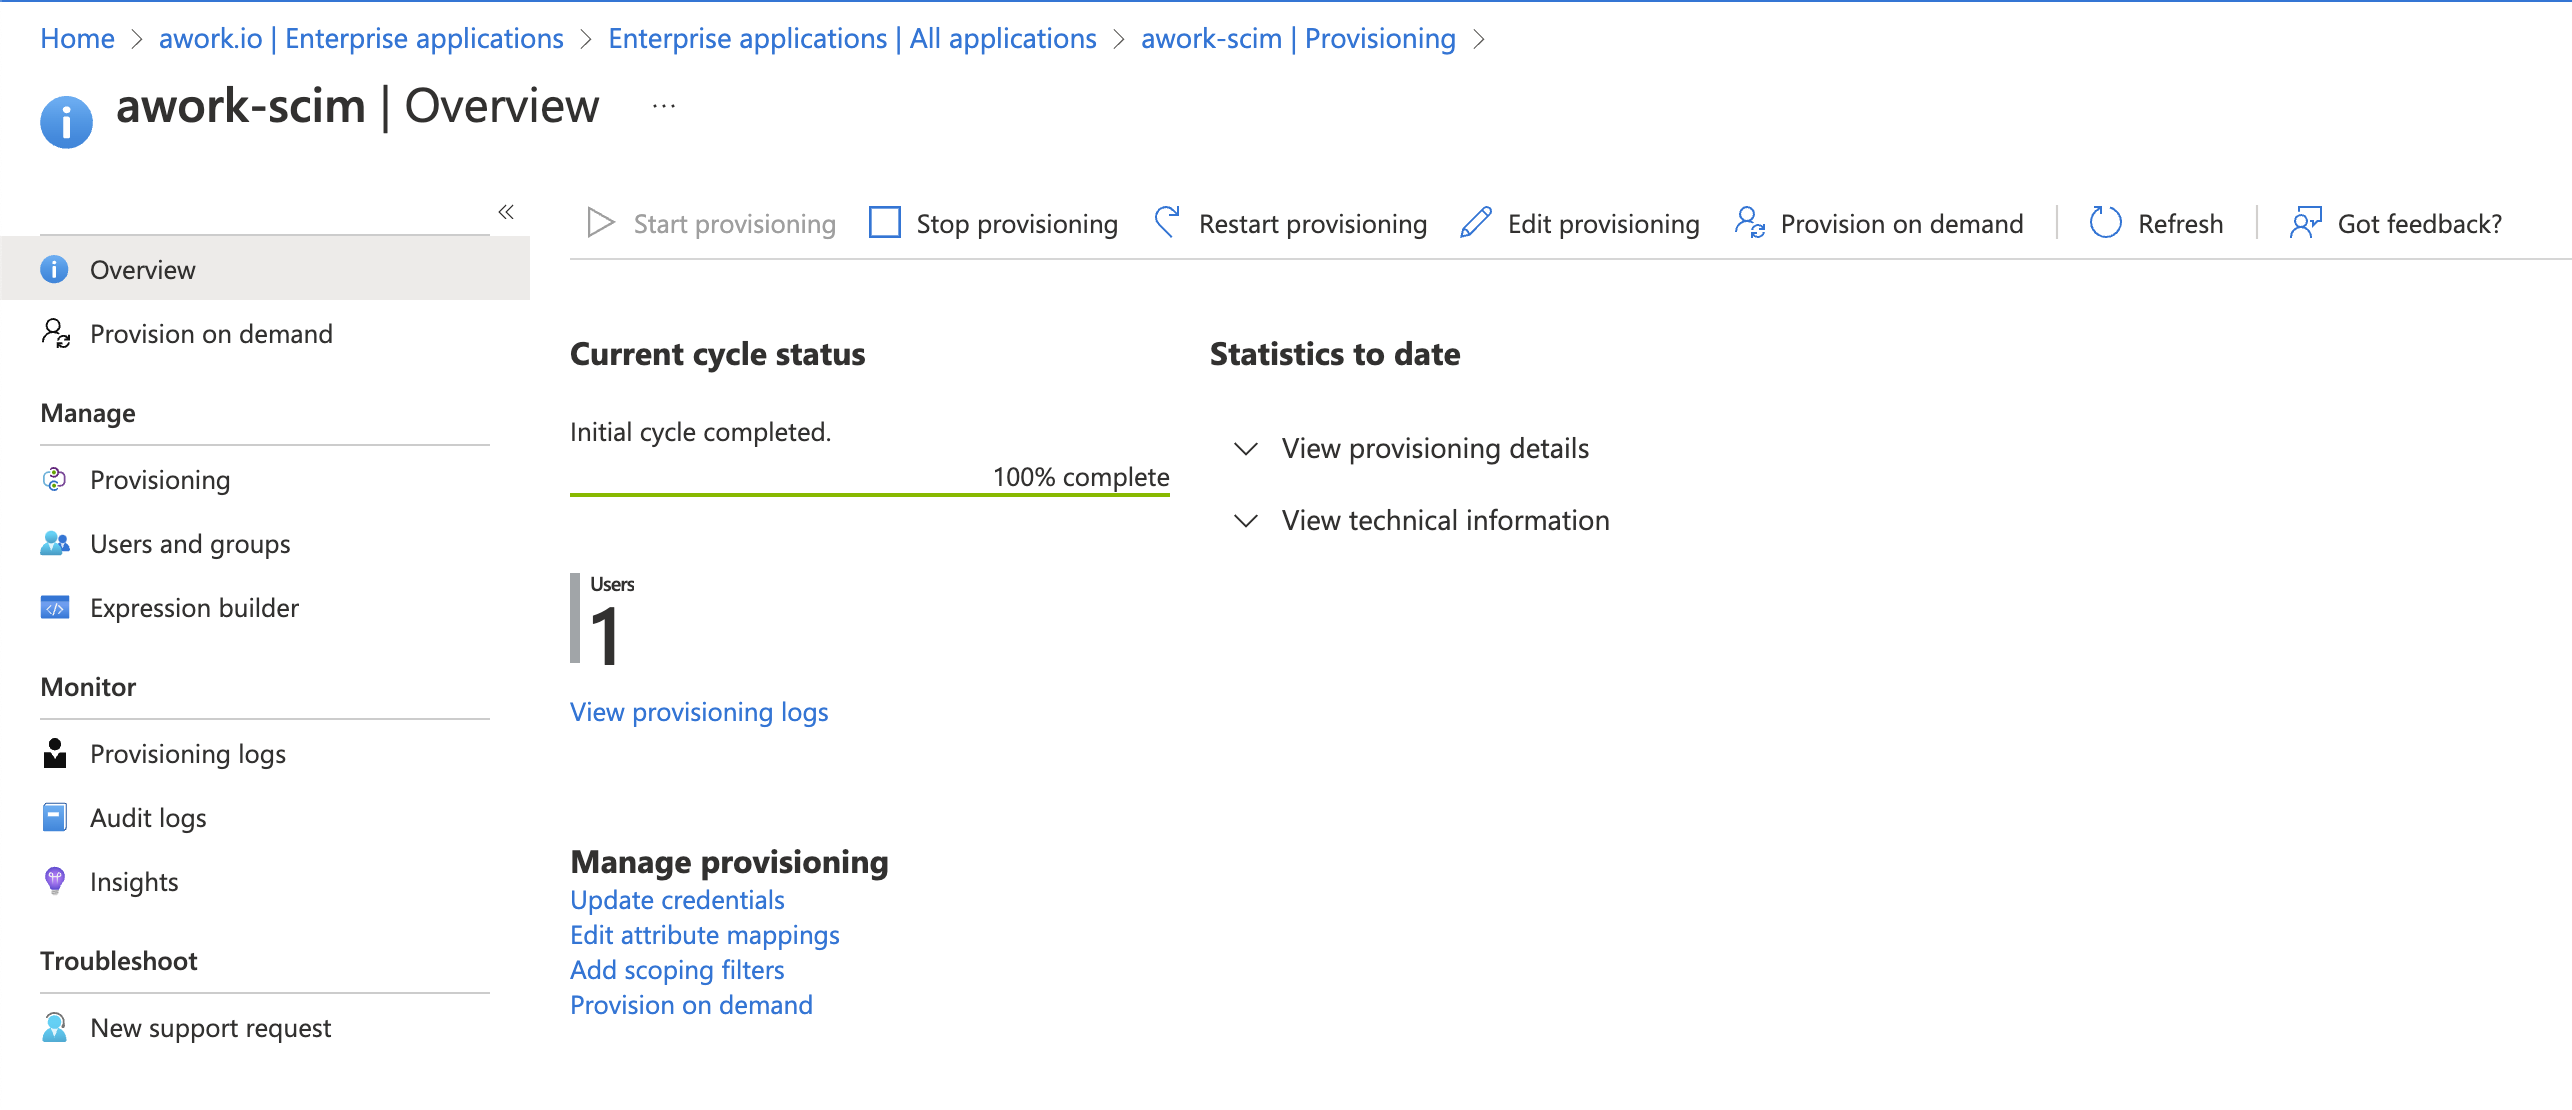
Go to the provisioning overview and start the provisioning job. This runs every 40 minutes and synchronizes all changes between Entra ID and awork. Fields that are not included in the mapping will not be overwritten in awork.
awork User Extension Attributes - Examples
Absence Regions
Absence region must be a string field that corresponds to the name of the absence region configured in awork.
Note: The absence region cannot be removed via the SCIM integration, only updated. The name matching is case-sensitive.
User Roles
The global user role for workspace-wide permissions can be updated via the userRole extension.
- The name of the user role must match the configured name in awork.
- Name matching is case-sensitive.
- The Guest role cannot be assigned.
- A user can only have one role at a time.
- There must always be at least one admin user.
- The user role cannot be removed.
Set a default value here if you want to control what default permission a newly invited user should have.
Troubleshooting Entra ID SCIM Sync
If SCIM synchronization isn't working as expected, you can go to Enterprise App Provisioning Overview and click View provisioning logs. There you'll find information about synchronized users and their properties. If there are problems, the status will be set to Failure. Click the entry, go to Troubleshooting & Recommendations, and copy the error message. Then contact our support and send us the error message so we can take a closer look.
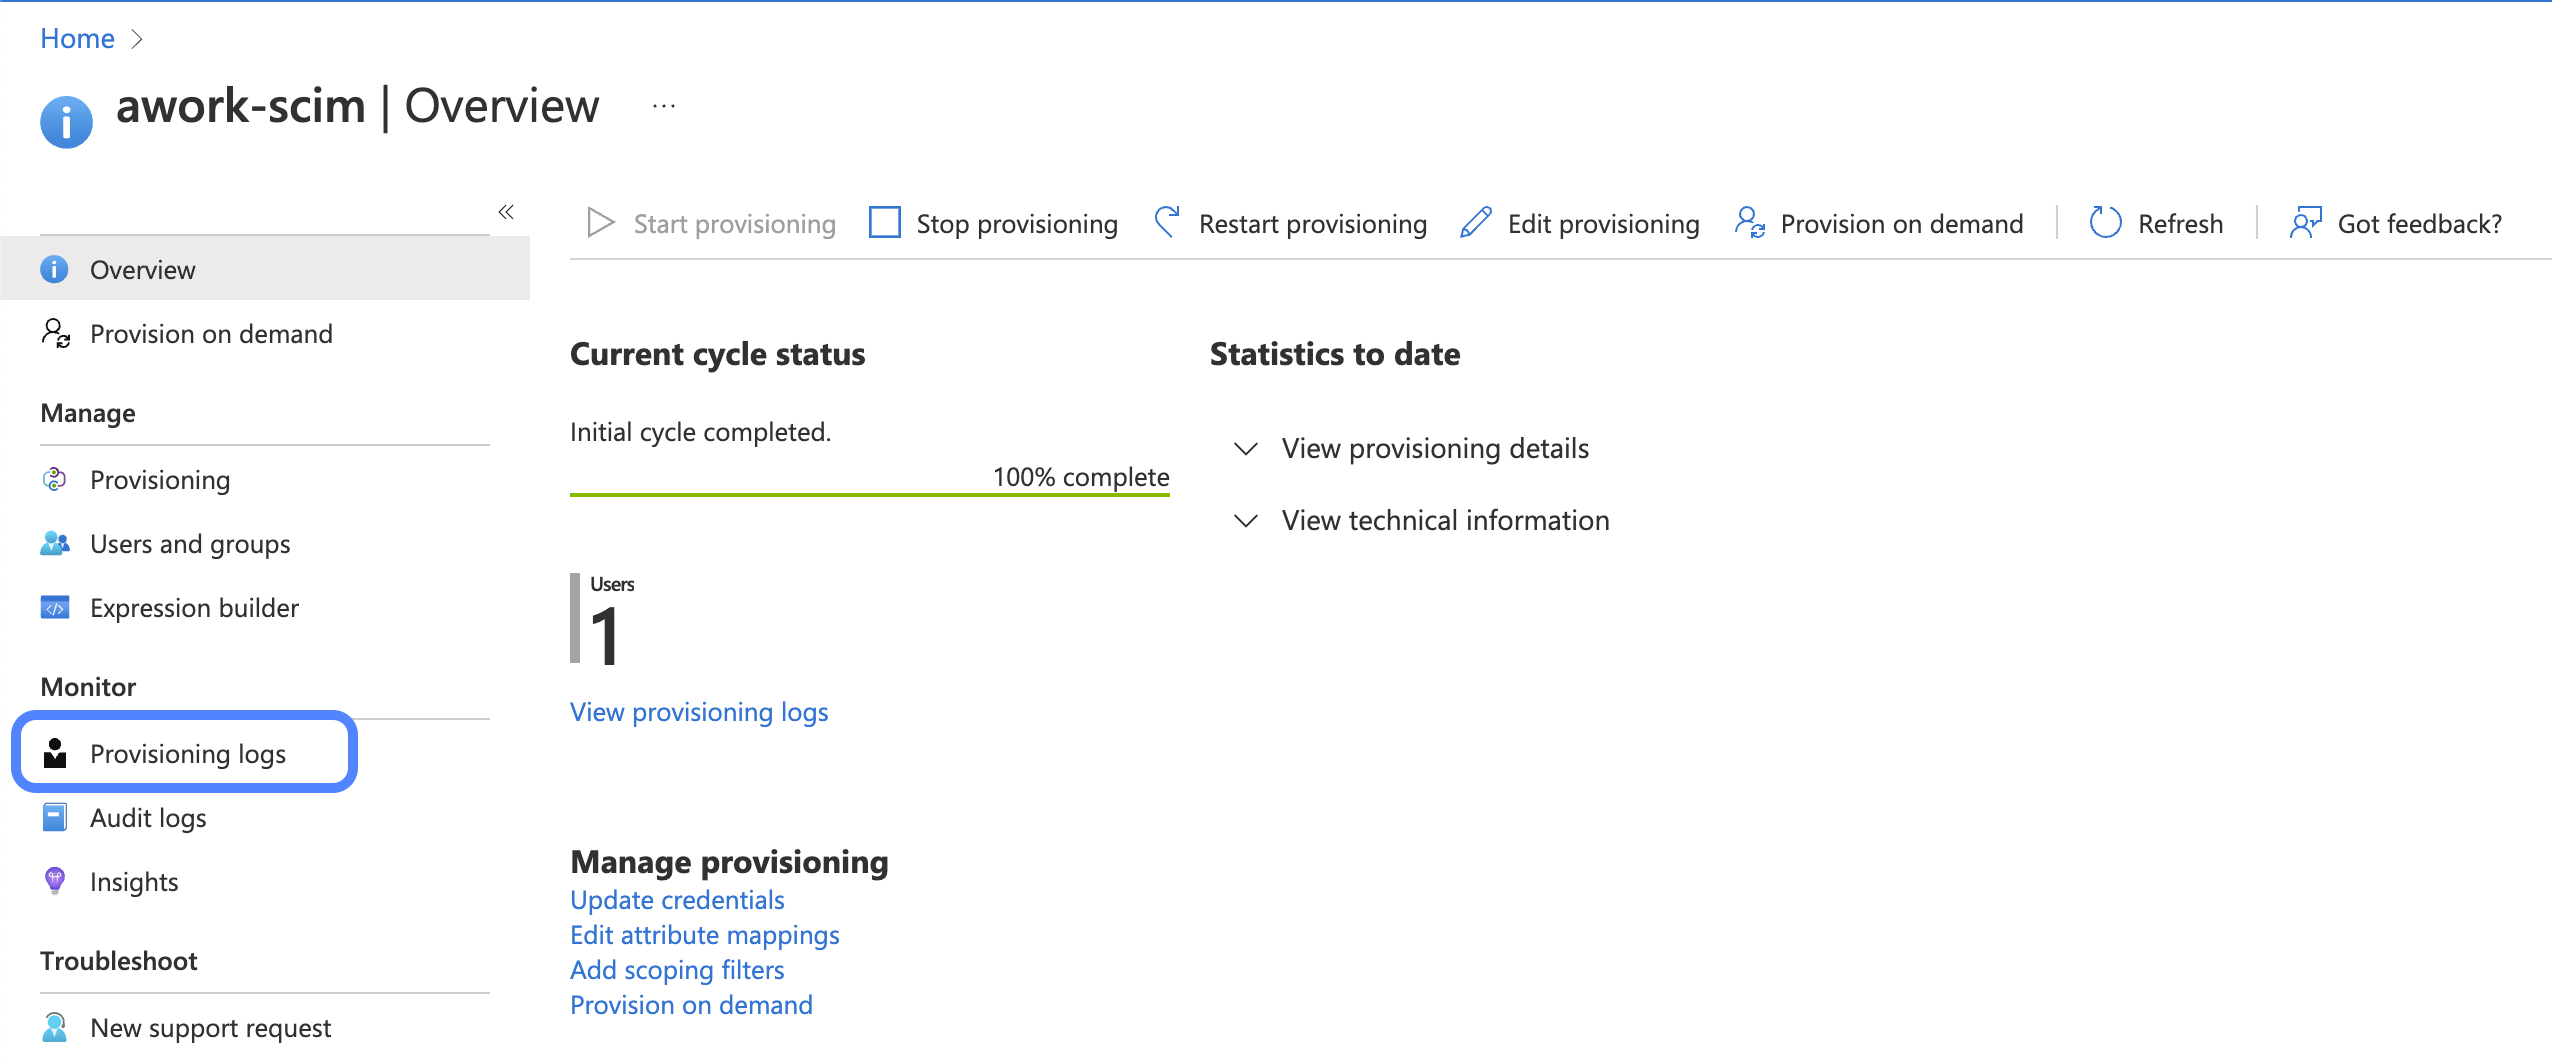

For more information about the Entra ID side of the SCIM integration, see the Microsoft Entra ID documentation: How Application Provisioning works in Microsoft Entra ID
3. Configure the Mapping
The awork user fields are mapped to the SCIM user resource. You can find a list of supported fields here:
| SCIM Field | awork Field | awork Account | Note |
|---|---|---|---|
| SCIM user | awork user | awork account | |
id | Id | ||
userName | Contact Info > type=email && subtype=work (primary user email) | This email is used to match the awork user/account with the SCIM user. | |
name > familyName | LastName | LastName | |
name > givenName | FirstName | FirstName | |
title | Title | ||
userType | Position | ||
preferredLanguage | Language | Currently only de-DE or en-GB is supported (other en- or de- prefixes are converted to en-GB) | |
timezone | Timezone | The IANA Timezone Information (https://www.iana.org/time-zones) | |
active | User Deactivated | ||
| SCIM User multi-value attributes | |||
email | Contact Info > type=email | The first work email is set as the primary email. | |
phoneNumbers | Contact Info > type=phone | ||
addresses | Contact Info > type=address | ||
urn:ietf:params:scim:schemas:extension:awork.com:2.0:User | Custom User Schema | ||
teams | User to Team assignment | Comma-separated list of team names. Case-sensitive. | |
absenceRegion | Absence Region of User | Name of the user's absence region in awork. Case-sensitive. | |
| userRole | Global permission role of the user | Name of the global user role. Case-sensitive. | |
| SCIM Group | awork User role | ||
id | Id | (not supported in Entra ID) | |
displayName | Name | (not supported in Entra ID) | |
members | User to Role assignment | (not supported in Entra ID) |
If there are fields you want to synchronize that aren't listed here, please let us know.
Note: awork provides its own extension for team assignments, absence regions, and user roles via the schema urn:ietf:params:scim:schemas:extension:awork.com:2.0:User. Mapping is done by the name of the team and absence region, so they must match exactly in awork and your SCIM provider.
awork user roles can be managed in two ways: either via the /Groups feature or the awork user extension.
- The awork user extension: For this, the extension attribute must be mapped to a text field of the user (or another field for SCIM sync) that contains the name of the user role (preferred)
- Using the SCIM /Groups feature: First, the available user roles must be synchronized. This is usually done manually by retrieving the available groups and mapping them based on defined rules. Note that an awork user can only have one user role at a time. So make sure you don't assign more than one role via group assignments, as this restriction is not directly supported by SCIM. If a role is renamed, a new role is added, or an existing role is deleted, you usually need to manually re-synchronize the available groups.
FAQ
Can I create/update user roles via SCIM?
No, you can only assign roles. To create or update permission roles in awork, go to Menu > Settings > Permissions.
Can I update email addresses via SCIM?
Yes, updating account emails and user contact emails is supported via SCIM. The account email for login and SSO is updated via the userName attribute.
Limitations:
- If the user is in multiple workspaces, the account email cannot be changed. The user must update their email manually in the profile settings.
- If the email is already used by another account, an error is returned. To use the email, the existing account must be deleted. This is done by deleting the user who is connected to that account.
Can I synchronize profile pictures via SCIM?
This is currently not supported by OneLogin and Okta providers. Therefore, we don't offer this functionality at this time.
What happens if I change the name of a permission role in awork?
After you rename the permission roles in awork, you need to update the groups in your SCIM client so the correct names are displayed. The assignment shouldn't change, since it's done based on the ID of the user role and not the display name.
What can I do if my SCIM integration isn't working as expected?
Check the users who can't be provisioned and look at their respective error messages. Send our support team the trace ID so we can check it for you. Make sure your client application is set up correctly and that the API Access element (entry in the list below the integrations) is present. Otherwise, delete the integration in awork and try setting it up again.
Can guest users be synchronized via SCIM?
Guest users cannot be created via the SCIM integration, since user creation automatically assigns the user role with the fewest permissions, which is not the guest role. If the user already exists in awork, the role will not be changed via SCIM integration unless this is explicitly configured via the SCIM Groups feature. Existing guest users can be synchronized via SCIM integration, but the SCIM Groups feature does not support assigning guest roles.
 Powered by happysupport.ai