
Setting Up Single Sign-On (SSO)
Configure Single Sign-On using OpenID Connect with Okta, Auth0, or Microsoft Entra ID to let your team log in without creating passwords
Single Sign-On (SSO) lets your team log in with an existing account from an Identity Provider - without setting a password in awork.
SSO is only available in the awork Enterprise plan.
Important: awork does not support SAML 2.0. Instead, awork uses the OpenID Connect standard based on OAuth 2.0.
Key benefits and use cases
SSO makes logging in simple and consistent:
- Let your team members use their existing Identity Provider accounts instead of creating a new awork password
- Use a modern OpenID Connect login based on OAuth 2.0
- Optionally disable other login methods once SSO is set up
How to set up Single Sign-On (SSO)
Choose a supported Identity Provider
Supported Identity Providers are:
- Okta (website)
- Auth0 (website)
- Microsoft Entra ID (formerly Azure AD) (website)
- OneLogin (website)
- GSuite (Google IAM: website)
- Keycloak (website)
If your Identity Provider isn't listed, contact us through Support and we'll check if we can integrate it.
Set up SSO in awork
- Navigate to Settings (gear icon in the bottom left of the main menu) > Integrations
- Open the Integration Library and select your desired provider
- Fill in the displayed fields and complete the setup
Note: Subdomain refers to your provider's subdomain, not your awork workspace URL.
Enable required Redirect URLs
The following Redirect URLs must be enabled:
https://app.awork.com/enterprise-login https://app.awork.com/api/v1/accounts/authorize-slack https://app.awork.com/api/v1/accounts/external/{Login Provider Name}
https://app.awork.com/api/v1/accounts/msteams/authorize https://app.awork.com/api/v1/accounts/authorize
Service-specific Redirect URLs:
- Web Login:
https://app.awork.com/enterprise-login - Slack Authorization:
https://app.awork.com/api/v1/accounts/authorize-slack - Microsoft Teams Authorization:
https://app.awork.com/api/v1/accounts/msteams/authorize - Zapier:
https://app.awork.com/api/v1/accounts/authorize
Configure SSO with Okta
- Open the Okta configuration at YOUR-SUBDOMAIN.okta.com/admin
- Go to the Applications section in the menu
- Add a new application and name it, for example, awork
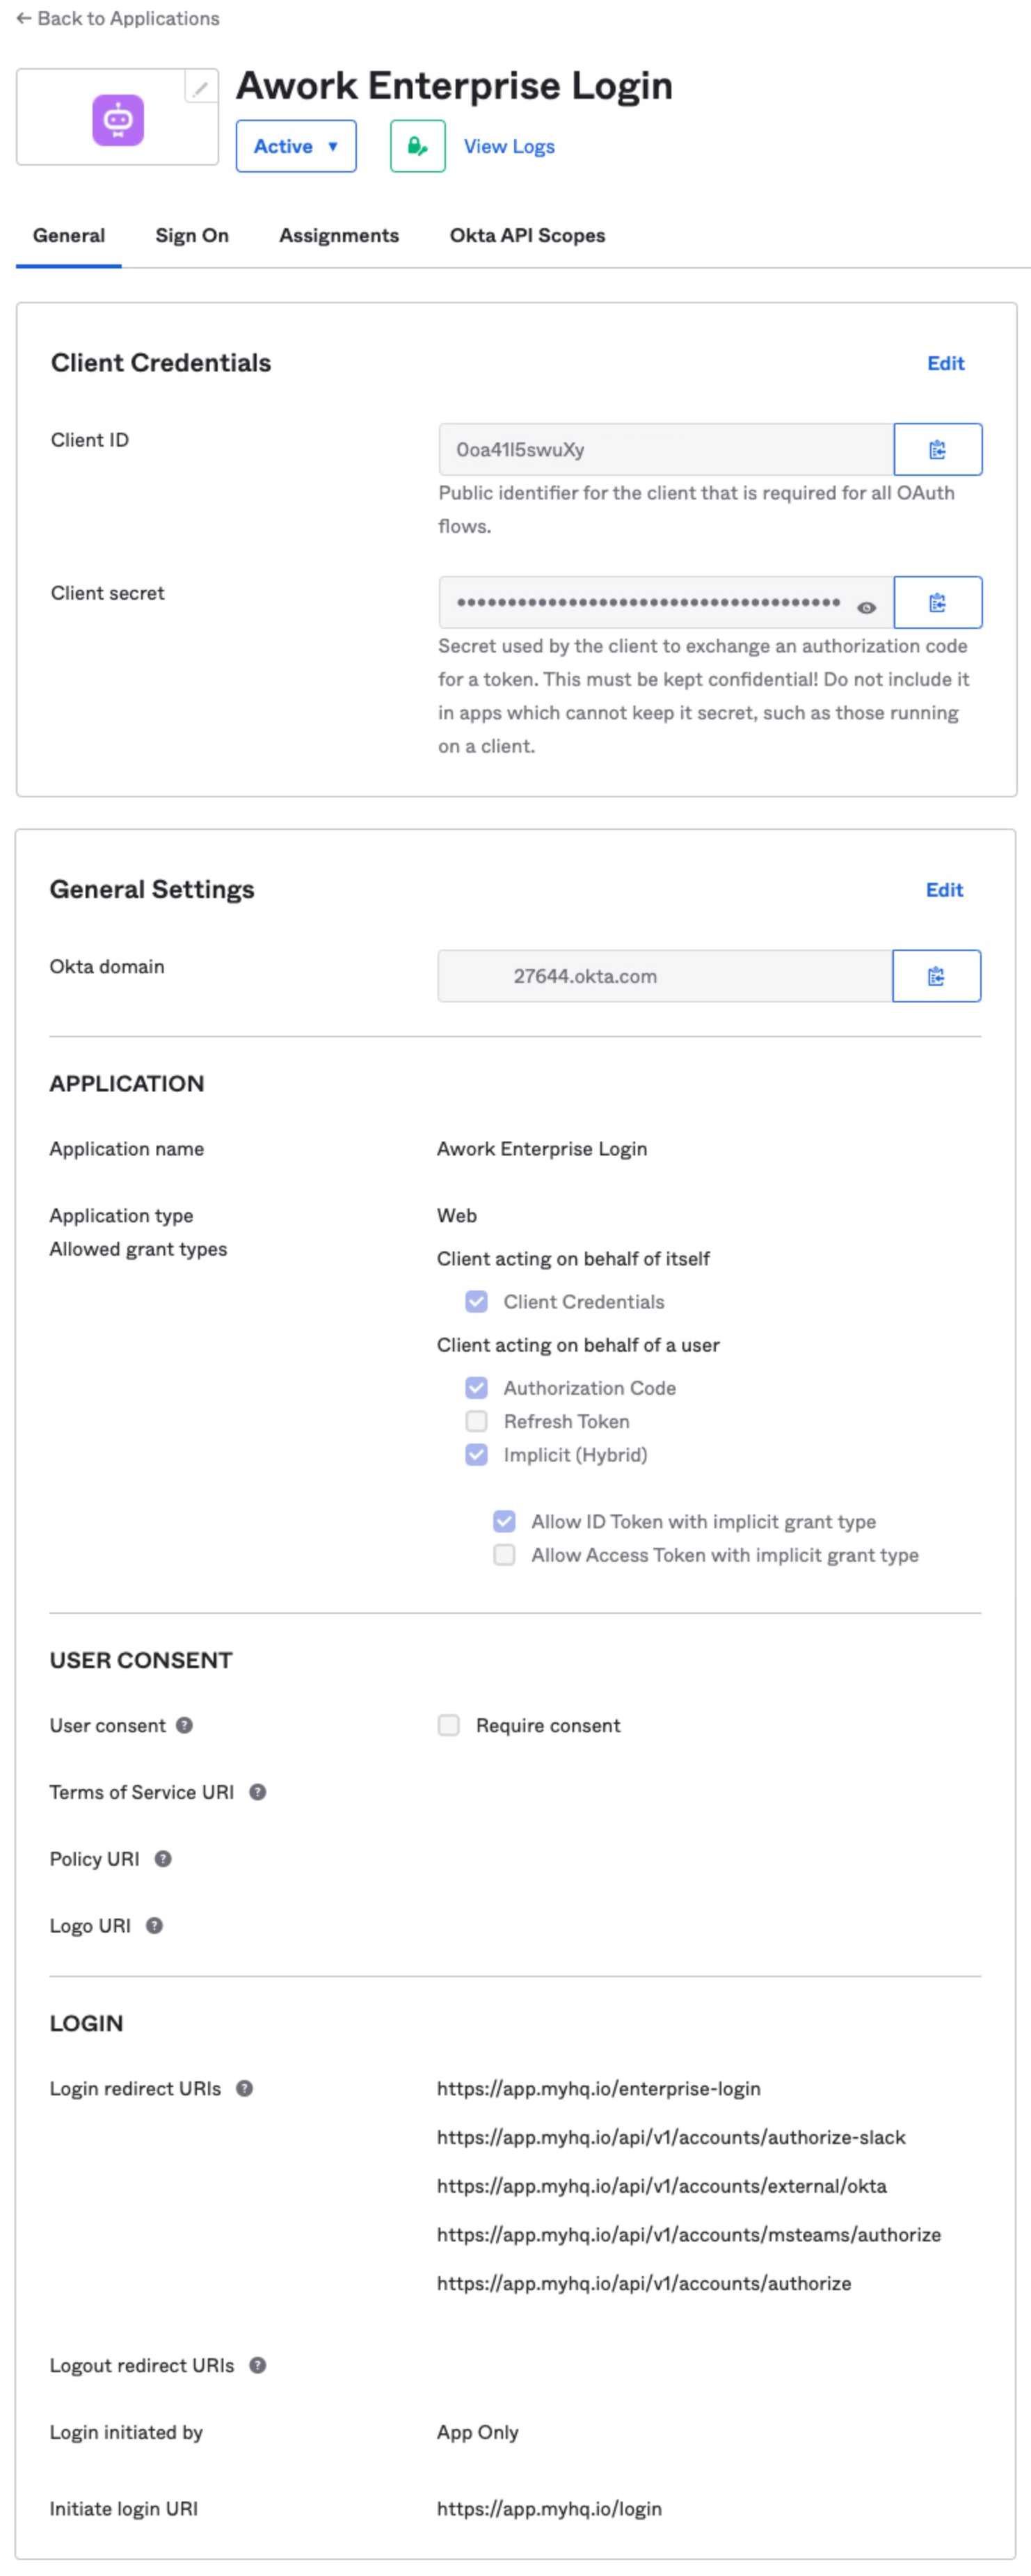
- Copy the Client ID, Client Secret, and Subdomain to the awork configuration and save by clicking Save
Important: The Login Redirect URLs must be set up correctly so Okta can properly redirect users. The Implicit (Hybrid) Flow (including the ID Token grant type) must be enabled. User consent is not required since awork only accesses the user's name and email address during login.
Additionally, set the following in Okta under the Login section:
- Initiate login URI: AWORK_SUBDOMAIN.awork.com/login
- Login redirect URIs: https://app.awork.com/enterprise-login https://app.awork.com/api/v1/accounts/authorize-slack https://app.awork.com/api/v1/accounts/external/okta https://app.awork.com/api/v1/accounts/msteams/authorize https://app.awork.com/api/v1/accounts/authorize
 )
)
Configure SSO with Auth0
- Open the Auth0 configuration
- Go to the Applications section in the menu
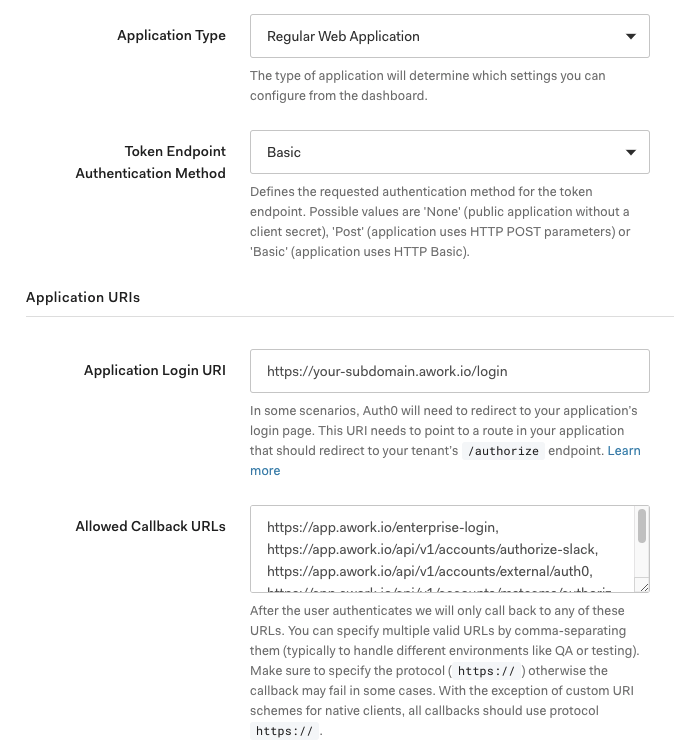
- Add a new application of type Regular Web Applications and name it, for example, awork
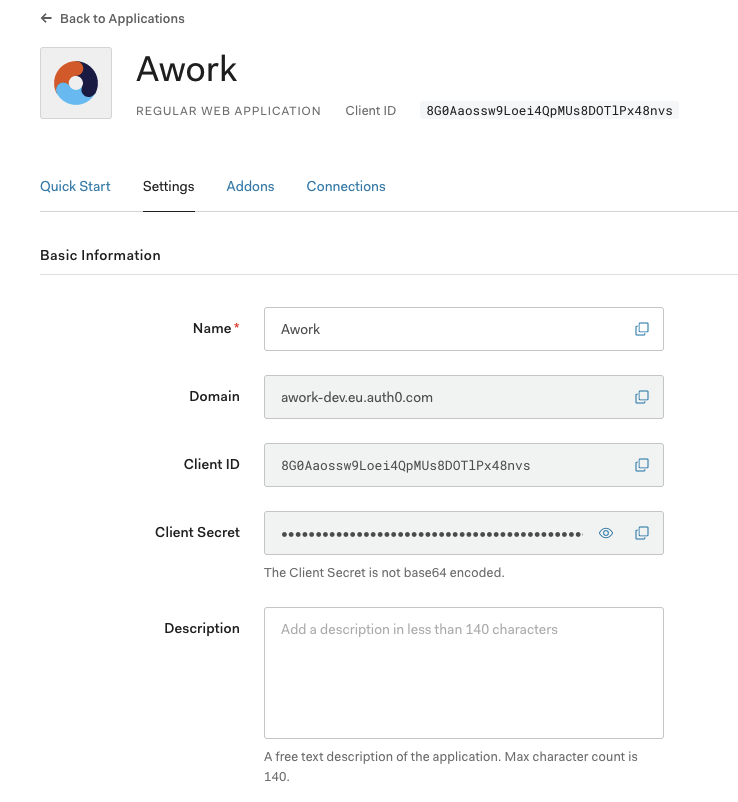
- Copy the Client ID, Client Secret, and Subdomain to the awork configuration and save
- Set the following URLs in the Application URLs section:
- Application login URL: AWORK_SUBDOMAIN.awork.com/login
- Allowed callback URLs: https://app.awork.com/enterprise-login, https://app.awork.com/api/v1/accounts/authorize-slack, https://app.awork.com/api/v1/accounts/external/auth0, https://app.awork.com/api/v1/accounts/msteams/authorize, https://app.awork.com/api/v1/accounts/authorize
- Allowed web origins: AWORK_SUBDOMAIN.awork.com app.awork.com
Note: All other settings are already configured correctly by default.
 )
)
 )
)
Configure SSO with OneLogin
- Open the OneLogin configuration at SUBDOMAIN.onelogin.com
- Go to the Applications section in the menu
- Add a new application by clicking Add App in the top right and name it, for example, awork
- Select OpenID Connect (OIDC) as the type, set the name to, for example, awork, and save
- In the SSO section you'll find Client ID and Client Secret. Find the Subdomain in your OneLogin account URL ({Subdomain}.onelogin.com). Enter these values in awork and save
- Set these URLs in the Configuration section:
- Login URL: AWORK_SUBDOMAIN.awork.com/login
- Redirect URIs: https://app.awork.com/enterprise-login https://app.awork.com/api/v1/accounts/authorize-slack https://app.awork.com/api/v1/accounts/external/onelogin https://app.awork.com/api/v1/accounts/msteams/authorize https://app.awork.com/api/v1/accounts/authorize
Configure SSO with Microsoft Entra ID (formerly Azure AD)
-
Open the Entra ID configuration in the Azure Portal
-
Click on App registrations in the Manage section of the menu
-
Add a new registration and name it, for example, awork SSO
-
Set Supported account types to Accounts in this organizational directory only (your Domain - single tenant) and enter
https://app.awork.com/enterprise-loginas the Redirect URI for the Web platform. Then click Register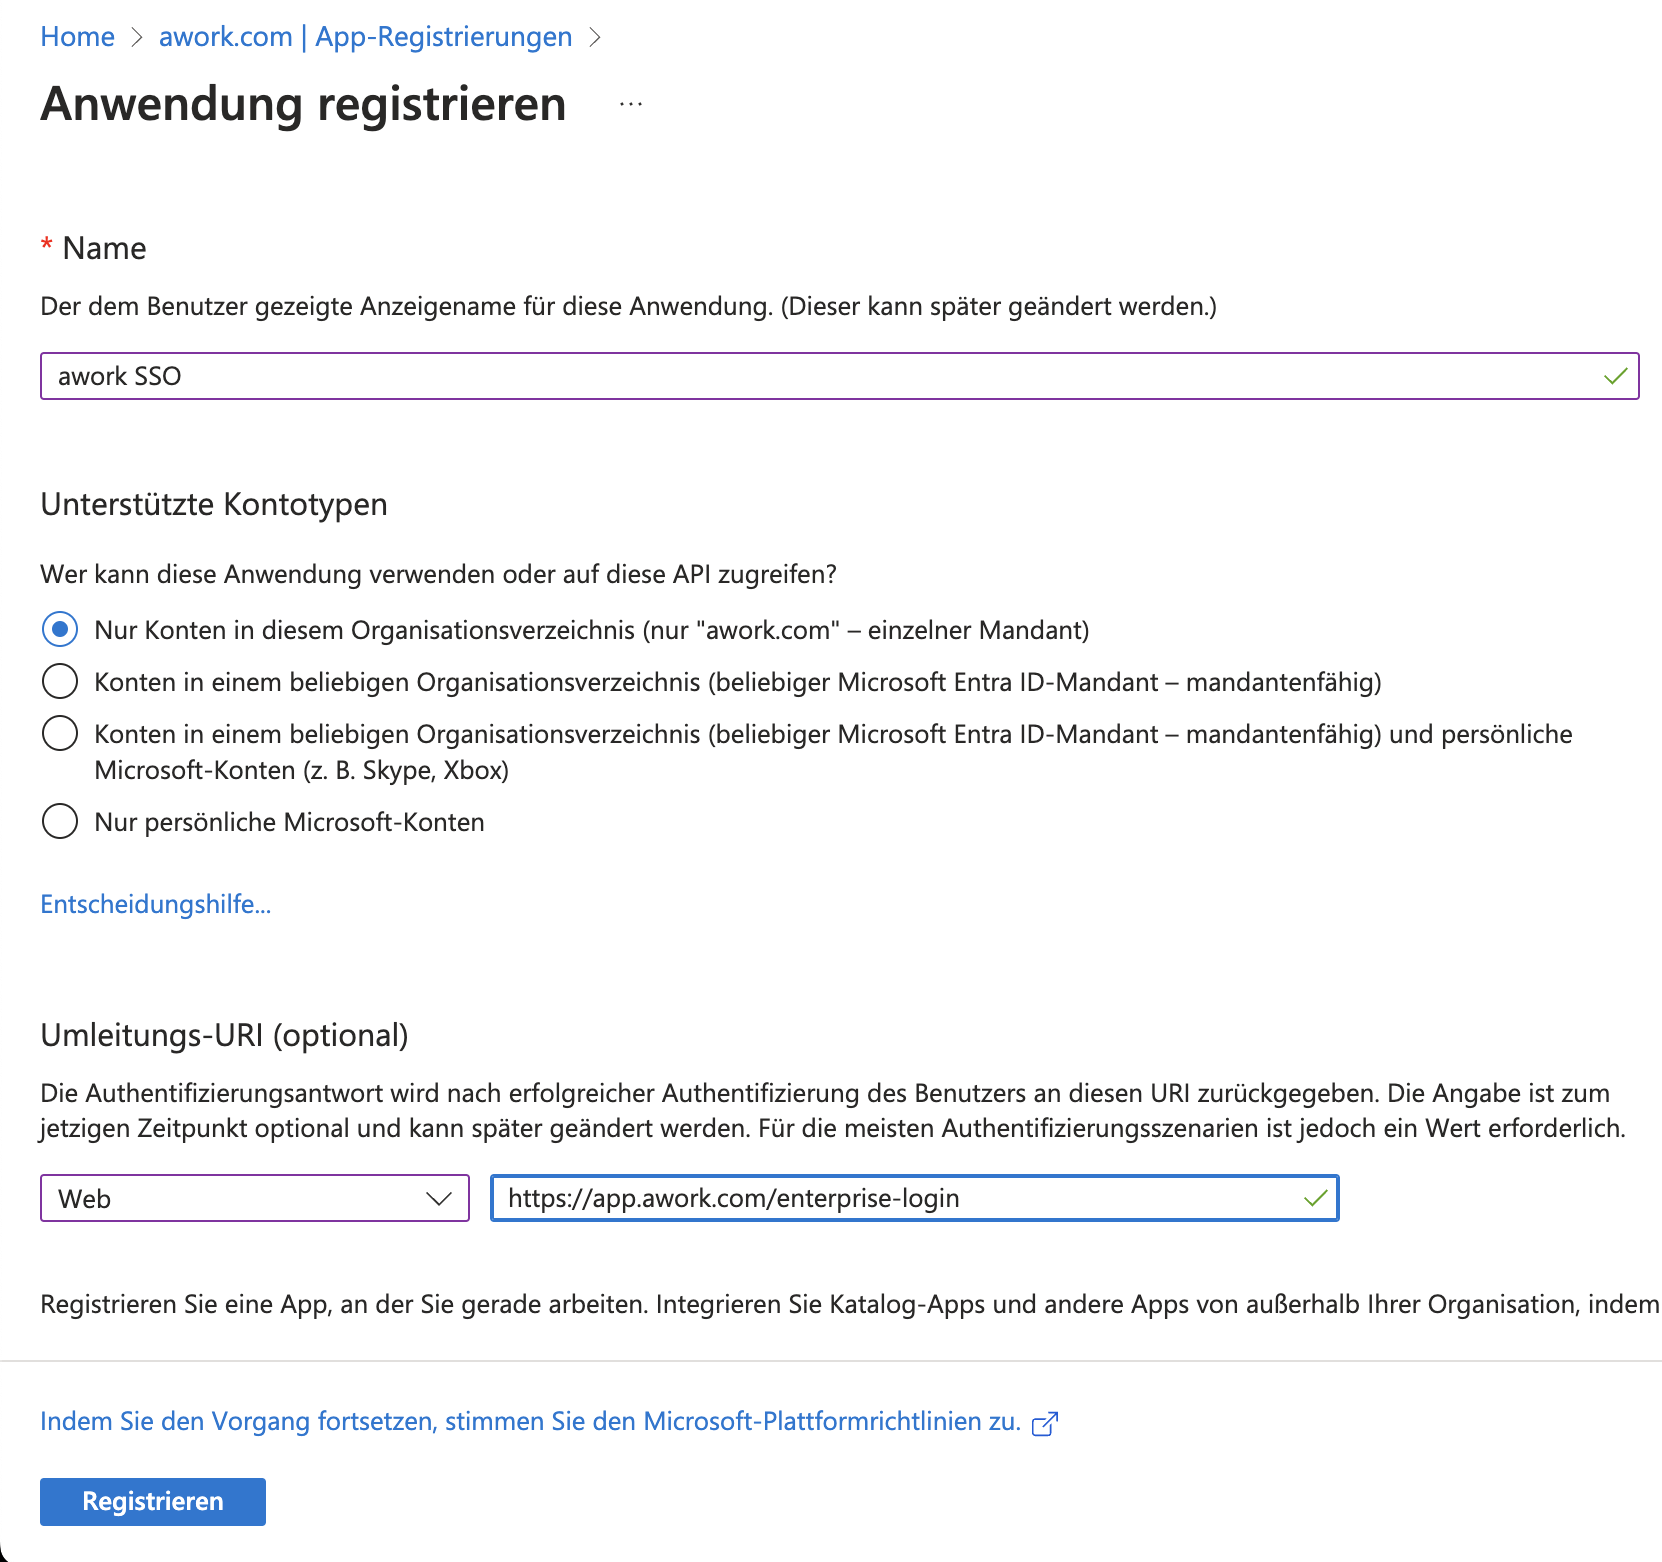 )
) -
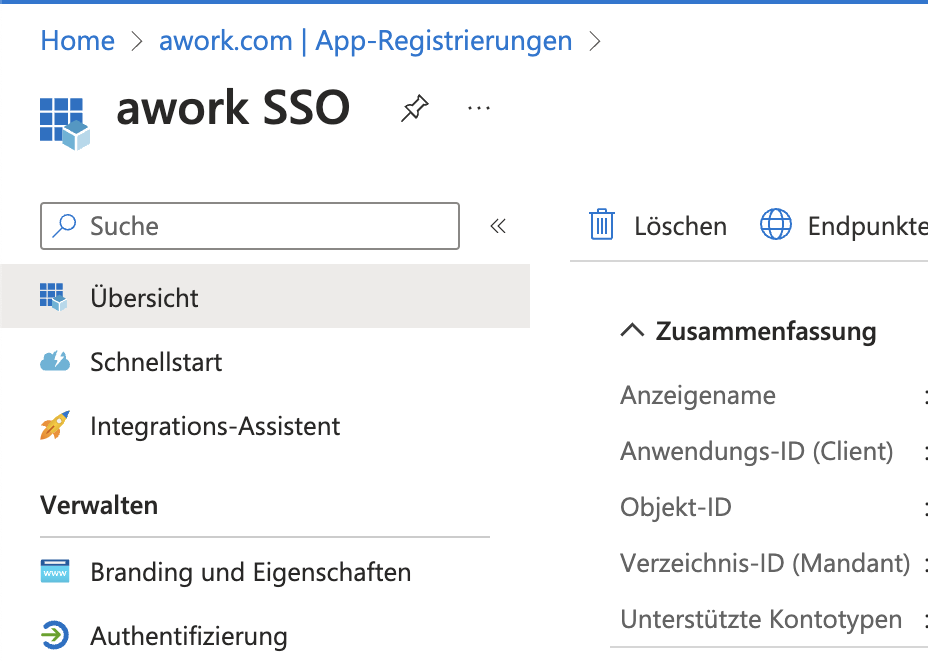
On the Overview page you'll find the Application (Client) ID (= Client ID in awork) and the Directory (Tenant) ID (= Subdomain in awork)
 )
) -
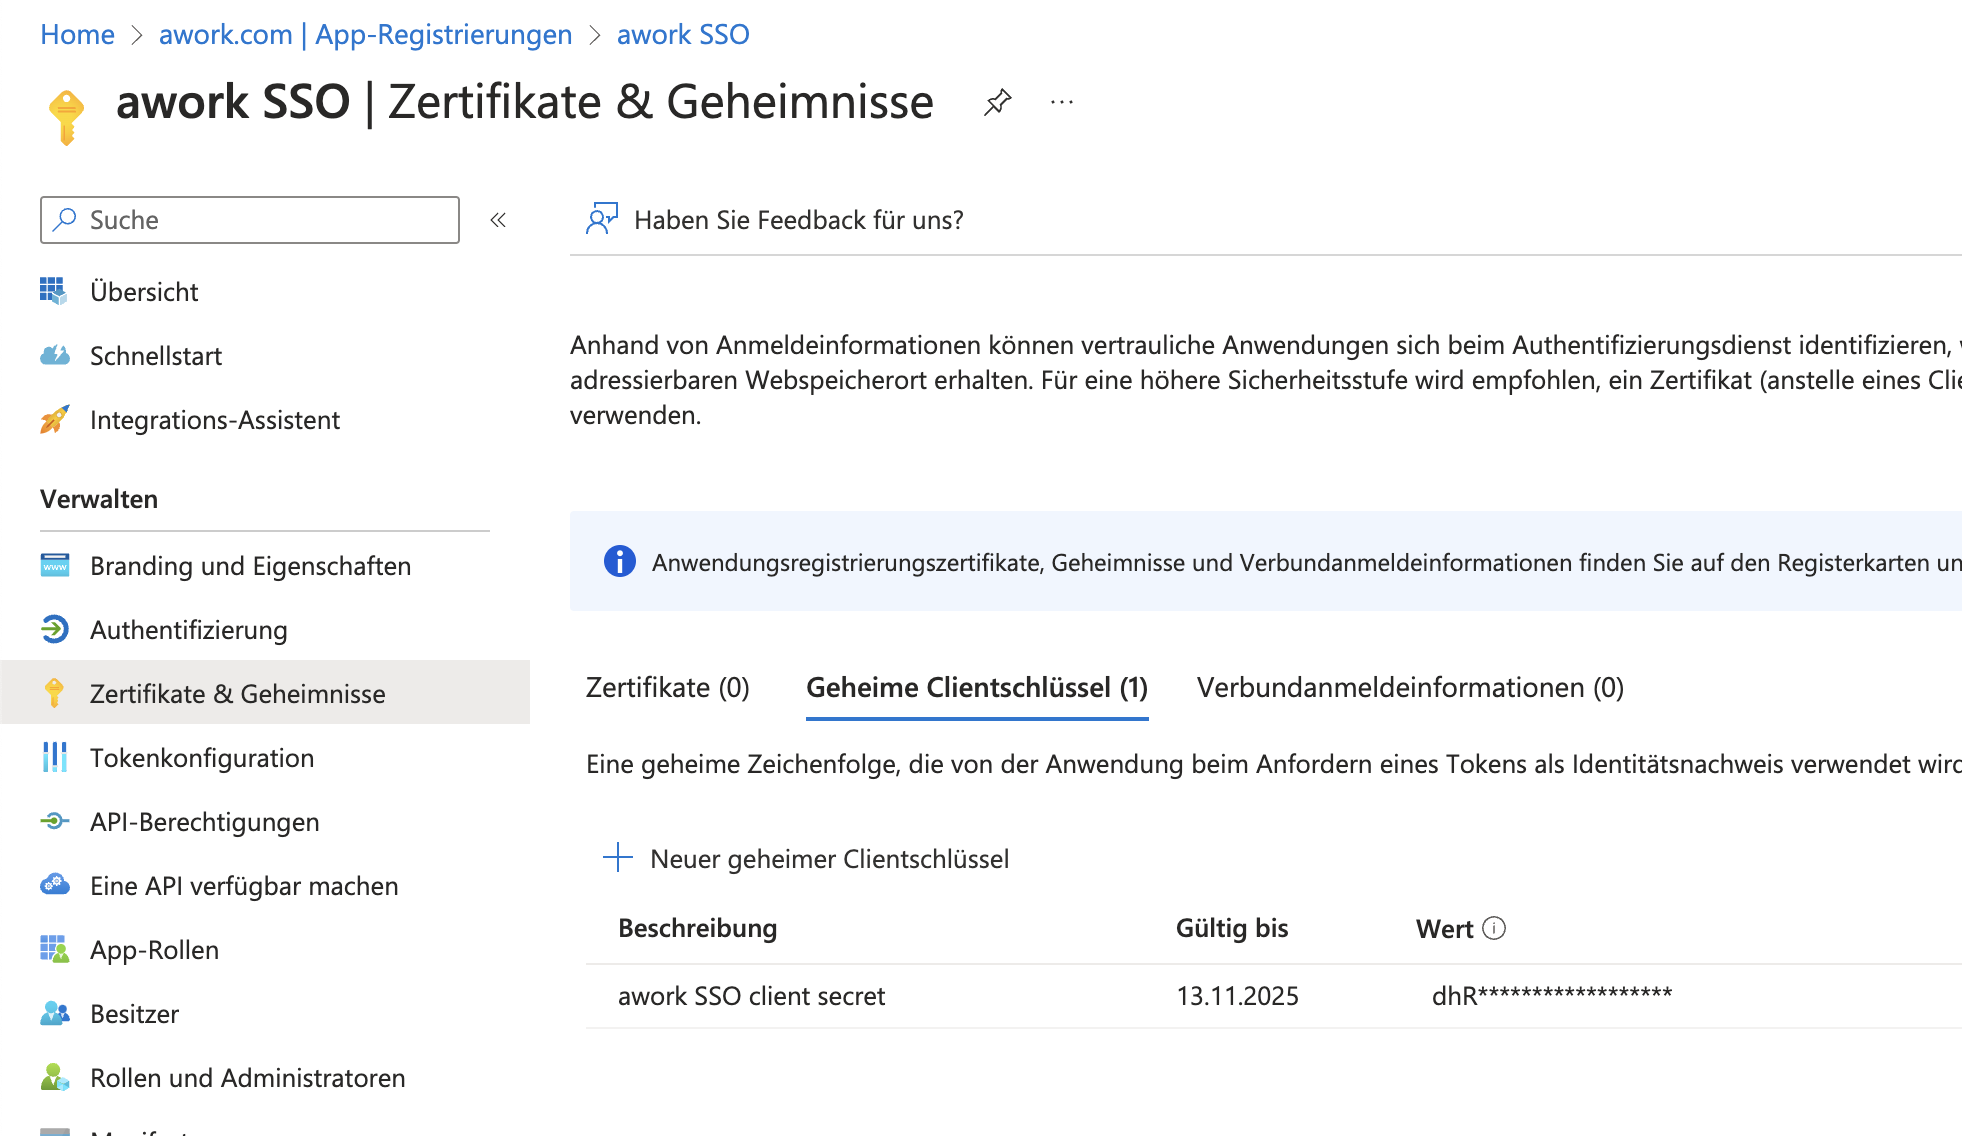
Under Certificates & secrets you can create a new Client secret and enter the value in awork as Client Secret.
Important: Copy the value, not the Secret ID
 )
)
To rotate Client secrets, you must delete the SSO integration in awork and add it again with the new secret.
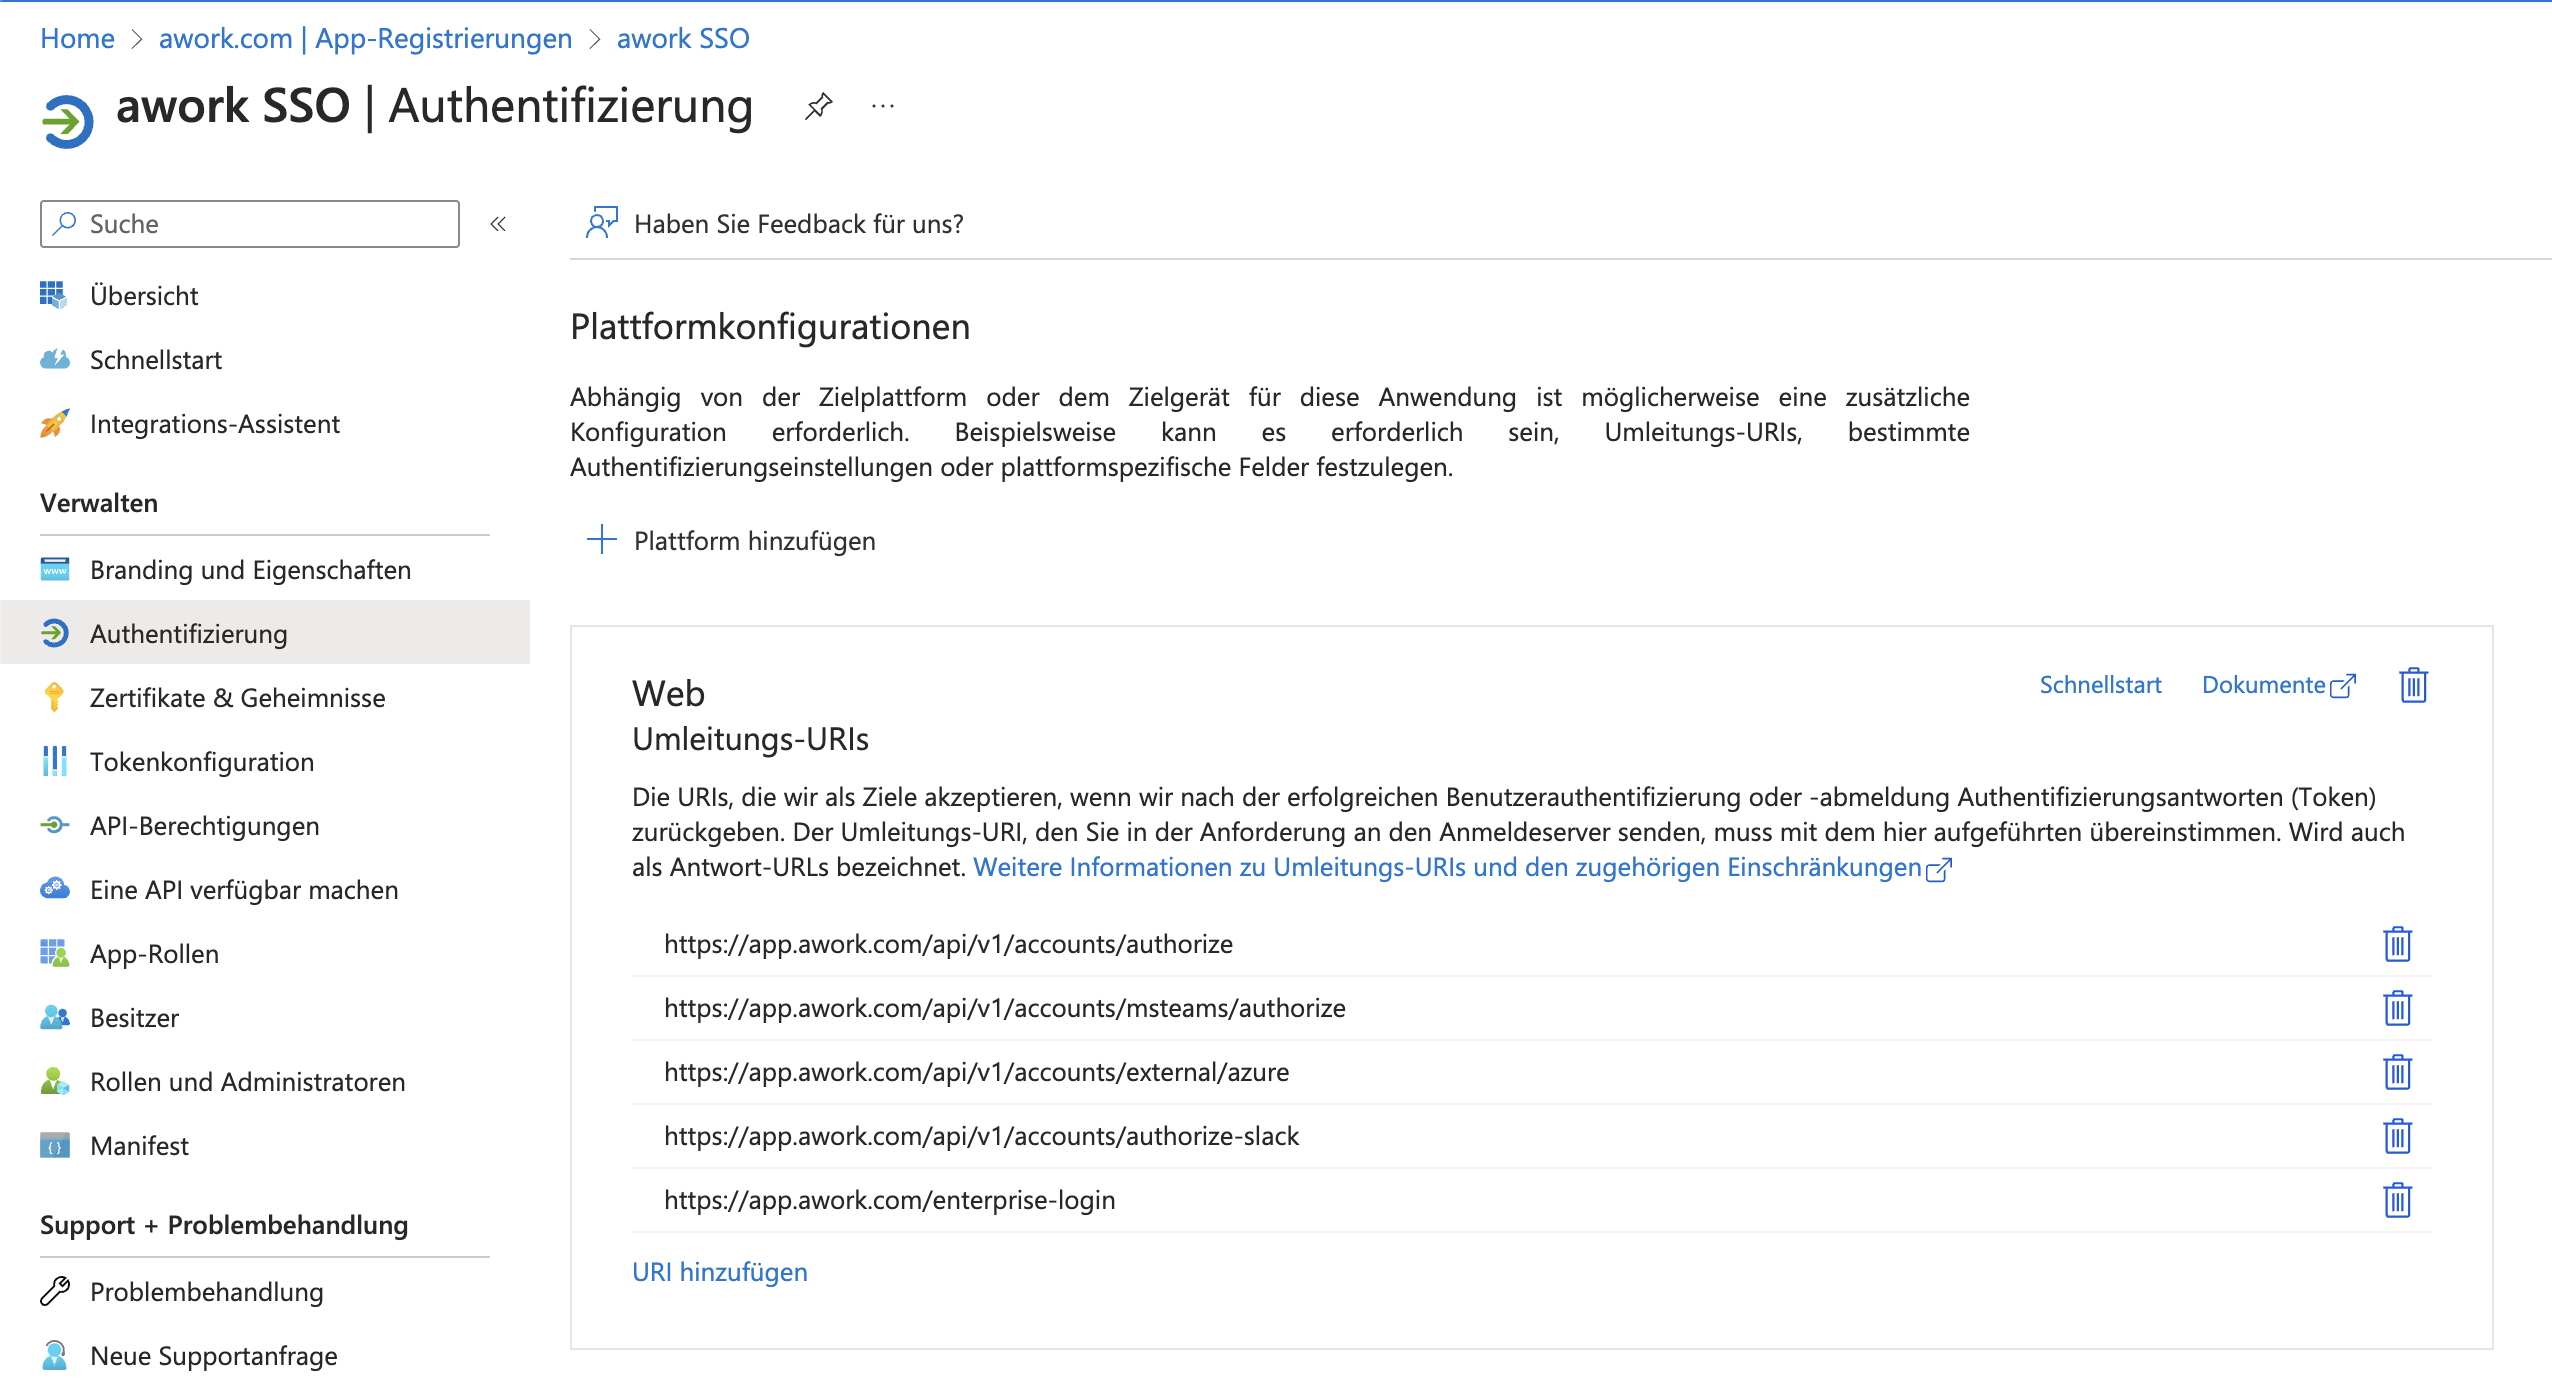
- Under Authentication enter the following Redirect URLs for a Web platform:
https://app.awork.com/enterprise-login https://app.awork.com/api/v1/accounts/authorize-slack https://app.awork.com/api/v1/accounts/external/azure https://app.awork.com/api/v1/accounts/msteams/authorize https://app.awork.com/api/v1/accounts/authorize
 )
)
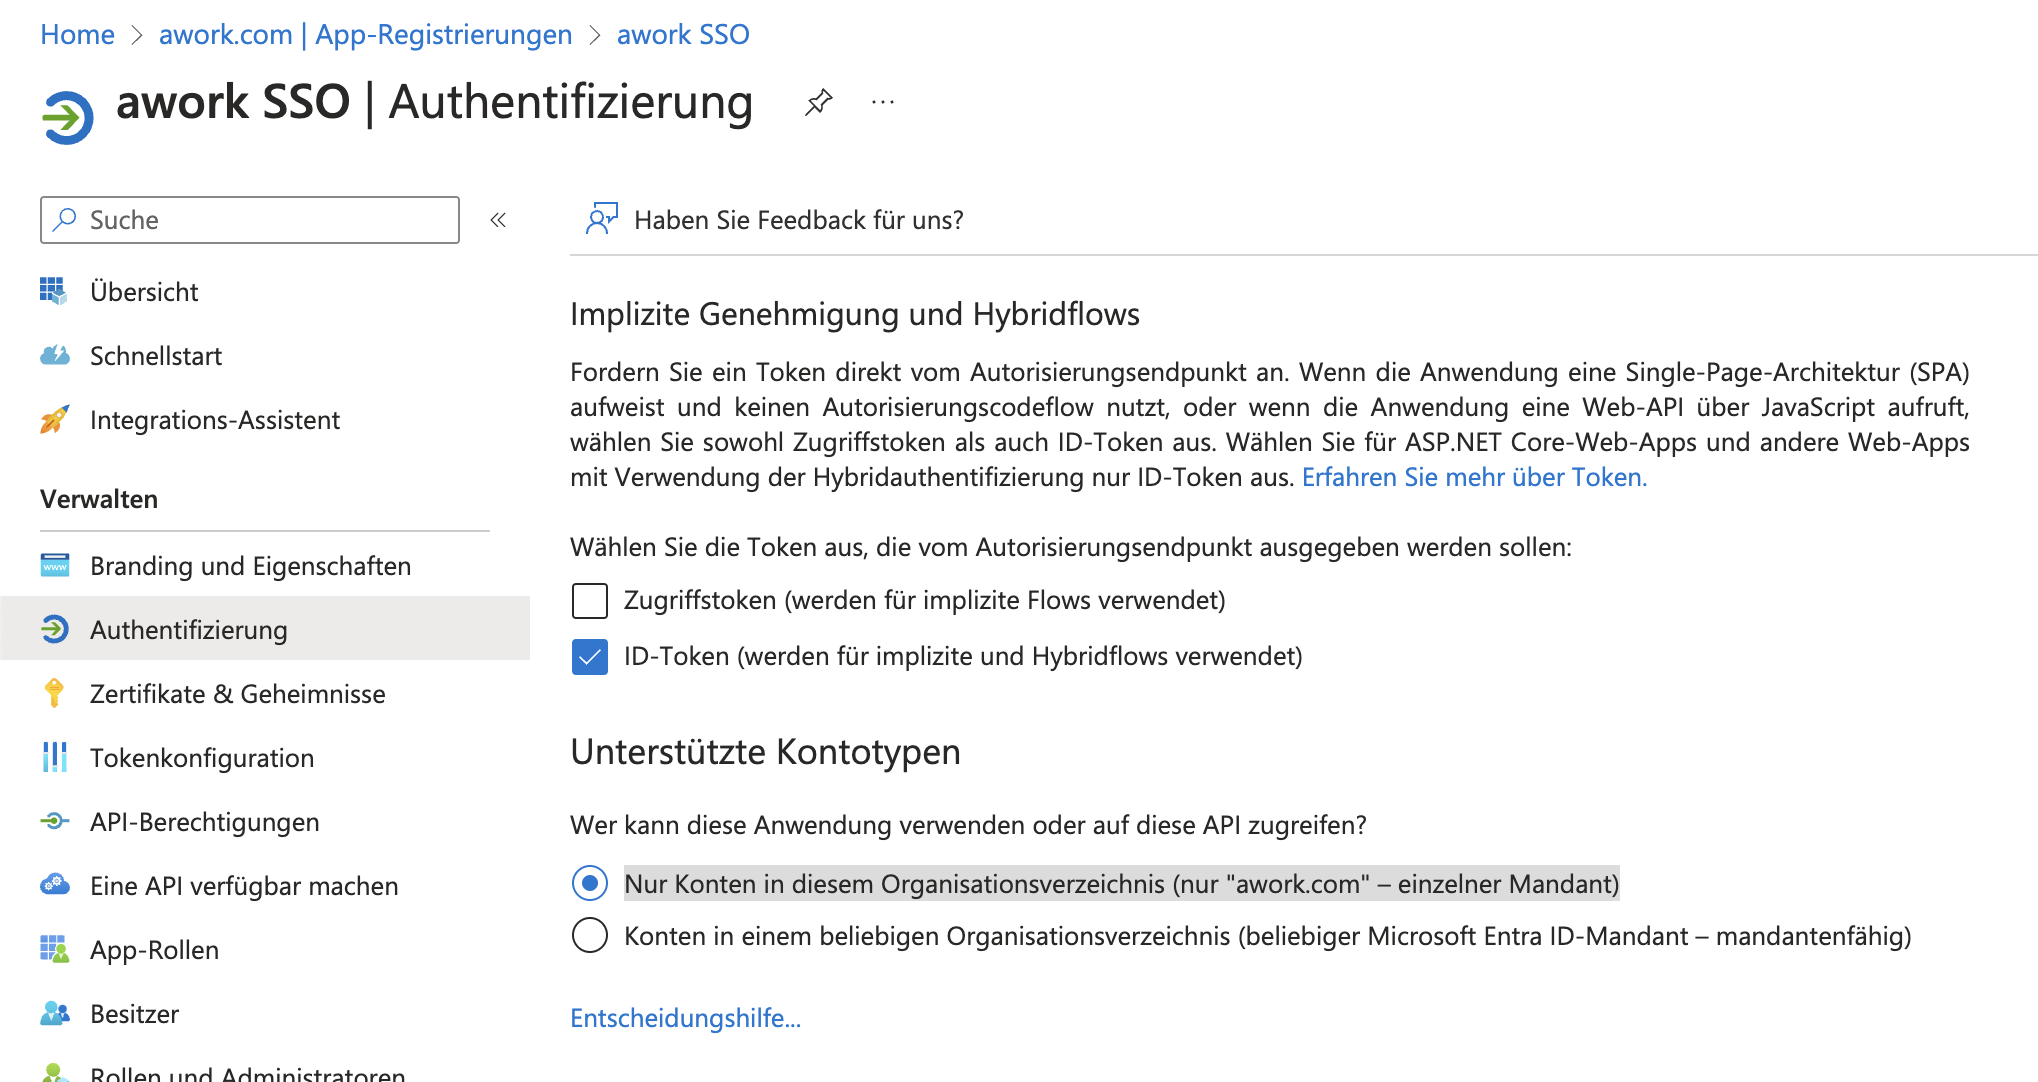
Under Implicit grant and hybrid flows you must check the box for ID tokens. Under Supported account types select Accounts in this organizational directory only (your Domain - single tenant)
 )
)
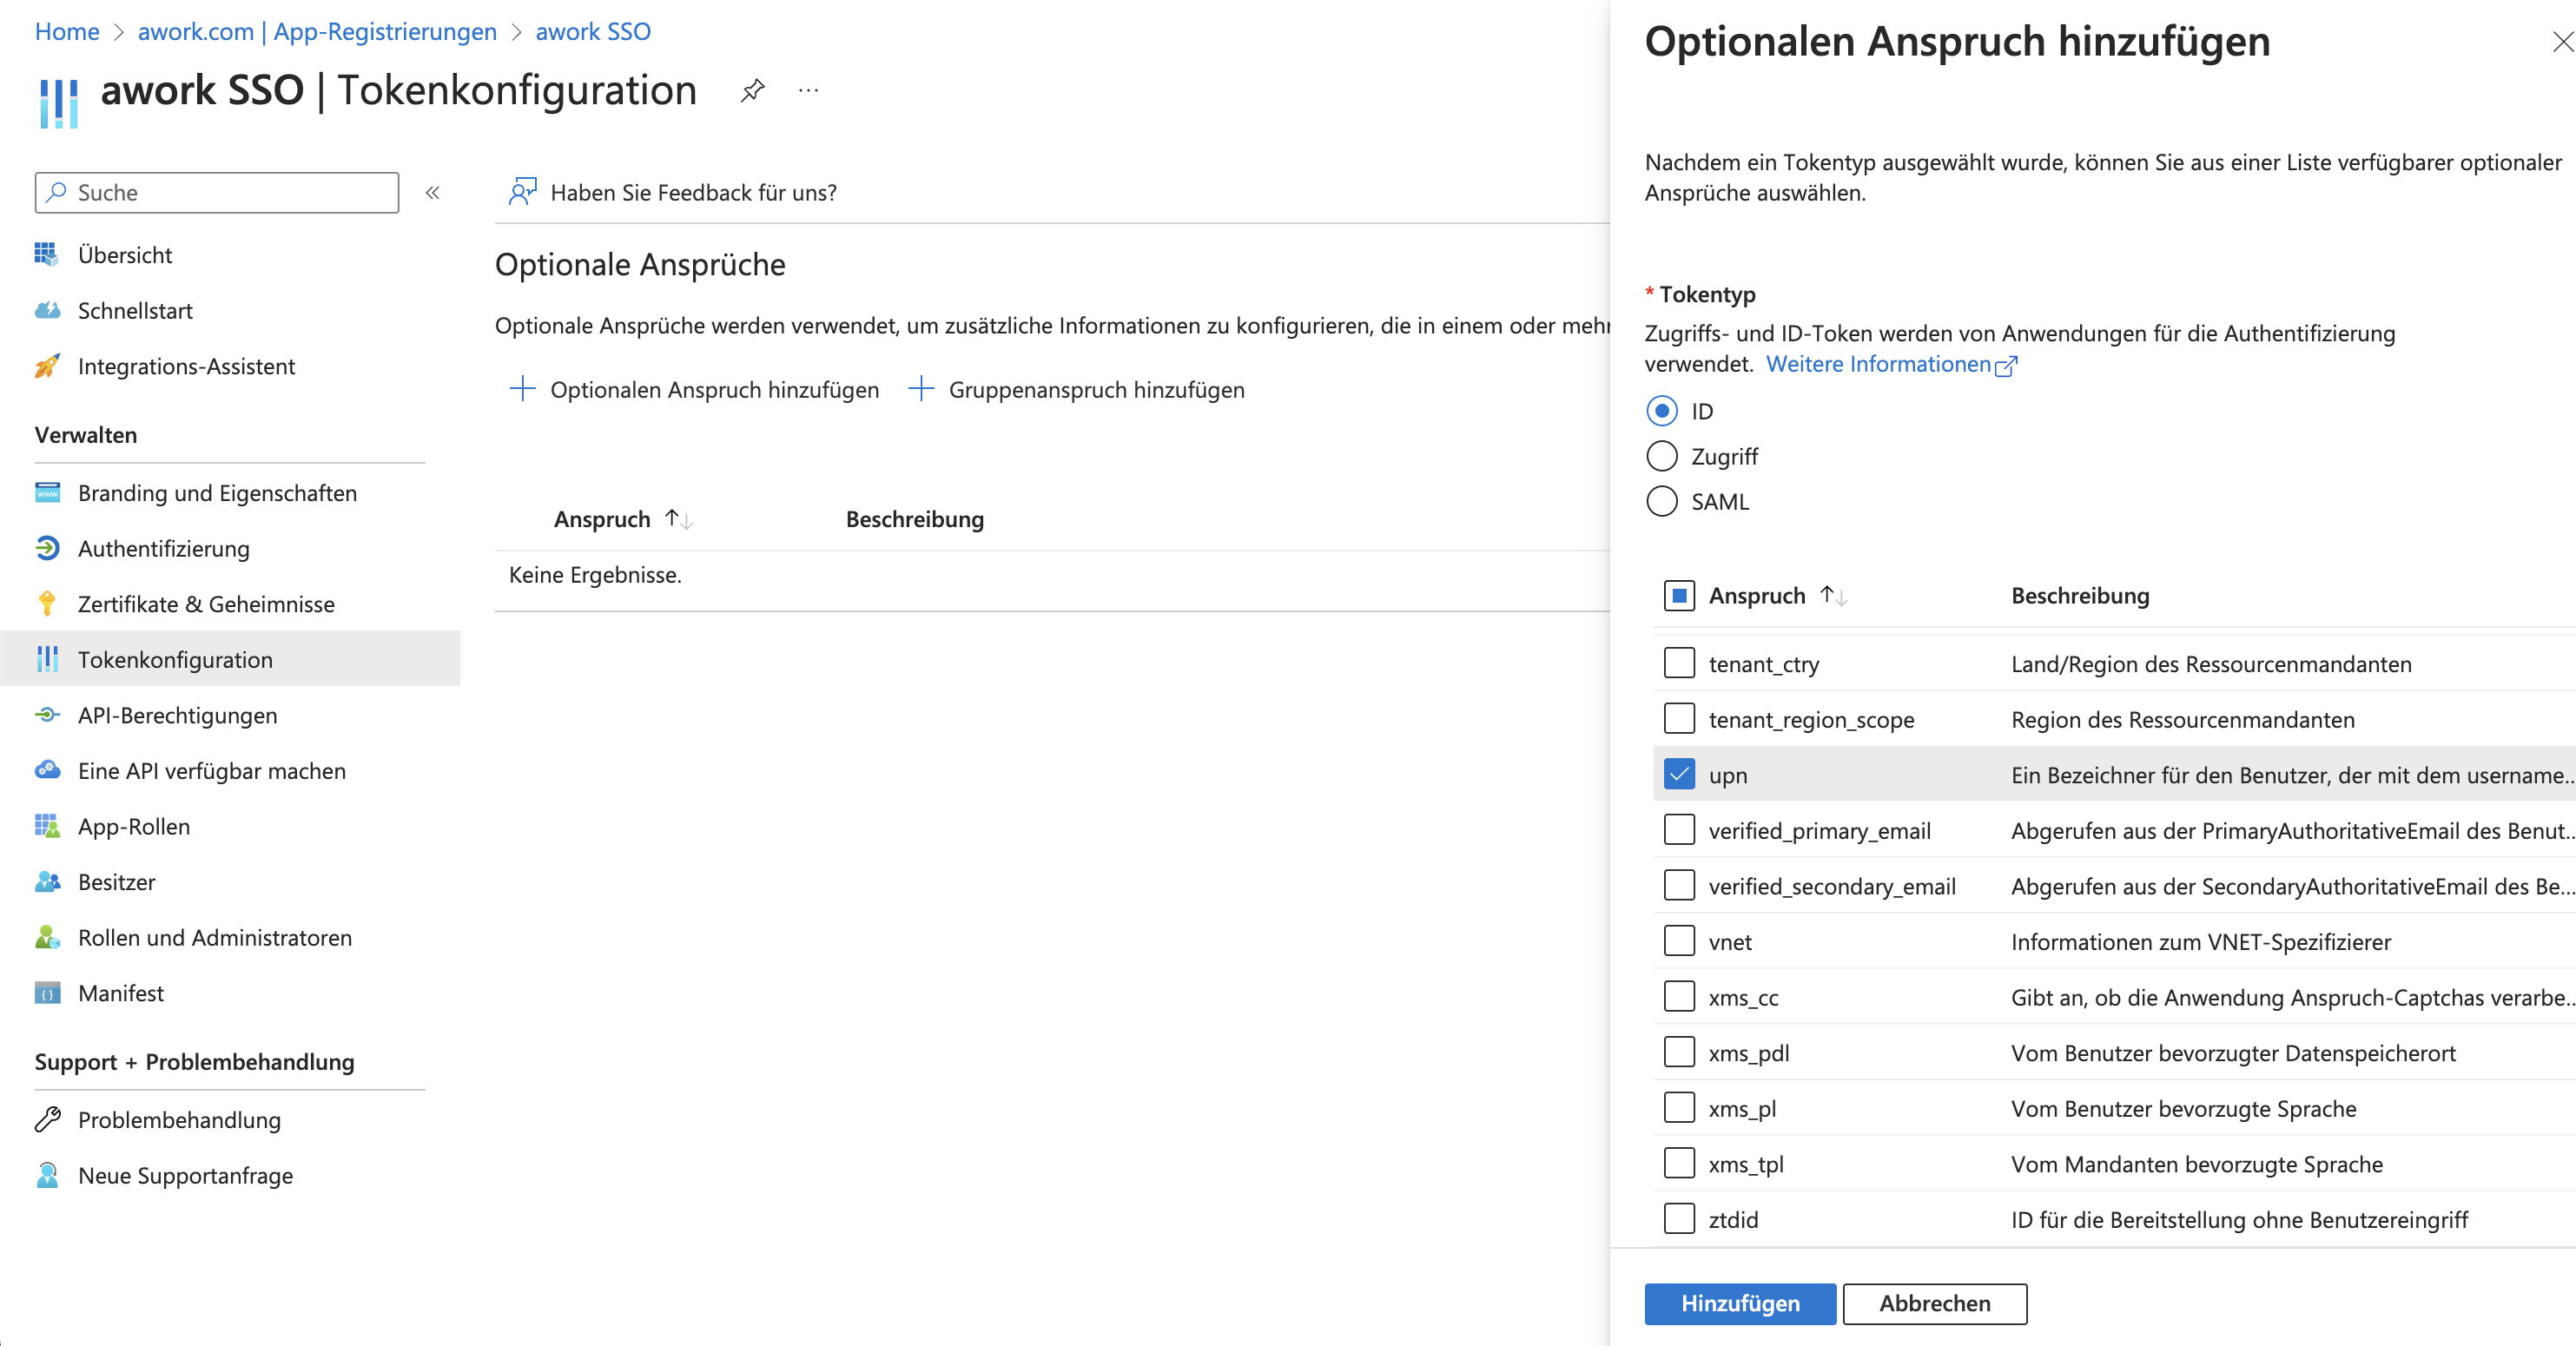
By default, the login flow uses the preferred_username claim from the Entra user. If you'd like to use UPN instead, you can configure UPN as an optional claim in the Token configuration:
- Token type:
ID - Claim:
upn
Then click Add.
 )
)
Important: UPN as an optional claim is only supported for app registrations for tenants, not for personal Microsoft accounts. Make sure this is configured correctly in the Authentication section.
Make sure the email address returned by Entra ID matches the email address of the user's awork account. In tenants where userPrincipalName and the actual email address differ, the correct email address may come from mail or another appropriate attribute.
Configure SSO with GSuite (Google IAM)
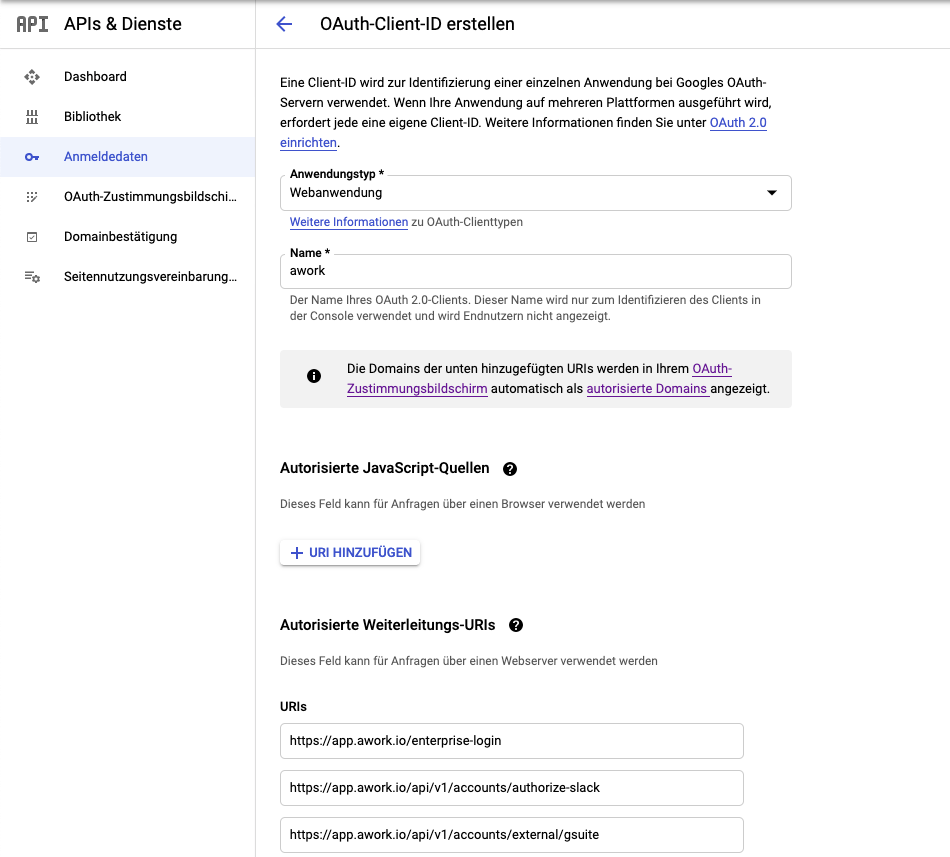
- Go to https://console.cloud.google.com/apis/credentials and select your project
- Click on Create credentials and select OAuth client ID
- Select Web application as the type
- Give it a name, for example, awork
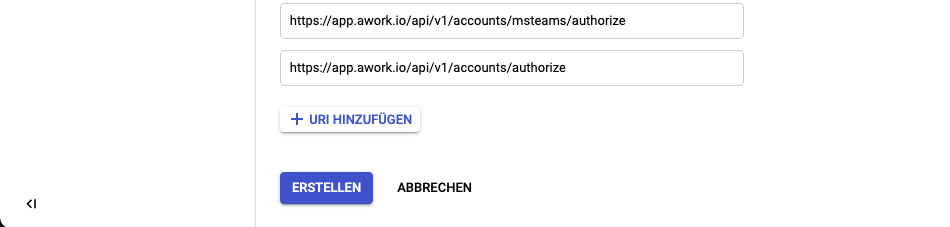
- Add the following Redirect URLs: https://app.awork.com/enterprise-login https://app.awork.com/api/v1/accounts/authorize-slack https://app.awork.com/api/v1/accounts/external/gsuite https://app.awork.com/api/v1/accounts/msteams/authorize https://app.awork.com/api/v1/accounts/authorize
- Save by clicking Create
- On the right you'll find the Client ID and the Client Secret that you need to enter in awork
 )
)
 )
)
For more information about SSO with GSuite, click here.
Configure SSO with Keycloak
Important: Please contact our Support if you want to set up SSO via Keycloak, as this option is not yet available in the web application.
To set up Keycloak SSO via OpenID Connect:
-
Log in to your Keycloak Admin Console
-
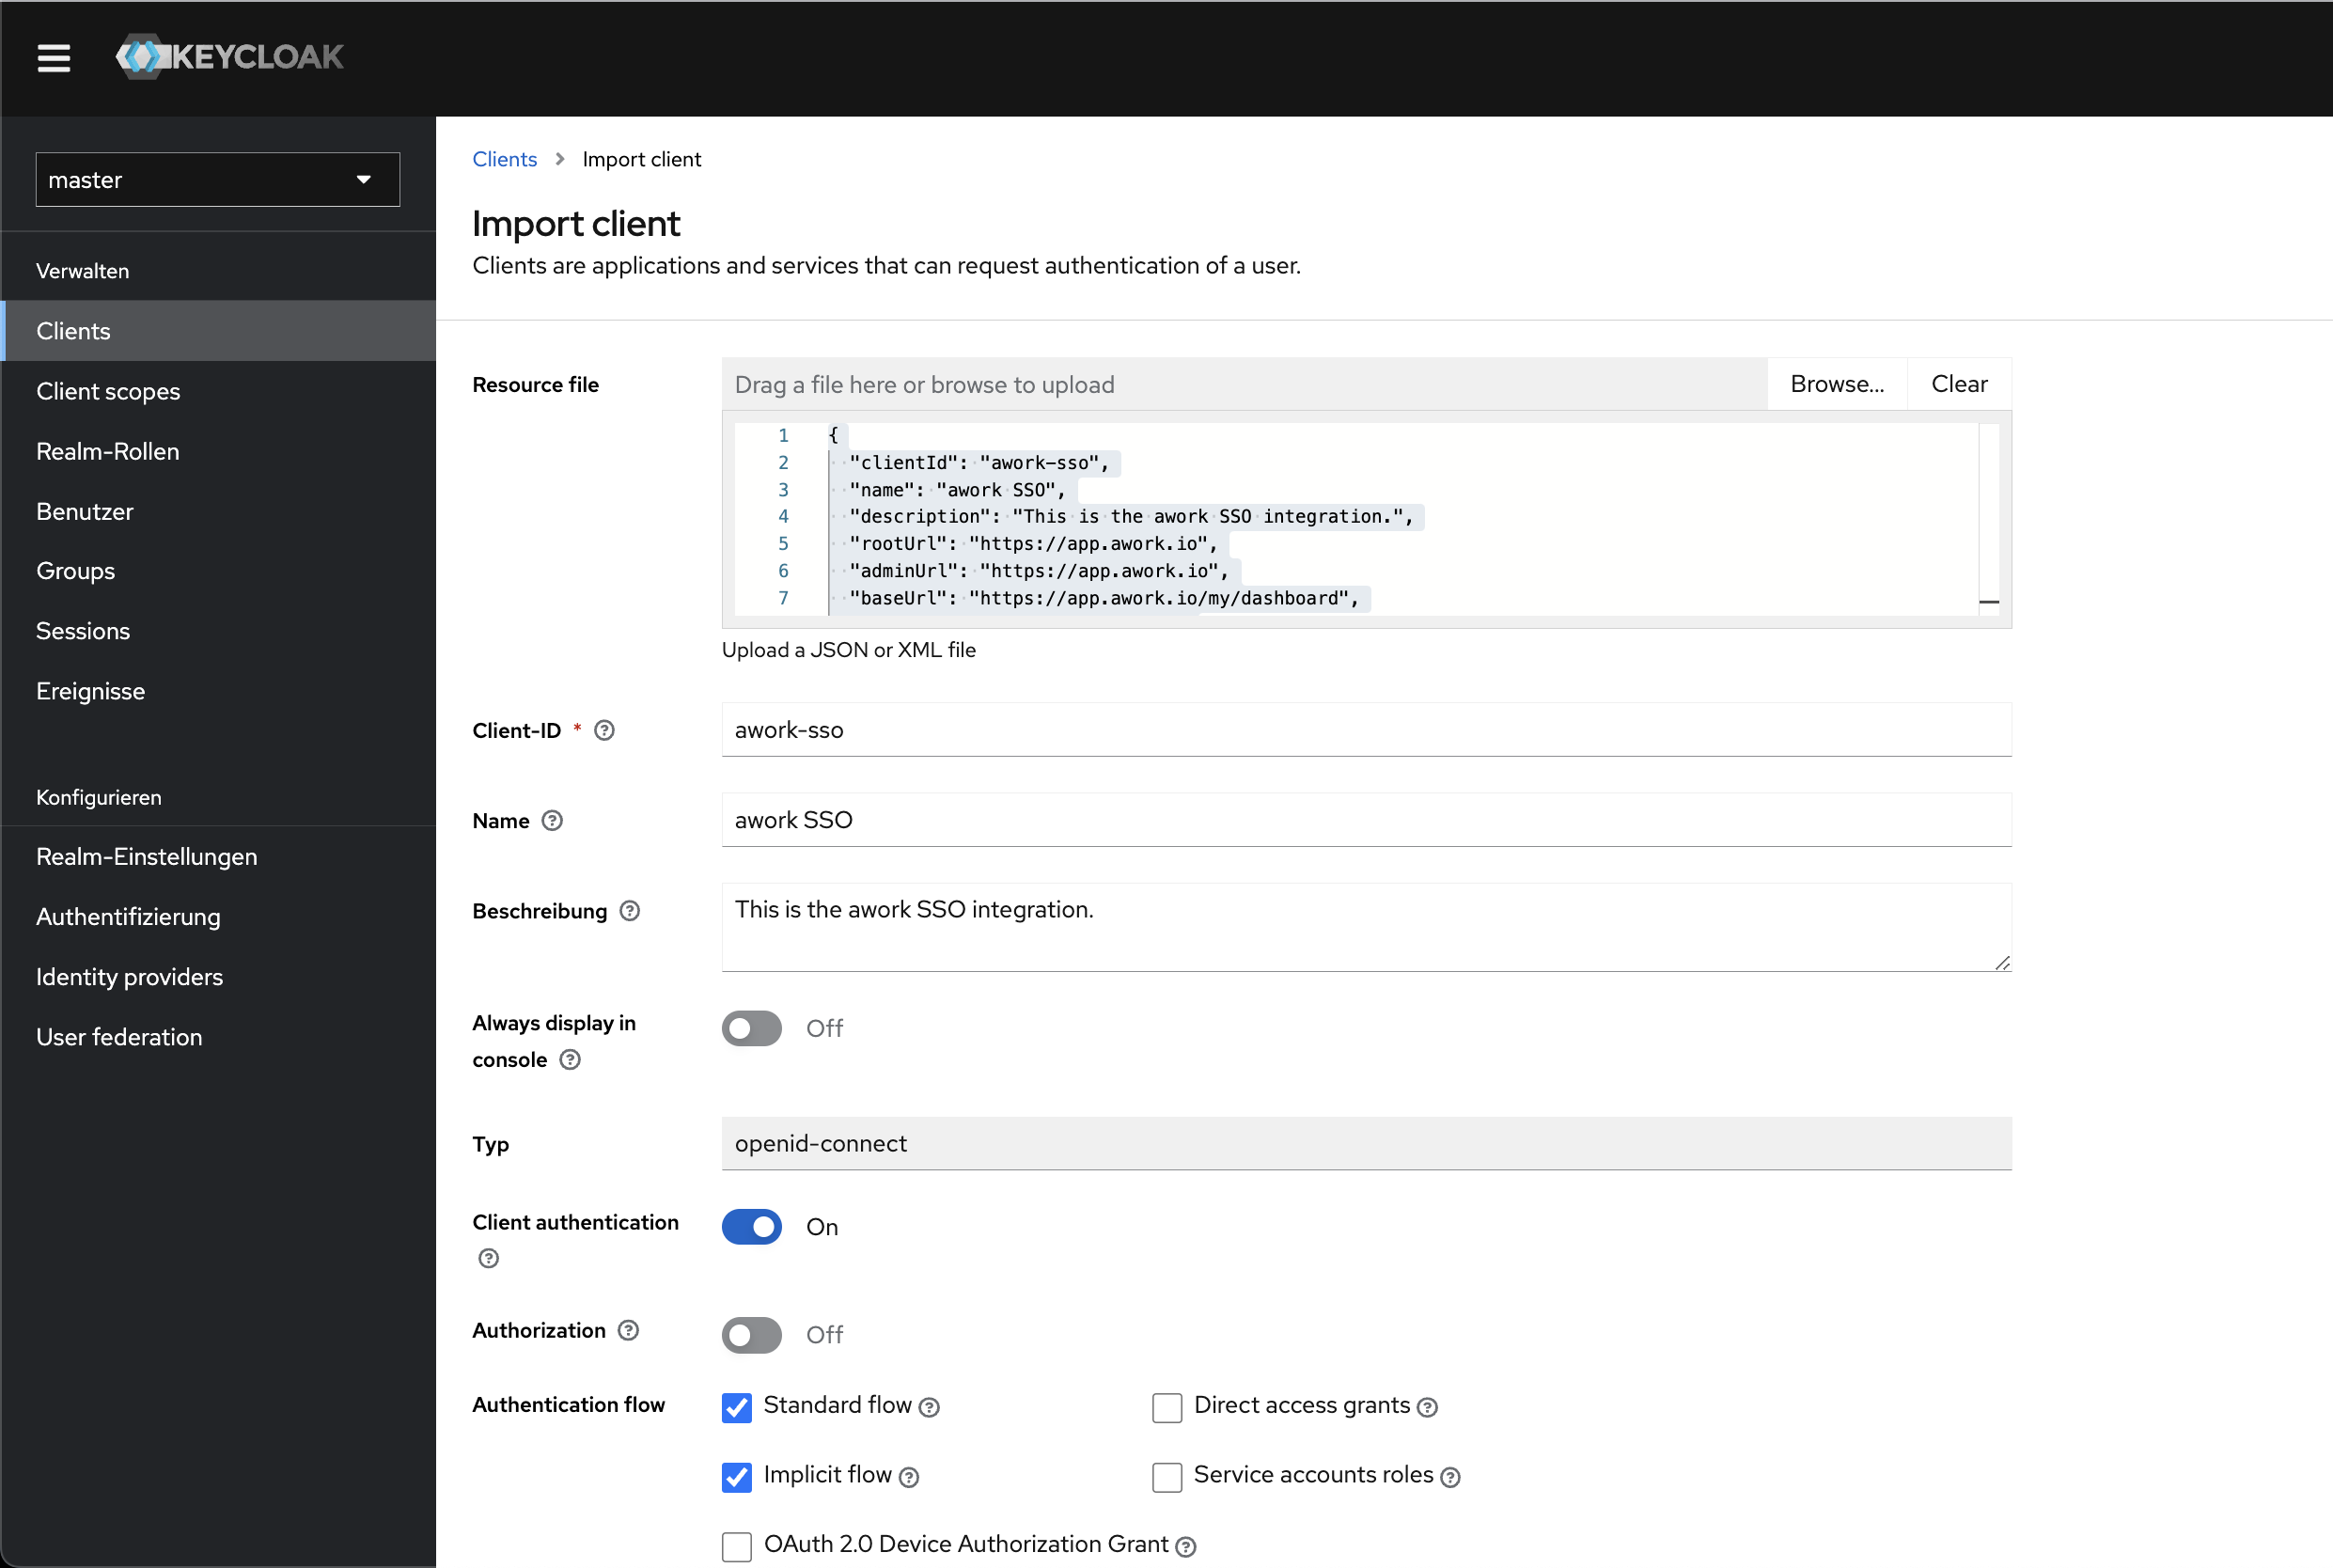
Navigate to Clients
-
Download the client configuration file: Keycloak awork Client Configuration
-
Drag the file into the resource field to import the required settings
-
Save the new client
 )
) -
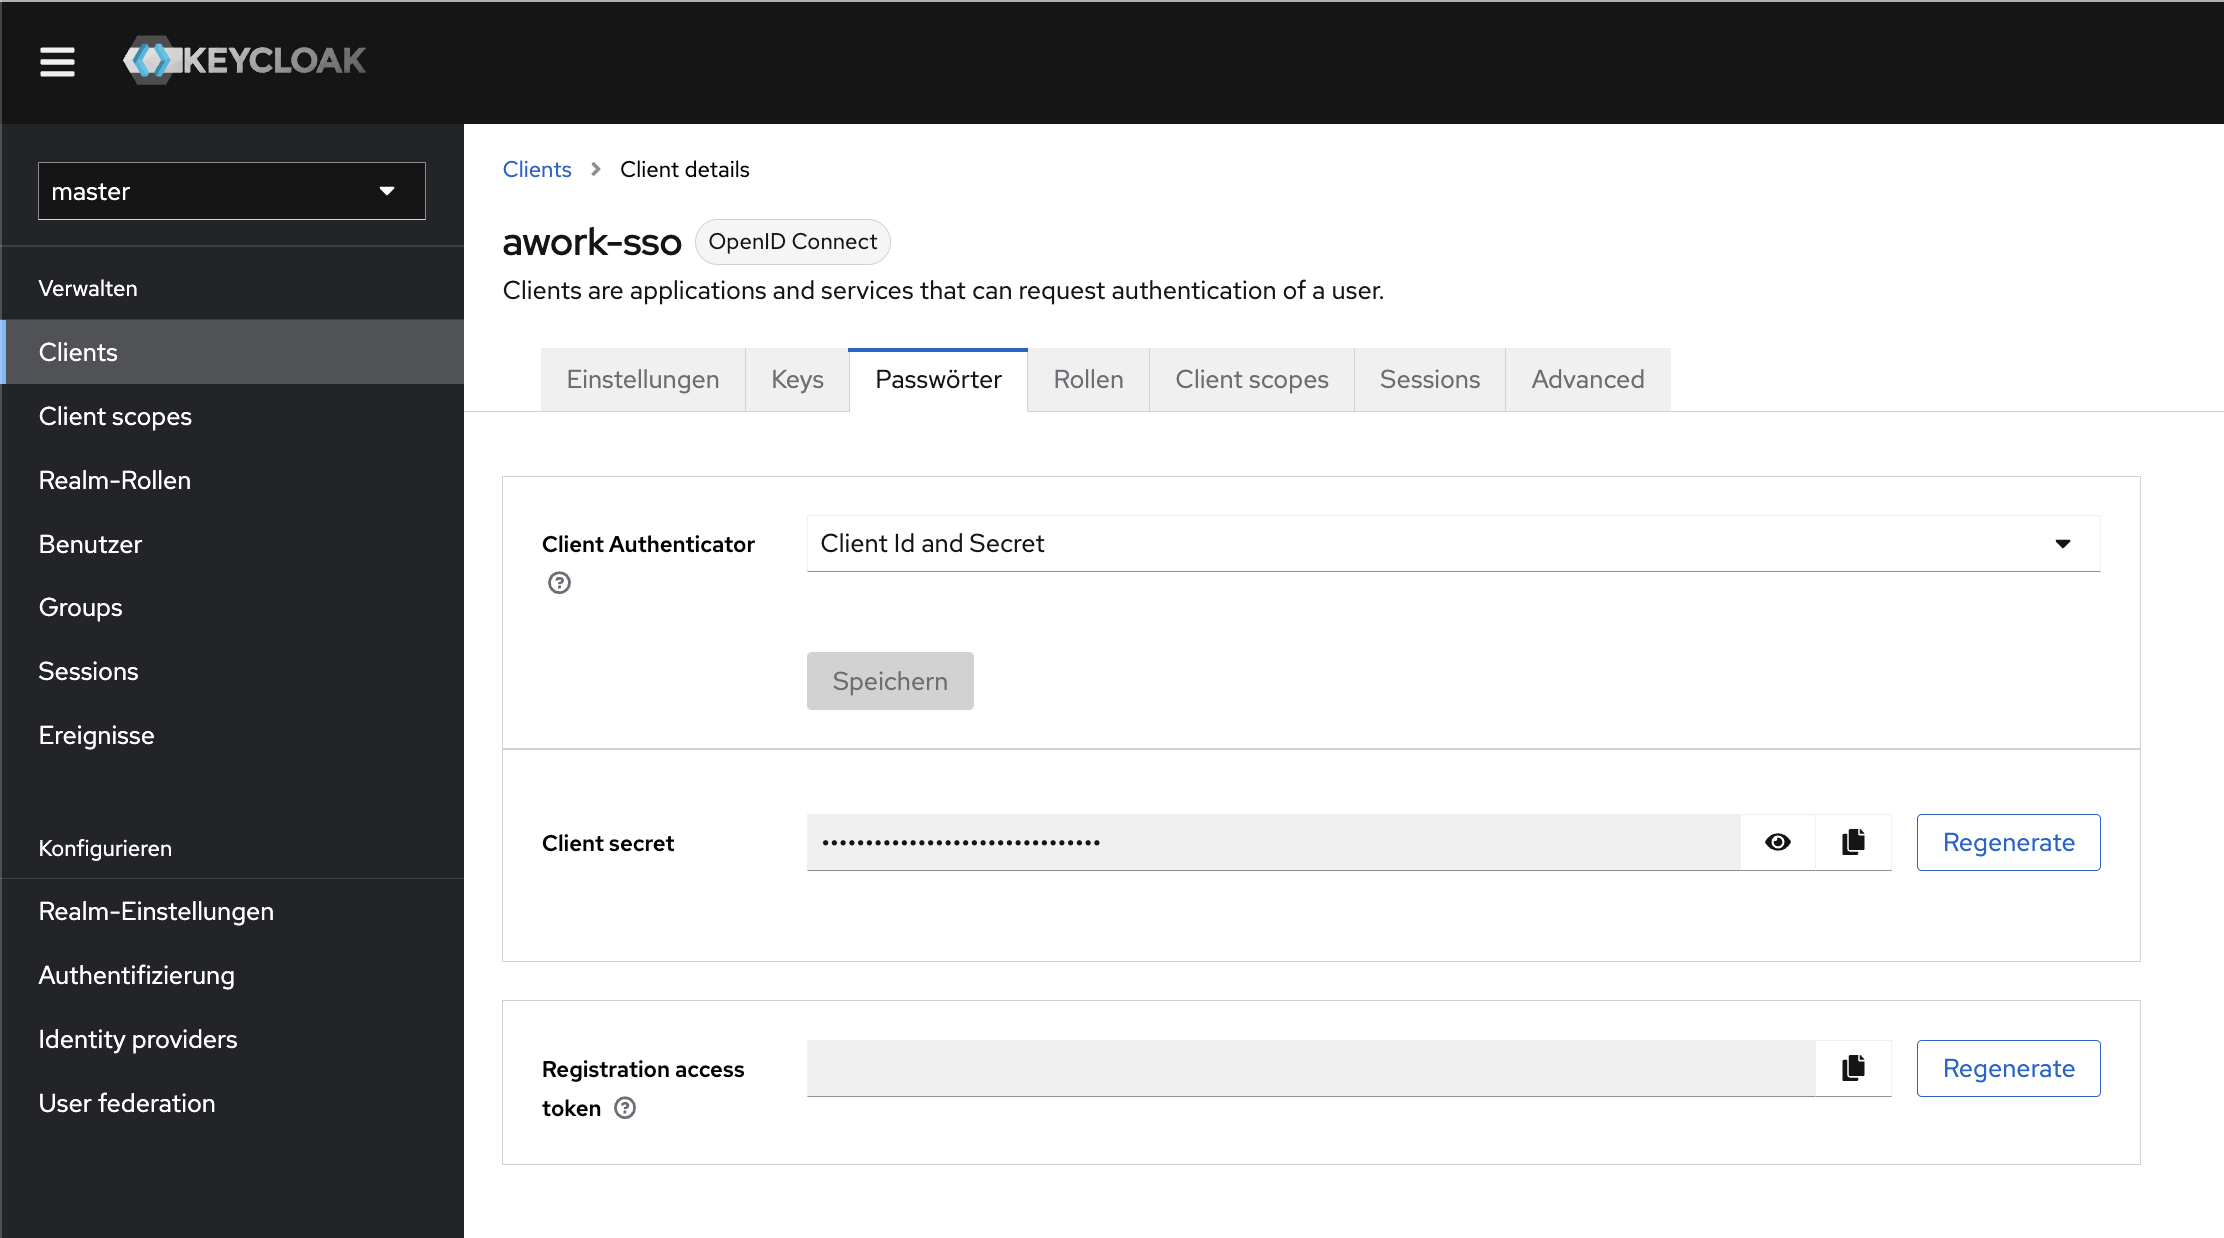
In the client details, go to the Credentials tab and copy the Client secret
 )
) -
In the Realm Settings you'll find the
.well-known/openid-configurationlink at the end of the General settings (OpenID Endpoint Configuration). The URL typically looks like: https://{your-keycloak-url}/realms/master/.well-known/openid-configuration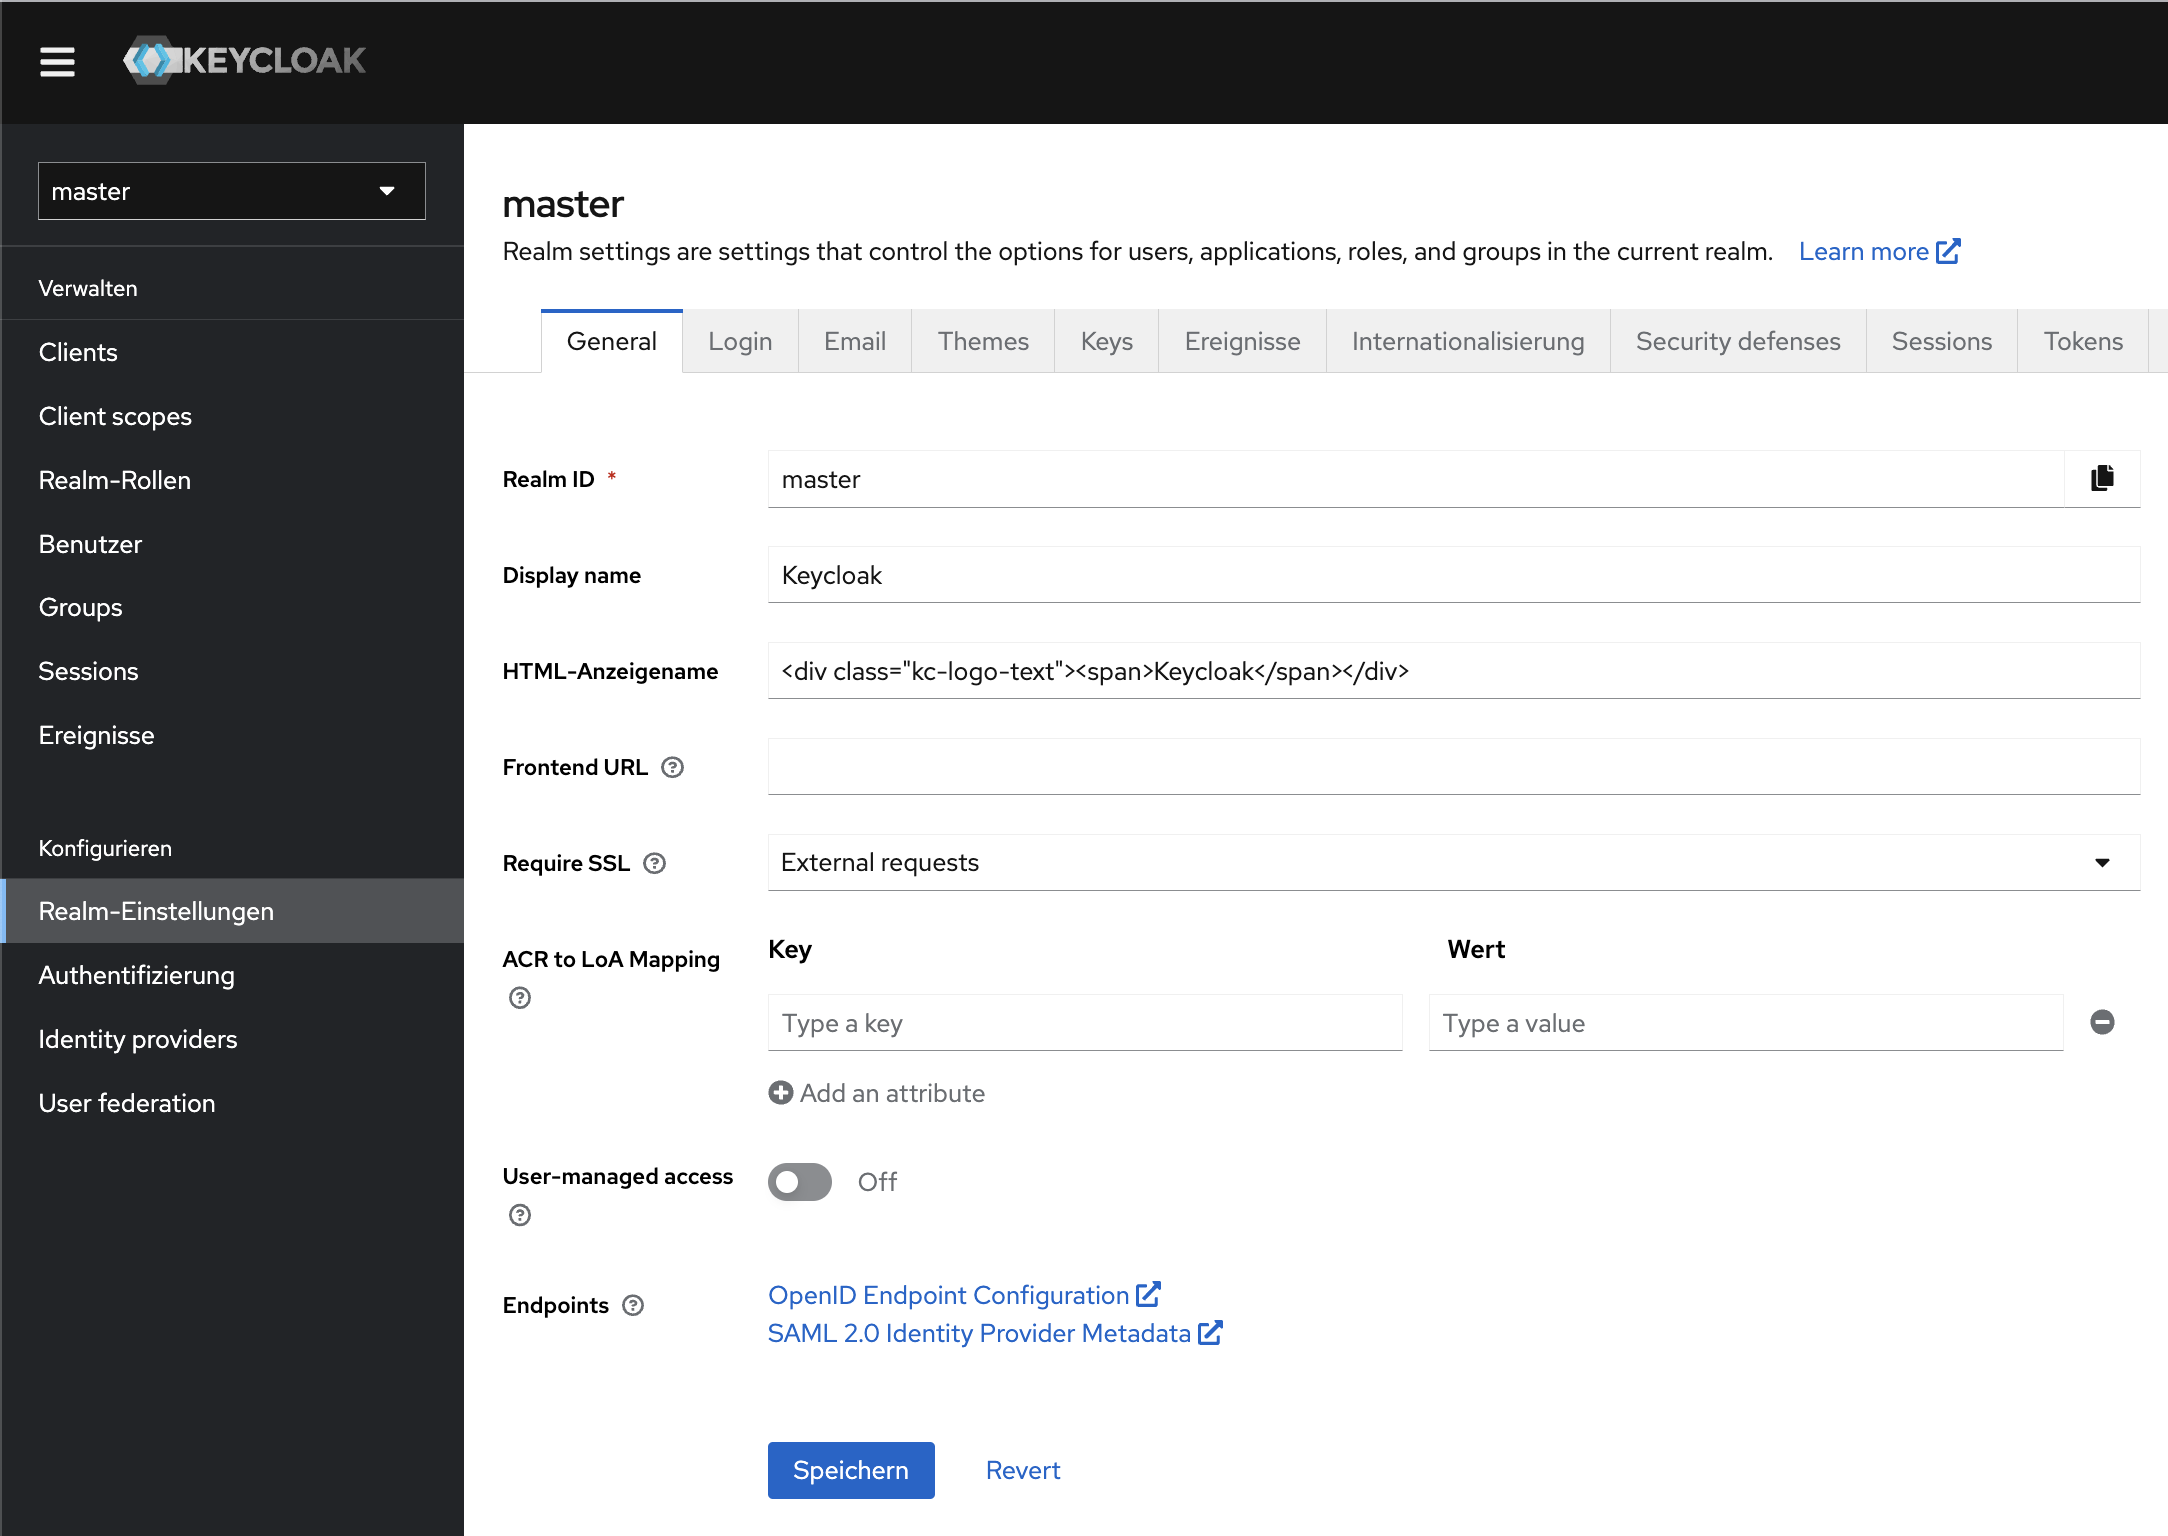 )
) -
Contact Support with the Client ID, Client Secret, and the
.well-known/openid-configurationURL so we can set up the integration for you
Important: The .well-known/openid-configuration URL must be permanently available to prevent login errors with SSO.
Configure custom SSO providers (OpenID Connect)
awork also supports any other SSO providers that support OpenID Connect.
You'll need the complete OpenID Configuration URL (for example, https://custom-domain.com/.well-known/openid-configuration), Client ID, and Client Secret.
Log in via SSO at app.awork.com
- Go to app.awork.com
- Select Sign in with SSO
- Enter your workspace subdomain
You'll be redirected to the SSO login page or, if you're already logged in, directly to your awork dashboard.
Tips and hints
SSO matches users based on their email address and doesn't automatically create new awork accounts. The email claim provided by the Identity Provider must match the existing email address of the awork account.
A user must already exist in awork before they can log in via SSO.
Note: Permissions, users, or groups are not managed through SSO. This information continues to be managed in awork or via SCIM if SCIM is configured.
Disable other login options
When SSO is configured, you can disable and hide other login methods (email and password as well as social login via Google and Apple).
- Navigate to Settings > General.
- Disable other login options
This is only recommended if no external or guest users work in your workspace who aren't managed through your Identity Management system.
In particular, check external or guest users before disabling email/password login and social login. Otherwise, these users might be affected by login restrictions even though they're not managed by your Identity Provider.
Note: If you remove the SSO settings in awork, email and password login will automatically be re-enabled so you can always log in with your admin account.
Global vs. workspace login
If you've disabled email/password and/or social login, these options will still appear on the global app.awork.com page. They'll only be hidden on the workspace page YOUR-WORKSPACE-SUBDOMAIN.awork.com.
Login via the global page won't be possible anyway. Use YOUR-WORKSPACE-SUBDOMAIN.awork.com to log in via SSO.
When SSO is configured, Sign in with SSO will additionally appear on YOUR-WORKSPACE-SUBDOMAIN.awork.com. You'll be redirected to the SSO login page or directly to your dashboard.
FAQ
Is SSO available in every plan?
No, SSO is only available in the awork Enterprise plan.
Does awork support SAML 2.0?
No. awork doesn't support SAML 2.0 and uses OpenID Connect based on OAuth 2.0 instead.
Can my Identity Provider manage permissions, users, or groups in awork?
No. SSO only controls login. Permissions, teams, roles, and other user data are not automatically managed through SSO in awork. SSO matches users based on their email address and doesn't automatically create new awork accounts. The email claim provided by the Identity Provider must match the existing email address of the awork account. A user must already exist in awork before they can log in via SSO.
What happens if I remove the SSO settings after disabling other login options?
Email and password login will automatically be re-enabled so you can always log in with your admin account.
Can I set up SSO with Keycloak in the awork web interface?
Not yet. Please contact Support to set up Keycloak SSO, as this isn't currently possible through the web interface (coming soon).
 Powered by happysupport.ai